Audi Q3: Battery Tester with Printer -VAS5097A- Device Description
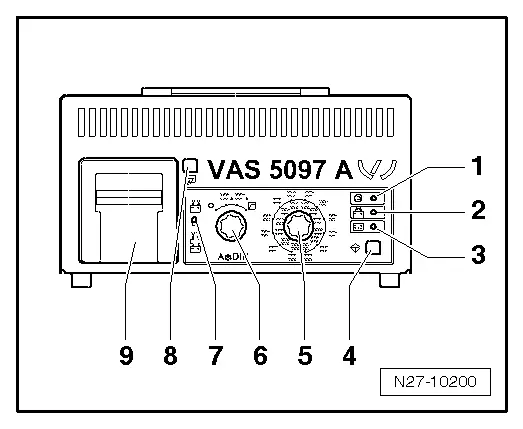
Battery Tester with Printer -VAS5097A-
1 - LED green, "Device in use"
2 - LED red, "Device connected with terminals reversed"
3 - LED red "Battery cannot be tested", the Battery -A- must be replaced.
4 - Start button
5 - Cold cranking output selector switch
6 - ON/OFF function switch
7 - Sliding switch (battery hook-up to the Battery -A-/at jump start point)
8 - Paper-feed -button
9 - Printer
Battery Load Test
 WARNING
Risk of injury. Follow all warning messages and safety precautions. Refer to → Chapter "Warnings and Safety Precautions".
Special tools and workshop equipment required
- Battery Tester with Printer -VAS5097A-
Always note the TPL 2012182.
Procedure
 WARNING
Do not check or charge a Battery -A- when the visual indicator has "no color or is bright yellow". Jump starting must not be used!
There is a risk of explosion during testing, charging or jump starting.
These Batteries -A- must be replaced.
 Note
Note
The Battery -A- temperature must be at least 10 ºC (50 ºF).
 Caution
- Turn off the ignition and all electrical equipment.
- Remove the key.
- Check the visual indicator on Batteries -A- with visual indicator. Refer to → Chapter "Battery, Checking, Vehicles with Battery Monitoring Control Module J367 or Energy Management Control Module J644 and Data Bus On Board Diagnostic Interface J533".
- Switch on the Battery Tester with Printer -VAS5097A-. Refer to → Chapter "Battery Tester with Printer -VAS5097A- Device Description".
- Determine the cold crank amps according to specifications on the Battery -A- in ampere (A) according to DIN and determine the Battery Tester With Printer -VAS5097A- adjustment range using the table. Refer to → Chapter "Cold Crank Amps Table".
 Note
Note
If the Battery -A- does not state this value in DIN but rather in IEC or EN/SAE, then convert the value using the table (refer to → Chapter "Cold Crank Amps Table") or the table on the Battery Tester with Printer -VAS5097A-.
- Set the cold crank amps with the cold crank amps selector switch. Refer to → Chapter "Battery Tester with Printer -VAS5097A- Device Description".
- Set the measuring range (80 to 379 A or 380 to 499 A) using the ON/OFF switch. Refer to → Chapter "Battery Tester with Printer -VAS5097A- Device Description".
 Note
Note
Batteries -A- with cold crank amps greater than 499 A according to DIN can be tested with the setting for 499 A according to DIN.
- Connect the red terminal (+) to the positive terminal of the Battery -A-.
- Connect the black terminal (-) to the negative terminal for the Battery -A-.
 Note
Note
- Make sure the test terminals make good contact!
- Note TPL 2012182 for the Battery Tester with Printer -VAS5097A-.
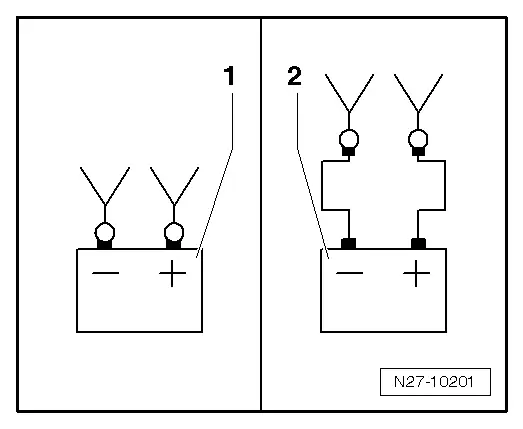
- Using the sliding switch, select the test clamp connection point. Refer to → Chapter "Battery Tester with Printer -VAS5097A- Device Description".
1 - Direct connection to the Battery -A-
2 - Connection on the battery jump start terminal
- Check if the cold crank amps indicated on the Battery -A- matches the selected value on the Battery Tester with Printer -VAS5097A-.
- Press theStart-button. Refer to → Chapter "Battery Tester with Printer -VAS5097A- Device Description".
The green LED lights up. Refer to → Chapter "Battery Tester with Printer -VAS5097A- Device Description". The test program runs automatically. The test results are output through the printer. Refer to → Chapter "Battery Load Test Results". If the Battery Tester with Printer -VAS5097A- does not start, (the LED does not come on and there is no print out), then charge the Battery -A-. Refer to → Chapter "Battery, Charging".
- Switch off the Battery Tester with Printer -VAS5097A-. Refer to → Chapter "Battery Tester with Printer -VAS5097A- Device Description".
- Remove the test terminals.
 Note
Note
- The test is over after approximately 20 seconds.
- The results of the test are output through the printer.
- Only perform the test once. Repeating the test will not produce accurate results.
- The Battery Tester with Printer -VAS5097A- needs 30 minutes to cool off before it is ready for the next measurement.
Cold Crank Amps Table
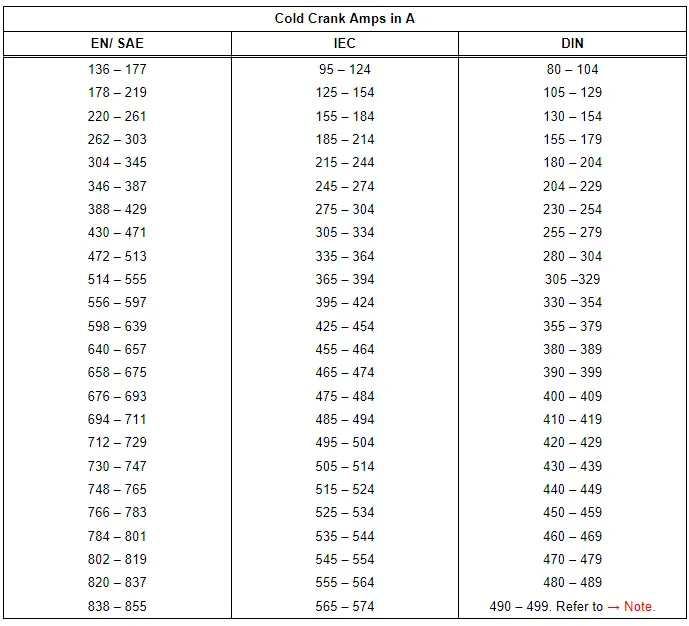
1) Batteries -A- with cold crank amps greater than 499 A according to DIN can be tested with the setting for 499 A according to DIN.
Battery Load Test Results
By placing the battery under a strong load during the Battery -A- load test, the battery voltage will be reduced.
- If the Battery -A- is good, the voltage drops only to the specified minimum voltage.
- If the Battery -A- is defective or weakly charged, the battery voltage will drop very quickly to below the specified minimum voltage.
- After testing, this low voltage level is maintained for a lengthy period and only increases again slowly.
- Only perform the test once. Repeating the test will not produce accurate results.
- In order to be able to test another/additional Battery -A-, the Battery Tester with Printer -VAS5097A- must cool down for approximately 30 minutes for the test result to be correct.
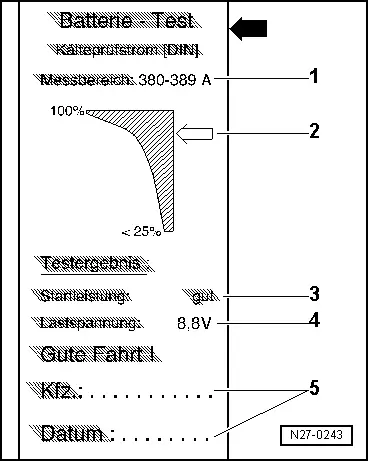
Printed Test Results Explanations
1 - Measuring range set on the Battery Tester with Printer -VAS5097A-
2 - Diagram, the -arrow- points to the Battery -A- status.
3 - Test result
4 - Battery -A- voltage during the battery load test.
5 - Vehicle data and date. For tester to fill out.
 Note
Note
- The printed test results are required for warranty claims.
- Only perform the test once. Repeating the test will not produce accurate results.
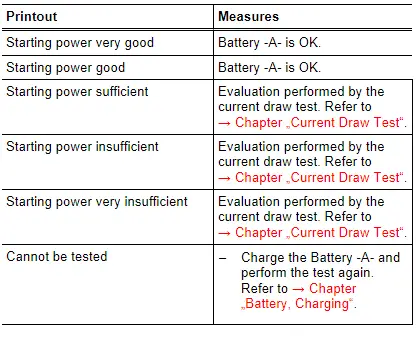
Test Result Evaluation
READ NEXT:
 Current Draw Test
WARNING
Do not check or charge a Battery -A- when the visual
indicator has "no color or is
bright yellow". Jump starting must not be used!
There is a risk of explosion during testing,
Battery Charger -VAS5095A-
WARNING
Risk of injury. Follow all warning messages and
safety precautions. Refer to
→ Chapter "Warnings and Safety Precautions".
In order to prevent damage to the Battery -A- o
Battery Charger -VAS5900-
WARNING
Risk of injury. Follow all warning messages and
safety precautions. Refer to
→ Chapter "Warnings and Safety Precautions".
WARNING
Do not check or charge a Bat
SEE MORE:
Overview - Window Regulator
1 - Door
2 - Clip
For the window regulator cable
3 - Lower Double-Bolt
4 - Window Regulator
Removing and installing. Refer to
→ Chapter "Window Regulator, Removing and Installing".
5 - Lower Double-Bolt
6 - Door
Antenna Amplifier, Removing and Installing
Antenna Amplifier -R24-, Removing and Installing
The Antenna Amplifier -R24- is located on the upper left of
the rear lid.
Removing
- Turn off the ignition and all electrical equipment and
remove the ignition key.
- Remove the upper rear lid trim panel. Refer to
→ Body Inte
