Audi Q3: Display and Control Head, Removing and Installing
Display and Control Head, Removing and Installing, A/C Control Module -J301- (Heater Control Module -J65-)
 Note
Note
- Only for vehicles with a manual climate control system (heater without Air Conditioning (A/C) system).
- The Heater Control Module -J65- (for vehicles without an A/C system) does not have an A/C or AC button.
- There are different versions (recognizable, for example, by the button labeling A/C instead of AC). Pay attention to the correct allocation. Refer to the Parts Catalog.
Removing
- Note the general information. Refer to → Chapter "General Information for A/C Control Module -J301- Control Head - Manual Climate Control System".
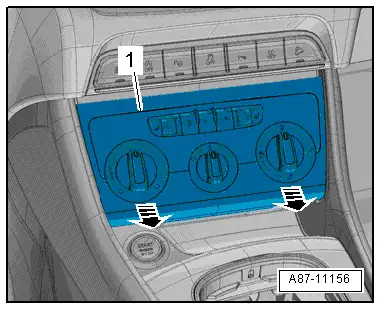
- Remove the trim -1- for the A/C Control Module -J301- (the Heater Control Module -J65-) control head -arrows-.
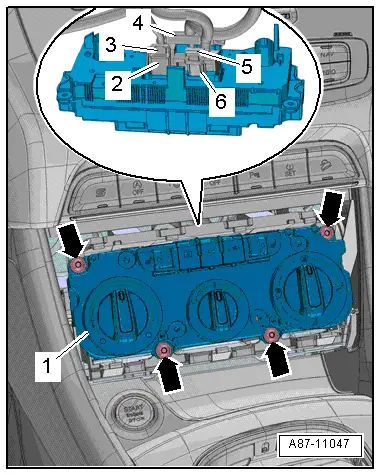
- Remove the bolts -arrows-.
- Disconnect the connector -4-.
- Disconnect the connectors -2 and 6- by sliding the safety catches -3 and 5- upward and pressing the release.
- Remove theA/C Control Module -J301- (the Heater Control Module -J65-) control head -1-.
Installing
Installation is done is reverse order, observe the following:
- Tighten the screws -arrows- to 1.5 Nm.
- When replacing an A/C Control Module -J301- (the Heater Control Module -J65-) control head, pay attention to the exact allocation. Refer to the Parts Catalog.
After replacing/installing the A/C Control Module -J301- (the Heater Control Module -J65-) control head, always perform the following procedures on the Vehicle Diagnostic Tester in the "Guided Fault Finding" function.
- Perform and/or check the coding.
- Perform the basic setting.
- Read the DTC memory (and clear the input for the currently displayed entry).
- Check the adaption.
- If necessary, perform the output diagnostic test.
Display and Control Head, Removing and Installing, Climatronic Control Module -J255-
 Note
Note
- Only on vehicles with an automatic climate control system
- There are different versions (recognizable, for example, by the button labeling A/C instead of AC). Pay attention to the correct allocation. Refer to the Parts Catalog.
- An OFF button exists on the Climatronic Control Module -J255- Air Conditioning (A/C) control heads with the part number starting from the index "D". For these Climatronic Control Modules -J255-, the function of the recirculation and A-recirculation buttons are combined in one button. The button labeling for switching the activation of the A/C compressor on and off is A/C instead of AC.
- For Climatronic Control Module -J255- A/C control heads with the part number from the index "F" (running change in MY 2014), the labeling of the buttons, trim and trim surface were changed (for example, the labeling on the defrost button was switched from Front to MAX). Pay attention to the correct version and allocation. Refer to the Parts Catalog.
- If the Climatronic Control Module -J255- control head is being replaced, select "Replace Control Module" on the Vehicle Diagnostic Tester in the "Guided Fault Finding" or "Guided Functions" function.
Special tools and workshop equipment required
- Backrest Panel Tool -3370-
Removing
- Note the general information. Refer to → Chapter "General Information for Climatronic Control Module -J255- Control Head - Automatic Climate Control System".
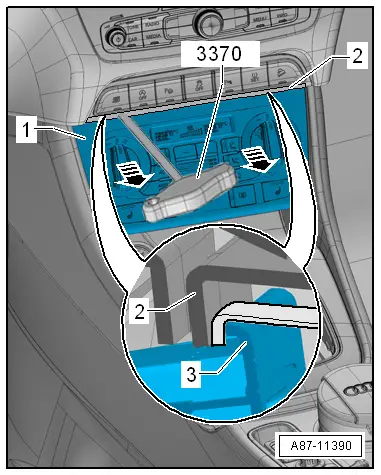
- Engage the Backrest Panel Tool -3370- at the top of the control head -1- as shown.
- Do not damage the center console -2- and the upper edge of the control head -3- while doing so.
- Carefully detach the control head from the center console -arrows-.
- Disconnect the connectors.
 Note
Note
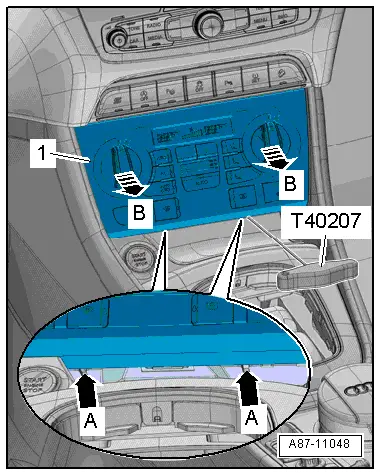
If, when removing -B arrows-, the Climatronic Control Module -J255- control head -1- becomes tilted in the center console mount and can no longer be removed, mount an additional Hook Tool -T40207- on the bottom at the openings -A arrows- and also carefully pull from below to loosen.
Installing
To installed, perform the steps done during removal in reverse order. Note the following:
- When replacing a Climatronic Control Module -J255- control head, pay attention to the exact allocation. Refer to the Parts Catalog.
After replacing/installing the Climatronic Control Module -J255- control head, always perform the following procedures on the Vehicle Diagnostic Tester in the "Guided Fault Finding" function.
- Perform and/or check the coding.
- Perform the basic setting.
- Read the Diagnostic Trouble Code (DTC) memory (and clear the input for the currently displayed entry).
- Check the adaption.
- If necessary, perform the output diagnostic test.
Interior Temperature Sensor Fan, Removing and Installing
 Note
Note
Only on vehicles with an automatic climate control system
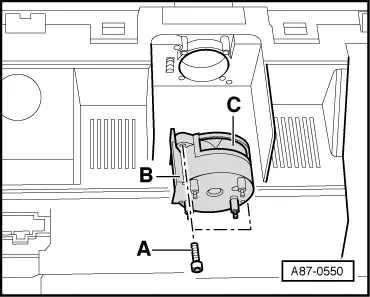
Removing
- Remove the Climatronic Control Module -J255- control head. Refer to → Chapter "Display and Control Head, Removing and Installing, Climatronic Control Module -J255-".
- Remove the screws -A-.
- Remove the Interior Temperature Sensor Fan -V42--B- from the Climatronic Control Module -J255- control head.
Installing
To installed, perform the steps done during removal in reverse order. Note the following:
 Note
Note
When installing the Interior Temperature Sensor Fan -V42-, hold onto the housing but do not press on the motor.
Tightening Specifications
- Blower to control head 0.8 Nm
READ NEXT:
 Sunlight Photo Sensor -G107-, Removing and Installing
Note
The Sunlight Photo Sensor -G107- is only installed with an
automatic climate control system.
Check the Sunlight Photo Sensor -G107- using the Vehicle
Diagnostic Tester in the "
Air Quality Sensor -G238-, Removing and Installing
Removing
- Remove the plenum chamber cover. Refer to
→ Body Exterior; Rep. Gr.50; Bulkhead; Plenum Chamber Cover,
Removing and Installing.
- Release the securing tab -4SEE MORE:
Transmitted information
Data collection
Applies to: vehicles with data collection
Depending on the country, Audi may collect data
for the following purposes, for example: offer
and product optimization, public safety, provision
of Audi connect remote vehicle services, and
adaptation to customer expectations. For example,
v
Repair Information
Minimum Curing Time for Bonded Windows
WARNING
For safety reasons, use only electrically
non-conductive 2C-adhesive when installing windshield
and rear window using the materials listed below.
The vehicle can only be used after the minimum
curing time has elapsed.
Window 