Audi Q3: Driver Side Instrument Panel Cover, Removing and Installing
 Note
Note
As a replacement part, the new cover is delivered with an additional attaching point.
Special tools and workshop equipment required
- Wedge Set -T10383-
Removing
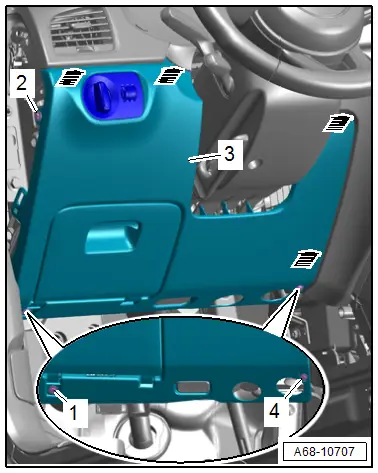
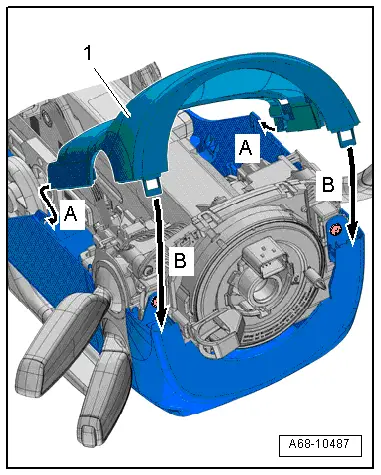
- Remove the side cover from the instrument panel on the driver side. Refer to → Chapter "Instrument Panel Side Cover, Removing and Installing".
- Remove the side screw -2-.
- Remove the lower bolts -1 and 4-.
- Unclip the driver side instrument panel cover -3- from the instrument cluster using the Wedge -T10383/1--arrows-.
 Note
Note
The instrument panel cover can only be unclipped from the instrument panel by exerting a relatively high amount of force.
- Disconnect the connector from the light switch.
- If the vehicle has footwell lamps: disconnect the connector.
Installing
Install in reverse order of removal. Note the following:
 Note
Note
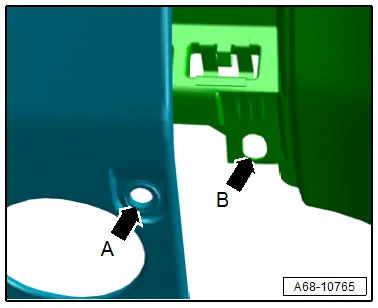
- As a replacement part, the new cover is delivered with an additional attaching point.
- On a used instrument panel and a new cover, the attaching points -arrow A- and -arrow B- can be offset approximately 1 mm.
- When offsetting the attaching points, the hole on the instrument panel must be reworked as described in the following:
- Remove approximately 3 mm overhang at the hole -arrow B- on the instrument panel with a small file.
Installation notes, for example tightening specifications, replacing components. Refer to → Chapter "Overview - Driver Side Instrument Panel Cover".
Instrument Cluster Gap Cover, Removing and Installing
Special tools and workshop equipment required
- Trim Removal Wedge -3409-
Removing
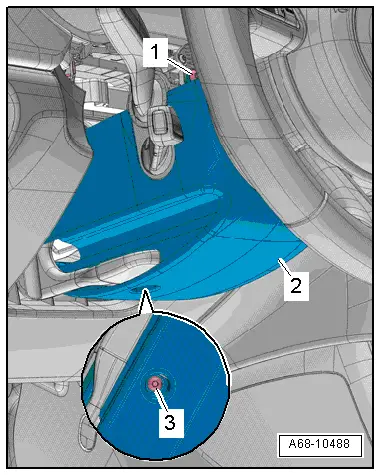
- Move the steering wheel as far down as possible.
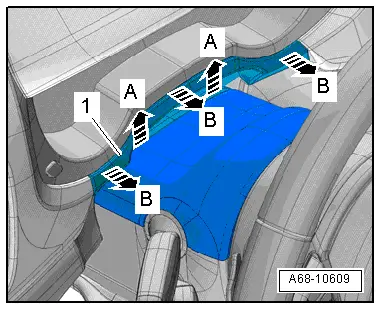
- Using a small flat-head screwdriver, carefully unclip the gap cover -1- from the upper trim panel for the steering column switch module -A arrows-.
- Unclip the instrument cluster gap cover from the instrument panel using the Trim Removal Wedge -3409--B arrows-.
- Remove the cover.
Installing
Install in reverse order of removal.
Installation notes, for example tightening specifications, replacing components. Refer to → Chapter "Overview - Steering Column Trim Panel".
Upper Steering Column Trim Panel, Removing and Installing
Removing
- Move the steering wheel as far down as possible.
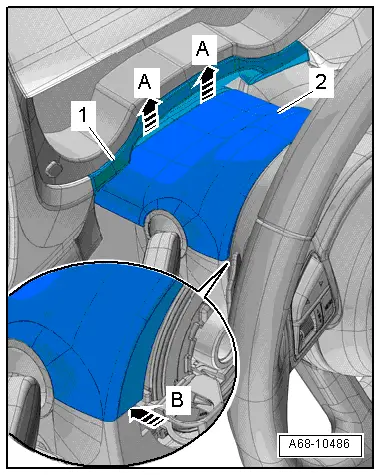
- Using a small flat-head screwdriver, carefully unclip the gap cover -1- from the upper trim panel -2- for the steering column switch module -arrow A-.
- Turn the steering wheel counterclockwise 90º from the straight position.
- Carefully pry the upper trim off the lower trim using a small flat blade screwdriver -arrow B-.
- Turn the steering wheel back 180º and repeat the procedure on the opposite side.
- Disengage the upper steering column switch module trim from the lower trim and remove it.
Installing
Install in reverse order of removal. Note the following:
- Engage the upper trim panel -1- in the lower trim panel -A arrows-.
- Make sure that the lower trim panel pins engage in the opening at the upper trim panel retaining tab -B arrows-.
Installation notes, for example tightening specifications, replacing components. Refer to → Chapter "Overview - Steering Column Trim Panel".
Lower Steering Column Trim Panel, Removing and Installing
Removing
- Remove the upper steering column switch module trim. Refer to → Chapter "Upper Steering Column Trim Panel, Removing and Installing".
- Turn the steering wheel counterclockwise 90º from the straight position.
- Remove the bolt -1-.
- Turn steering wheel back 180º and remove screw on the opposite side.
 Note
Note
When bolt -1- is not accessible, the steering wheel must be removed for further work. Refer to → Suspension, Wheels, Steering; Rep. Gr.48; Steering Wheel; Steering Wheel, Removing and Installing.
- Remove the screw -3- and the lower trim panel -2- for the steering column switch module.
- Disconnect the connector.
Installing
Install in reverse order of removal.
Installation notes, for example tightening specifications, replacing components. Refer to → Chapter "Overview - Steering Column Trim Panel".
READ NEXT:
 Glove Compartment Handle, Removing and Installing
Special tools and workshop equipment
required
Locking Pin (3 pc.) -T40011-
Removing
Note
If glove compartment cover does not open, it can be opened
via the emergency release. Ref
Equipment
Overview - Sun Visors
1 - Sun Visor
Allocation. Refer to the Parts Catalog.
Removing and installing. Refer to
→ Chapter "Sun Visor, Removing and Installing".
Insert visor
Overview - Center Console
Overview - Center Console, Basic Equipment Level
1 - Storage Compartment
Vehicles with:
With External Audio Source Connection -R199-
Removing and installing. Refer to
→&nbsSEE MORE:
Options and settings
Options
Context-dependent functions and settings may
be available depending on vehicle equipment, the
selected source, the connected mobile device,
and the connection type.
Requirement: the playback view must be displayed
1 fig. 141.
Press More 11.
Play more like this
The track currently playin
Overview - Rear Brakes
Overview - Rear Brakes, Brakes 1KU
1 - Brake Shield
Removing and installing, refer to
→ Chapter "Brake Shield, Removing and Installing, Brakes 1KU".
2 - Brake Rotor
Allocation, refer to the Parts Catalog.
Dimensions
→ Chapter "Brakes Technical Da