Audi Q3: Overview - Door Handle and Door Lock
Audi Q3 (8U) 2011-2018 Service Manual / Body / Body Exterior / Rear Doors / Overview - Door Handle and Door Lock
Overview - Exterior Door Handle, Bracket
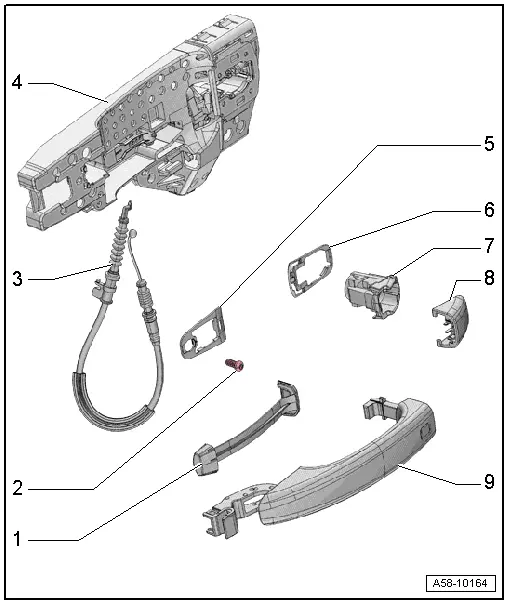
1 - Exterior Door Handle Trim
- Removing and installing. Refer to → Chapter "Door Handle Trim, Removing and Installing".
2 - Bolt
- 2.5 Nm
3 - Operating Cable
- For the door lock
 Caution
There is a risk of malfunctions.
The door lock must be removed and installed together with the bracket to prevent over-bending the cable when disengaging and engaging it.
The cable must be disconnected from/attached to lever on the door lock outside of the door.
- Removing and installing. Refer to → Chapter "Door Lock Cable, Removing and Installing".
4 - Bracket
- Removing and installing. Refer to → Chapter "Bracket, Removing and Installing".
5 - Front Backing
- Removing and installing. Refer to → Chapter "Door Handle, Removing and Installing".
6 - Rear Backing
- Removing and installing. Refer to → Chapter "Door Handle, Removing and Installing".
7 - Housing
- Removing and installing. Refer to → Chapter "Housing, Removing and Installing".
8 - Cap
- Removing and installing. Refer to → Chapter "Housing Cap, Removing and Installing".
9 - Exterior Door Handle
- Removing and installing. Refer to → Chapter "Door Handle, Removing and Installing".
Overview Door Lock, Striker Pin
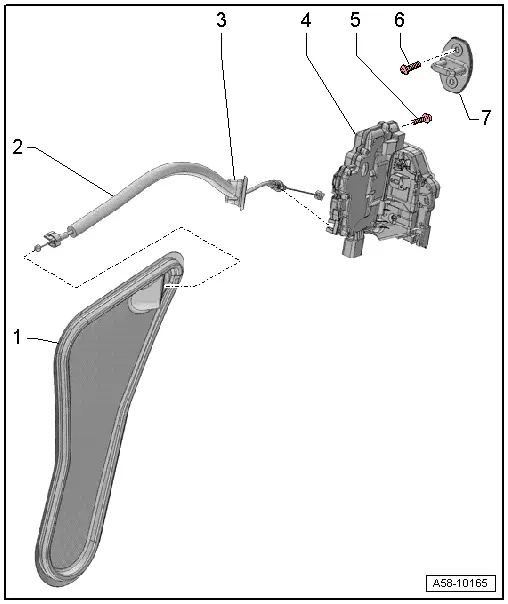
1 - Door Inner Cover
- Removing and installing. Refer to → Chapter "Door Inner Cover, Removing and Installing".
2 - Door Lock Operating Cable
- Removing and installing. Refer to → Chapter "Door Opener Cable, Removing and Installing".
3 - Grommet
- Cannot be replaced separately
4 - Door Lock
- Removing and installing. Refer to → Chapter "Door Lock, Removing and Installing".
5 - Bolt
- 19 Nm
- Quantity: 2
6 - Bolt
- 25 Nm
- Quantity: 2
7 - Catch
- Removing and installing. Refer to → Chapter "Catch, Removing and Installing".
READ NEXT:
 Window Regulator Motor, Removing and Installing
Removing
Note
The window regulator motor can be removed or installed with
the motor or door window in any position.
- Remove the rear door trim panel. Refer to
→ Body Interi
Inner Window Shaft Strip, Removing and Installing
Removing
- Remove the rear window frame trim panel. Refer to
→ Body Interior; Rep. Gr.70; Rear Door Trim Panels; Window Frame
Trim Panel, Removing and Installing.
- Rem
Door Handle, Removing and Installing
Housing, Removing and Installing
Removing
- Remove the sealing plugs.
- Remove the clamping screw -3-
until it stops using a screwdriver -4-.
- Press the housing retaining brack
SEE MORE:
Glass Panel, Removing and Installing
Panel 1 for the Panorama Roof, Removing
Caution
Do not move or operate the already removed panel
otherwise it may become damaged.
Note
If the screws for the panel mounting were completely
removed, then they must be replaced.
1 - Bolt
7 Nm
Front and rear,
Safety systems monitoring
The
indicator light in the instrument cluster
monitors the safety systems such as the airbags
(including the control modules, sensor, and wiring)
and the belt tensioners. It turns on when you
switch the ignition on and turns off after several
seconds.
If the indicator light does not turn on when
© 2019-2025 Copyright www.auq3.net
