Audi Q3: Overview - Rear Lid
Overview - Rear Lid
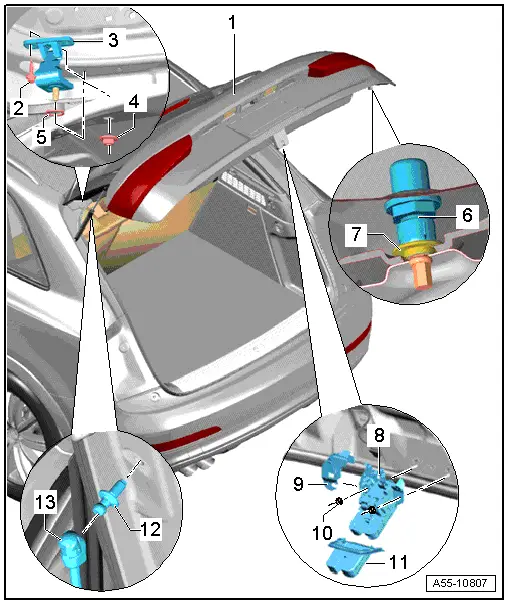
1 - Rear Lid
- Removing and installing. Refer to → Chapter "Rear Lid, Removing and Installing".
- Rear Lid Seal, Removing and Installing. Refer to → Chapter "Rear Lid Seal, Removing and Installing".
2 - Bolt
- 12 Nm
3 - Lid Hinge
- Removing and installing. Refer to → Chapter "Hinges, Removing and Installing".
4 - Nuts
- 25 Nm
5 - Seal
- Replace
6 - Adjusting Buffer
- Body-side, adjustment
7 - Stop
8 - Rear Lid Latch
- Removing and installing. Refer to → Chapter "Lid Latch, Removing and Installing".
9 - Cover for Lid Latch
10 - Nuts
- 21 Nm
11 - Cover
12 - Ball Stud
- Tightening specification → Chapter "Gas-Filled Strut, Removing and Installing".
13 - Gas-Filled Strut
Overview - Rear Lid, Stop and Adjusting Buffer
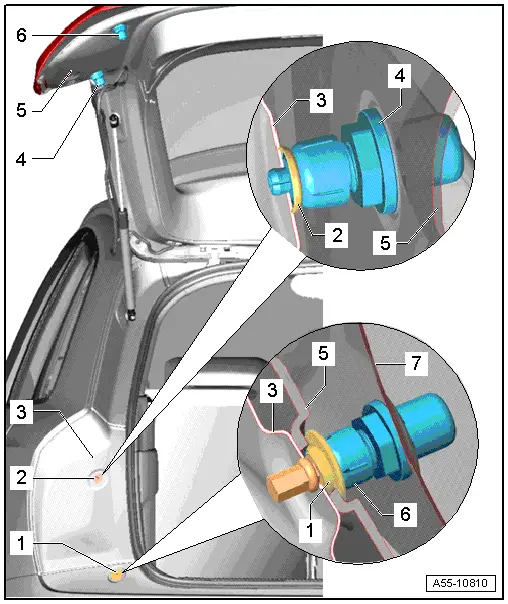
1 - Lower Stop Buffer
- 1.5 Nm
2 - Upper Stop Buffer
- To remove push the clamping pin and remove the stop buffer.
- Remove the clamping pin from the side panel.
- Install the stop buffer with an expanding clip and push the clamping pin in flush.
3 - Side Panel
4 - Upper Adjusting Buffer
- Removing and installing → Chapter "Adjusting Buffer, Removing and Installing"
5 - Rear Lid
6 - Lower Adjusting Buffer
- Removing and installing → Chapter "Adjusting Buffer, Removing and Installing"
7 - Side Panel
Overview - Rear Lid, Rear Lid Lock Cylinder Unlock Button -F248-
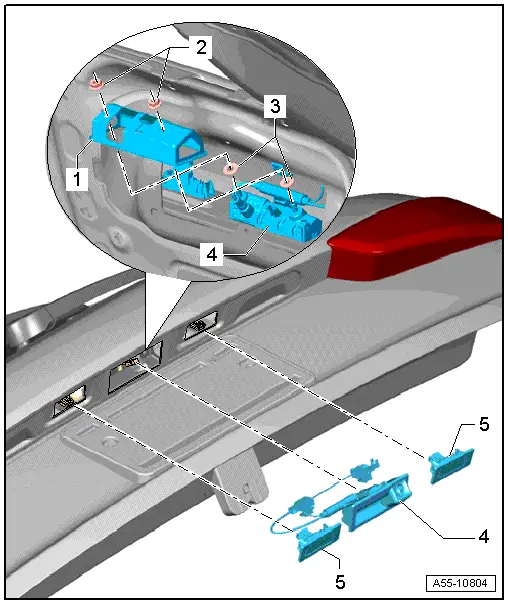
1 - Anti-theft Protection
2 - Nut
- Tightening specification. Refer to → Electrical Equipment; Rep. Gr.96; Controls; Component Location Overview - Luggage Compartment Controls
3 - Seal
4 - Rear Lid Lock Cylinder Unlock Button -F248-
- Removing and Installing. Refer to → Electrical Equipment; Rep. Gr.96; Controls; Rear Lid Lock Cylinder Unlock ButtonF248, Removing and Installing.
5 - License Plate Lamp
- Removing and installing. Refer to → Electrical Equipment; Rep. Gr.94; License Plate Light; License Plate LampX4/X5 Removing and Installing.
Overview - Rear Lid, Rear Lid Motor
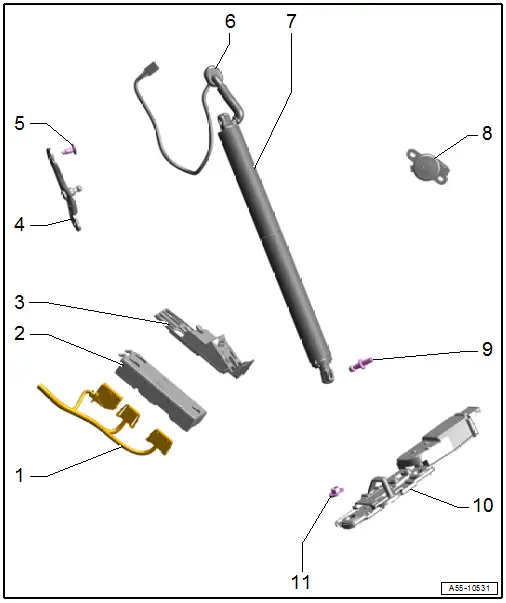
1 - Connectors
2 - Rear Lid Control Module -J605-
- Removing and installing. Refer to → Chapter "Rear Lid Control Module -J605-, Removing and Installing".
3 - Bracket
- For Rear Lid Control Module -J605-
4 - Mount
- With ball pin
5 - Bolt
- 30 Nm
- Quantity: 2
6 - Grommet
7 - Rear Lid Motor
- Rear Lid Motor 1 -V444- with Sensor in Rear Lid Motor 1 -G745-
- Rear Lid Motor 2 -V445- with Sensor in Rear Lid Motor 2 -G746-
- Removing and installing. Refer to → Chapter "Rear Lid Motor 1 and 2 -V444-/-V445-, Removing and Installing".
8 - Rear Lid Warning Buzzer -H32-
- Removing and installing. Refer to → Electrical Equipment; Rep. Gr.96; Controls; Rear Lid Warning BuzzerH32, Removing and Installing.
9 - Ball Pin
- 21 Nm
10 - Rear Lid Lock Unit -F256-
- With a Rear Lid Closing Assist Motor -V382-
- Removing and installing. Refer to → Chapter "Catch, Removing and Installing, Vehicles with Rear Lid Lock Unit -F256-".
- Adjusting.
11 - Nut
- 21 Nm
- Quantity: 2
READ NEXT:
 Rear Lid, Removing and Installing
Rear Lid, Removing and Installing
A second technician will be needed during removal and
installation to support and to hold the rear lid.
Removing:
Note
Mark the position of the re
Actuator, Removing and Installing
Rear Lid Motor 1 and 2 -V444-/-V445-, Removing and Installing
WARNING
After removing and installing, the Rear Lid Motor 1
- V444- or Rear Lid Motor 2 -V445- must be adapted via
Guided
Rear Lid Seal, Removing and Installing
1 - Rear Lid
2 - Rear Lid Seal
To remove, remove seal from body flange.
When installing, align the seal with the joint
-arrow- with the marking in the center of the vehi
SEE MORE:
Setup
Connecting a mobile phone via Bluetooth
Applies to: vehicles with telephone
Requirement: the vehicle must be stationary and
the ignition must be switched on. The Bluetooth
settings must be open on your mobile device during
the connection setup. The mobile device to be
connected must not be actively
Menus and symbols
Fig. 14 MMI: center display
Description of common symbols
You can operate the default functions using the
symbols that follow. The symbols may be found
in any menu, depending on the context.
Go back one level
Close the menu
Search for content
Open explanations for a menu
Open settings for the
