Audi Q3: Rear Luggage Compartment Floor Handle, Removing and Installing
Special tools and workshop equipment required
- Pry Lever -80-200-
Removing
- Remove the luggage compartment floor panel.
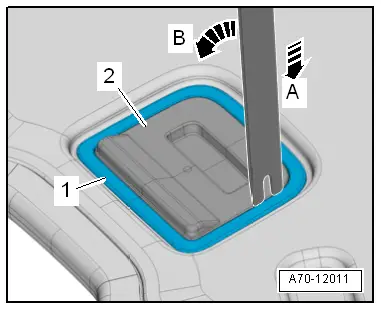
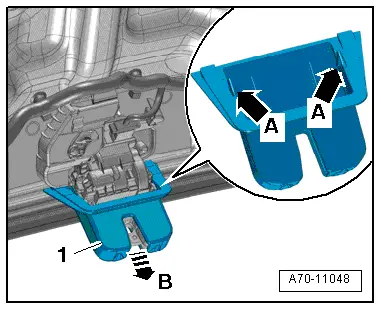
- Release the mounting bracket -1- from the underside of the luggage compartment floor.
- To do this position the Pry Lever -80 - 200--arrow A-, and release the frame -arrow B-.
- Release the mounting bracket, and remove the luggage compartment floor panel handle -2-.
Installing
Install in reverse order of removal. Note the following:
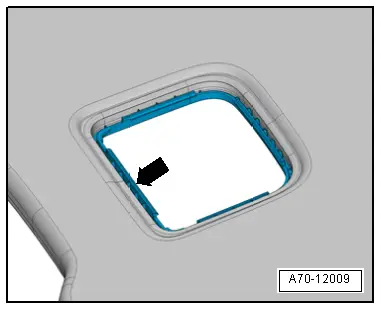
- Position the mounting bracket -arrow- from below on the cut-out in the luggage compartment floor and hold.
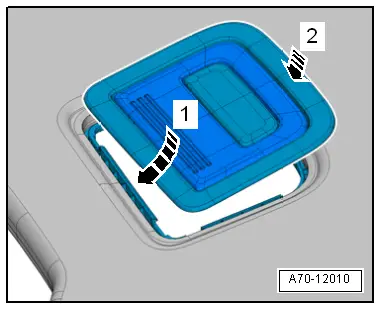
- Push the luggage compartment handle opposite of direction of travel in the mounting bracket -arrow 1- and lock downward -arrow 2-.
Installation notes, for example tightening specifications, replacing components. Refer to → Chapter "Overview - Luggage Compartment Floor".
Emergency Triangle Cover, Removing and Installing
Removing
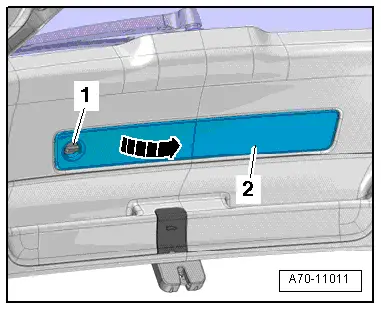
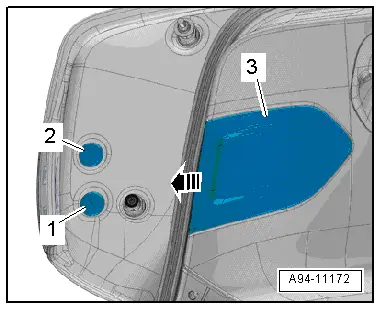
- Turn the quick release -1- 90Âş counter-clockwise and move the emergency triangle cover -2--arrow-.
- Disengage the cover from the lower rear lid trim panel and remove it.
Installing
Install in reverse order of removal.
Installation notes, for example tightening specifications, replacing components. Refer to → Chapter "Overview - Lower Rear Lid Trim Panel".
Tail Lamp Cover, Removing and Installing
Removing
- Unclip the tail lamp cover -3- from the lower rear lid trim panel in the direction of the -arrow-.
 Note
Note
Ignore -items 1 and 2-.
Installing
Install in reverse order of removal.
Installation notes, for example tightening specifications, replacing components. Refer to → Chapter "Overview - Lower Rear Lid Trim Panel".
Rear Lid Lock Trim Panel, Removing and Installing
Removing
- Remove the lower rear lid trim panel. Refer to → Chapter "Lower Rear Lid Trim Panel, Removing and Installing".
- Release the tabs -arrows A- with a screwdriver and remove the rear lid lock trim -1- from the rear lid lock -arrow B-.
Installing
Install in reverse order of removal.
Installation notes, for example tightening specifications, replacing components. Refer to → Chapter "Overview - Lower Rear Lid Trim Panel".
Lock Carrier Trim Panel, Removing and Installing
Special tools and workshop equipment required
- Pry Lever -80-200-
- Omega Clip Tool -T40280-
Removing
- Remove the luggage compartment liner.
- Remove the vehicle tool kit mounting box.
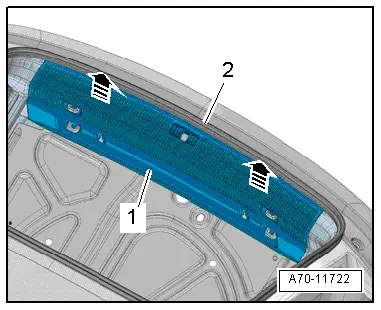
- Remove the rear lid seal -2- near the lock carrier trim panel.
- Unclip the lock carrier trim panel -1- vertically upward using the Pry Lever -80 - 200--arrows-.
- Carefully remove the lock carrier trim panel upward and disconnect the connector for the Rear Lid -Closed- Sensor 1 -G525-/Rear Lid -Closed- Sensor 2 -G526-.
 Note
Note
A lot of force is be needed to remove the lock carrier trim panel from the rear lid end piece.
Installing
Install in reverse order of removal. Note the following:
- The lock carrier trim panel -1- must engage in the eyes, pins and luggage compartment side trim panel.
Installation notes, for example tightening specifications, replacing components. Refer to → Chapter "Overview - Lock Carrier Trim".
READ NEXT:
 Roof Trim Panels
Component Location Overview - Roof Trim Panel
1 - Roof Grab Handle
Overview. Refer to
→ Chapter "Overview - Sun Visors".
2 - Sun Visor
Overview. Refer to
â
Overview - Seat Versions
Component Location Overview - Seat Versions
1 - Front Passenger Seat
Standard Seat/Sport Seat (Manual)
Vehicles with:
Seat/backrest heating
Lumbar Support
Standard seat drawer
SEE MORE:
Driving with a trailer
Trailer brakes
If the trailer has its own brake system, then follow
the manufacturer specifications. However,
the brake system on the trailer must never be
connected to the vehicle brake system.
Safety chains
Make sure the safety chains are correctly applied
when pulling a trailer. The chains should
Drive system
Breaking in
A new vehicle must be broken in within the first
1,000 miles (1,500 km) so that all moving parts
work smoothly together, which helps to increase
the service life of the engine and other drive components.
Do not drive higher than two-thirds of the maximum
permitted engine RPM during the
