Audi Q3: Wheel Housing Liner
Overview - Front Wheel Housing Liner
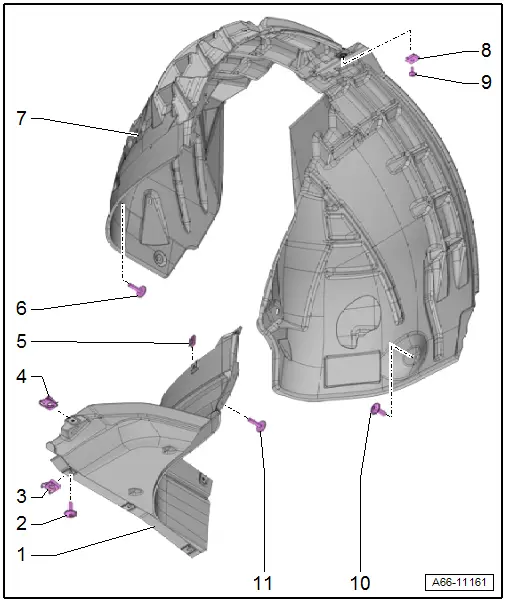
1 - Front Wheel Spoiler
- Removing and installing. Refer to → Chapter "Front Wheel Spoiler, Removing and Installing".
2 - Bolt
- 2.5 Nm
3 - Metal Nut
4 - Spring Nut
- For the quick release
- Quantity: 3
5 - Metal Nut
- Quantity: 4
6 - Bolt
- 2.5 Nm
- Quantity: 2
7 - Front Wheel Housing Liner
- Removing and installing. Refer to → Chapter "Front Wheel Housing Liner, Removing and Installing".
8 - Bracket
- For the wheel housing liner to the fender
9 - Bolt
- 2.5 Nm
10 - Bolt
- 2.5 Nm
- Quantity: 11
Overview - Rear Wheel Housing Liner
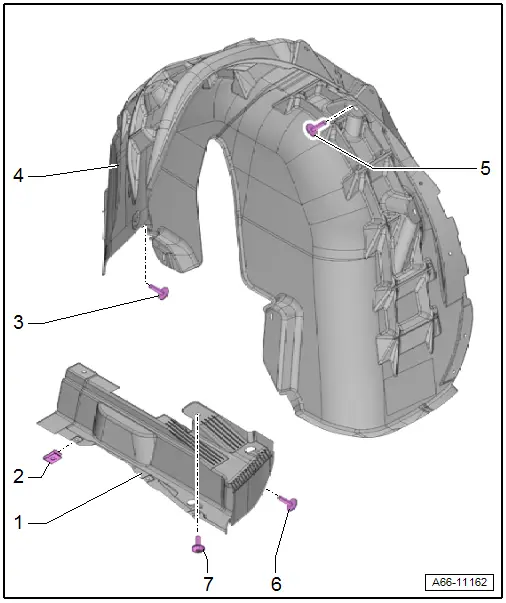
1 - Rear Wheel Spoiler
- Removing and installing. Refer to → Chapter "Rear Wheel Spoiler, Removing and Installing".
2 - Metal Nut
- Quantity: 5
3 - Bolt
- Quantity: 2
- 2.5 Nm
4 - Rear Wheel Housing Liner
- Removing and installing. Refer to → Chapter "Rear Wheel Housing Liner, Removing and Installing".
5 - Bolt
- 2.5 Nm
- Quantity: 10
6 - Bolt
- 2.5 Nm
7 - Bolt
- 2.5 Nm
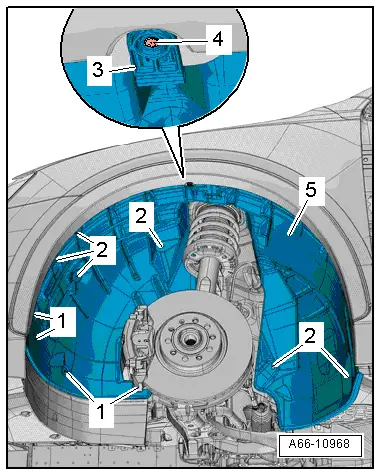
Front Wheel Housing Liner, Removing and Installing
Front Wheel Housing Liner, Removing and Installing
Removing
- Remove the bolts -1 and 2-.
- Remove the bolt -4- and then disengage the bracket -3- on the fender.
- Remove the wheel housing liner -5-.
Installing
Install in reverse order of removal.
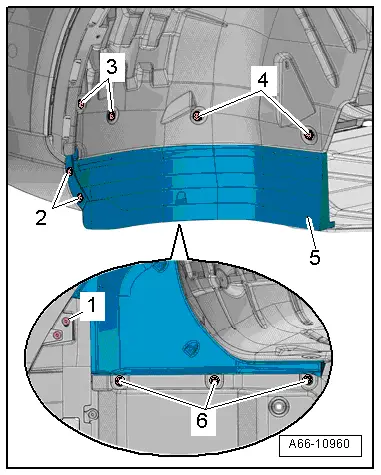
Front Wheel Spoiler, Removing and Installing
Removing
- Remove the bolts -1 to 4-.
- Loosen the quick release fastener -6- and remove the wheel spoiler -5-.
Installing
Install in reverse order of removal.
READ NEXT:
 Name Badges and Emblems
Overview - Name Badges and Emblems
Overview - Name Badges and Emblems, Vehicles through MY 2014
1 - Audi Rings
Removing and installing. Refer to
→ Chapter "Front Emblem, Rem
Trailer Hitch
Overview - Trailer Hitch
1 - Grommet
For the cable
2 - Bolt
Quantity: 4
Tightening specification. Refer to
→ Chapter "Overview - Impact Member".
3
SEE MORE:
Headrest, Removing and Installing
Note
The headrests can be removed with the front seats installed.
Removing
- Move the front seat forward into the lowest position and
tilt backrests approximately 45º.
Note
The release button is located on the outer left of the
driver seat and inner left of the passe
Lower Transverse Link, Removing and Installing
Lower Transverse Link, Removing and Installing, FWD Vehicles
Special tools and workshop equipment
required
Torque Wrench 1332 40-200Nm -VAG1332-
Removing
- Measure dimension from center of wheel to lower edge of
wheel housing. Refer to
→ Chapter "Wheel Bearing in Curb Weig
