Audi Q3: Driver Side Footwell Vent, Removing and Installing
Removing
- Remove the driver side instrument panel cover. Refer to → Body Interior; Rep. Gr.68; Storage Compartments and Covers; Driver Side Instrument Panel Cover, Removing and Installing.
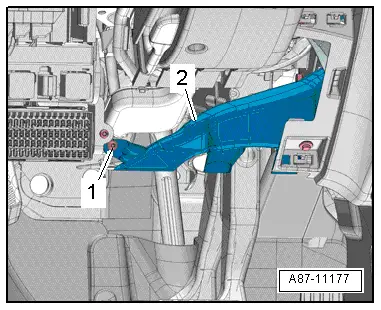
- Remove the bolt -1-.
- Remove the footwell vent -2-.
Installing
Installation is done is reverse order, observe the following:
- Install the driver side instrument panel cover. Refer to → Body Interior; Rep. Gr.68; Storage Compartments and Covers; Driver Side Instrument Panel Cover, Removing and Installing.

Front Passenger Side Footwell Vent, Removing and Installing
Removing
- Remove the glove compartment. Refer to → Body Interior; Rep. Gr.68; Storage Compartments and Covers; Glove Compartment, Removing and Installing.
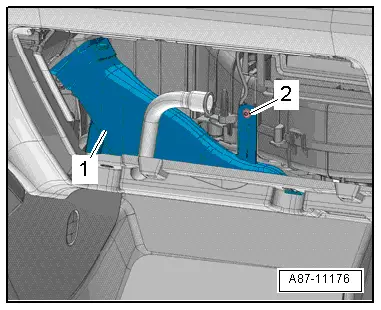
- Remove the bolt -2-.
- Remove the footwell vent -1-.
Installing
Installation is done is reverse order, observe the following:
- Install the glove compartment. Refer to → Body Interior; Rep. Gr.68; Storage Compartments and Covers; Glove Compartment, Removing and Installing.

Rear Footwell Vent, Removing and Installing
Removing
- Remove the affected seat (driver- or front passenger seat). Refer to → Body Interior; Rep. Gr.72; Front Seats; Front Seat, Removing and Installing.
- Lift the carpet far enough so that the footwell vent can be removed. Refer to → Body Interior; Rep. Gr.70; Passenger Compartment Trim; Carpet, Removing and Installing.
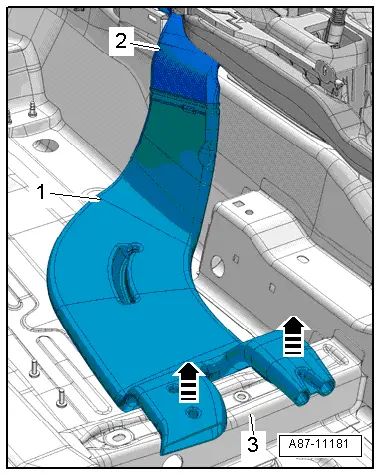
- Loosen the rear footwell vent -1- from the retainers on the body -3--arrows-.
- Pull the rear footwell vent out of the air guide channel -2- and remove it.
Installing
Installation is done is reverse order, observe the following:
- Install the carpet. Refer to → Body Interior; Rep. Gr.70; Passenger Compartment Trim; Carpet, Removing and Installing.
- Install the removed affected seat (driver- or front passenger seat). Refer to → Body Interior; Rep. Gr.72; Front Seats; Front Seat, Removing and Installing.


