Audi Q3: Interior Door Mechanism, Removing and Installing
Removing
- Remove the rear door trim panel. Refer to → Chapter "Rear Door Trim Panel, Removing and Installing".
- Remove insulation mat.
- Disconnect and free up the connectors and wire.
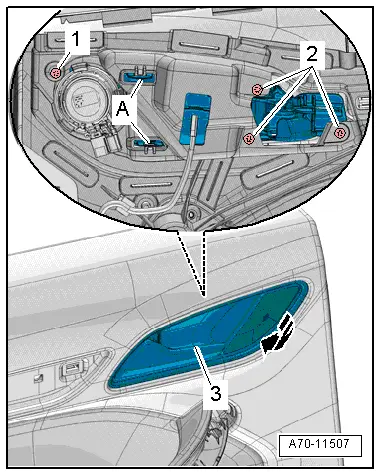
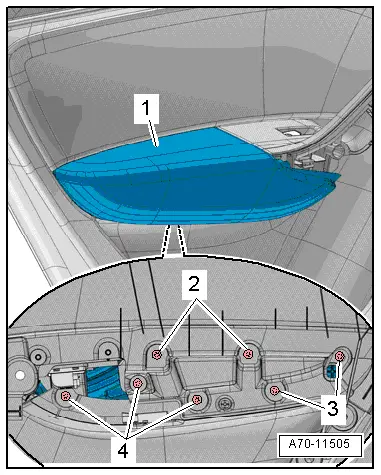
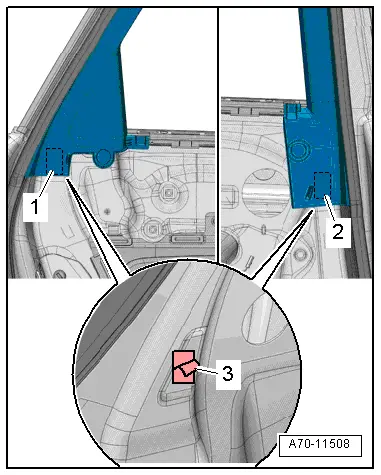
- Remove the bolts -1- and -2- from the rear of the door trim.
- Remove the interior door mechanism -3- from the door trim -arrow-, to do this release the catches -A-.
Installing
Install in reverse order of removal.
Installation notes, for example tightening specifications, replacing components. Refer to → Chapter "Overview - Rear Door Trim Panel".
Rear Door Trim Panel, Removing and Installing
Special tools and workshop equipment required
- Wedge Set -T10383-
Removing
- Switch the ignition off and remove the ignition key.
- Remove the trim panel. Refer to → Chapter "Trim Molding, Removing and Installing".
- Remove the pull handle grip recess. Refer to → Chapter "Pull Handle Grip Recess, Removing and Installing".
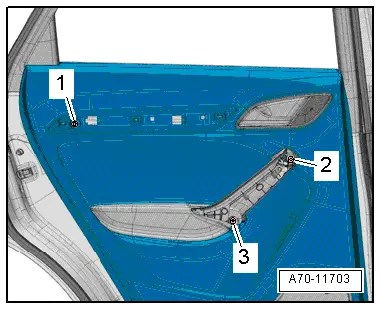
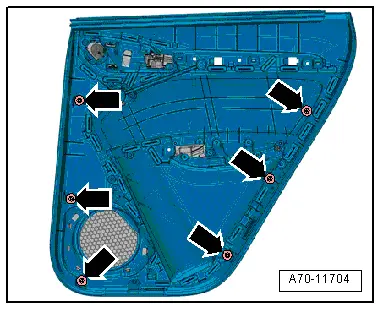
- Remove the bolts -1 to 3-.
 Note
Note
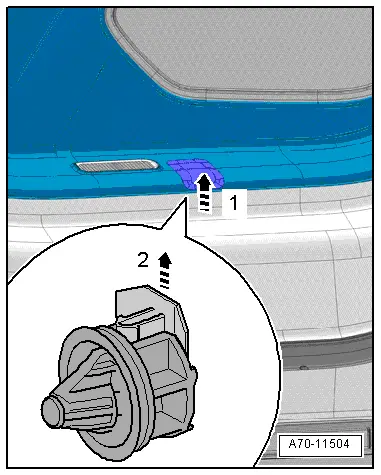
A two-part clip sits in the center of the door trim at the bottom. This clip must be released before the six "normal" one-piece clips are unclipped.
- At the impression down beside the entry light, press hard against the door trim with thumb -arrow 1-. The two-piece clip is released as a result -arrow 2-.
- Using the Wedge -T10383- unclip at lower rear in the radius beginning from the door by inserting the wedge between door trim and door in the area of the retaining clip.
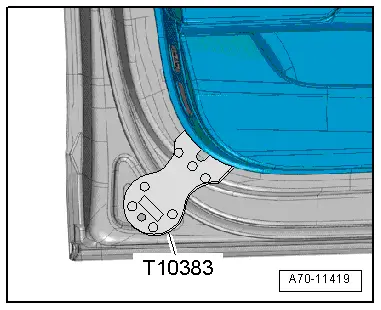
- Position of the remaining clips -arrows-.
- Disengage the top of the door trim from the door in the window recess by pulling the door trim up.
- Versions with a treble speaker: disconnect the treble speaker connector.
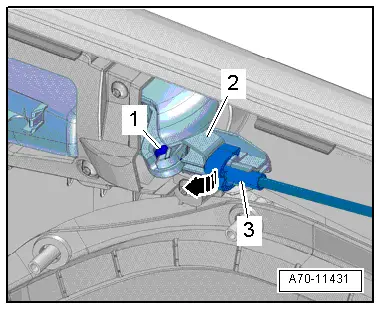
- Unclip the cable -3- carefully from the interior door mechanism -2-.
- Swivel the interior door mechanism cable -arrow-.
- Disengage the ends of the cable -1- from the inside door release mechanism.
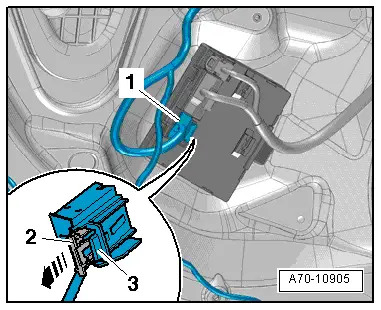
- Disconnect the electrical connector -1- on the door control module by removing securing clip -2--arrow- and pressing the release mechanism -3-.
- Remove the door trim.
Installing
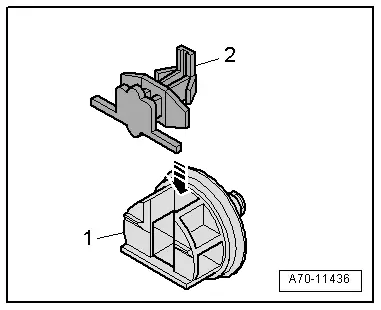
- Replace the two-part clip by detaching the lower part -1- from the door from the rear side and removing the upper part -2- from the door trim panel.
- Assemble two-part clip -arrow- and insert in the door trim.
- Engage the ends of the cable -1- in the inside door release mechanism lever.
- Attach the interior door mechanism cable -3- to the interior door mechanism -2-.
- Connect the connectors on the door control module.

- Position the door trim on the window recess and press it down firmly.
- Carefully position the door trim panel clips -2- all around the door and press the door trim onto the door -1- until it engages audibly on the mounting points -arrows-.
Install in reverse order of removal.
Installation notes, for example tightening specifications, replacing components. Refer to → Chapter "Overview - Rear Door Trim Panel".

Rear Armrest, Removing and Installing
Removing
- Remove the rear door trim panel. Refer to → Chapter "Rear Door Trim Panel, Removing and Installing".
- Remove insulation mat.
- Remove the bolts -2 through 4- on the rear of the door trim.
- Remove the armrest -1- from the door panel.
Installing
Install in reverse order of removal.
Installation notes, for example tightening specifications, replacing components. Refer to → Chapter "Overview - Rear Door Trim Panel".
Rear Pull Handle, Removing and Installing
Removing
- Remove the armrest. Refer to → Chapter "Rear Armrest, Removing and Installing".
- Disconnect the connectors.
- Versions with ambient lighting: disconnect the connector for the left/right rear door ambient lighting bulb -L166-/-L167-.
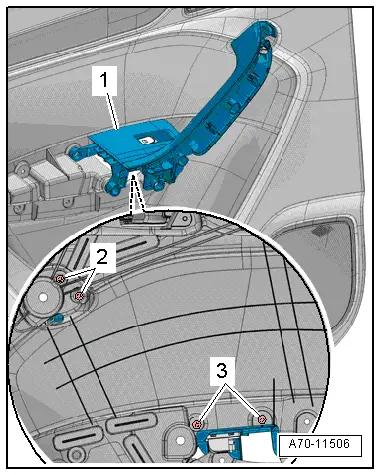
- Remove the bolts -2- and -3- from the rear of the door trim.
- Remove the pull handle -1- from the door panel.
Installing
Install in reverse order of removal.
Installation notes, for example tightening specifications, replacing components. Refer to → Chapter "Overview - Rear Door Trim Panel".
Window Frame Trim Panel, Removing and Installing
Special tools and workshop equipment required
- Trim Removal Wedge -3409-
Removing
- Lower the door window.
- Remove the rear door trim panel. Refer to → Chapter "Rear Door Trim Panel, Removing and Installing".
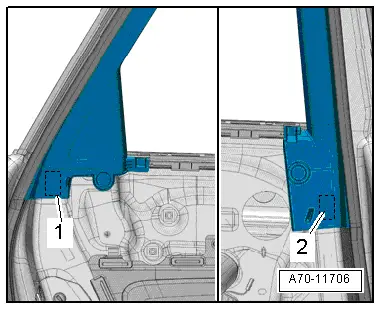
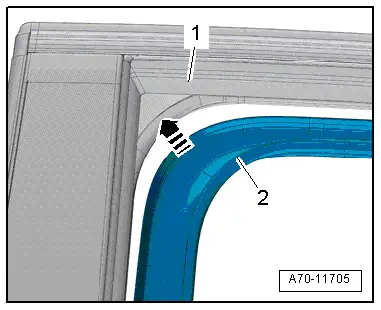
- Loosen the trim on the ends from the adhesive pads -1- and -2- from the door frame, using the Trim Removal Wedge -3409-.
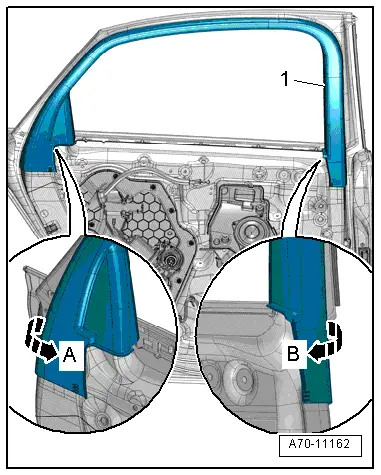
- Carefully pry off the window frame trim panel -1- starting at the lower rear and working along the length of the window guide to the upper front using the Trim Removal Wedge -3409--arrow A-.
- Then, carefully pry off the window frame trim at the lower front using the Trim Removal Wedge -3409- along the length of the window guide -arrow B-.
- Pull down the window frame trim from the window frame and remove.
Installing
- Insert window frame trim -2- in the window guide starting at the top of the B-pillar -1--arrow-.
- Install window frame trim along the entire length of the window guide.
- Attach the adhesive pads -1- and -2- on the door frame and press on door frame.
- Remove the protective film -3- from the adhesive pads.
- Push on the trim panel in the area of the adhesive pads.
Install in reverse order of removal.
Installation notes, for example tightening specifications, replacing components. Refer to → Chapter "Overview - Rear Door Trim Panel".
READ NEXT:
 Component Location Overview - Instrument Panel
1 - Center Console
Overview. Refer to
→ Chapter "Overview - Center Console".
2 - Driver Side Instrument Panel Cover
Overview. Refer to
→ Chapter "Ove
Instrument Panel Side Cover, Removing and Installing
Special tools and workshop equipment
required
Trim Removal Wedge -3409-
Removing
- Pry off the cover -1- for the
instrument panel side cover using the Trim Removal Wedge -3409--arrow-
Instrument Panel, Removing and Installing
Instrument Panel Storage Compartment, Removing and Installing
Special tools and workshop equipment
required
Trim Removal Wedge -3409-
Removing
- Remove the center instrument panel vent
SEE MORE:
Cockpit
Fig. 1 Cockpit
Door handle
Central locking switch
Air vent with thumbwheel
Lever for:
Turn signals and high beams
High beam assistant
Lane departure warning
Lane guidance
Multifunction steering wheel with:
Horn
Driver's airbag
Operating buttons
Shift paddles
Inst
Checking coolant
Fig. 150 Engine compartment - coolant expansion tank (diagram): 1 cover; 2
markings
Observe the safety precautions.
Checking the coolant level
Park the vehicle on a level surface.
Switch the ignition off.
Open the hood.
Check the coolant level in the coolant expansion
tank fig. 146 using th
