Audi Q3: Instrument Panel Side Cover, Removing and Installing
Special tools and workshop equipment required
- Trim Removal Wedge -3409-
Removing
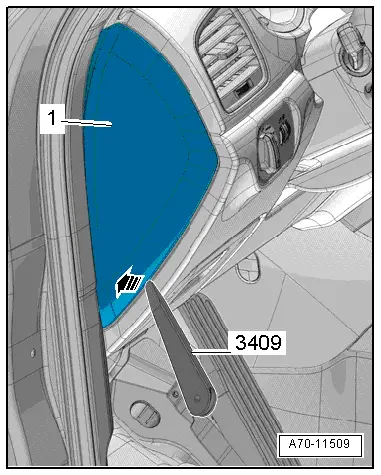
- Pry off the cover -1- for the instrument panel side cover using the Trim Removal Wedge -3409--arrow-.
- Remove the cover rearward from the A-pillar gap cover.
Installing
Install in reverse order of removal.
Installation notes, for example tightening specifications, replacing components. Refer to → Chapter "Overview - Instrument Panel".
Instrument Panel Decorative Trim, Removing and Installing
Special tools and workshop equipment required
- Trim Removal Wedge -3409-
- Wedge Set -T10383-
Removing
- Remove the glove compartment. Refer to → Chapter "Glove Compartment, Removing and Installing".
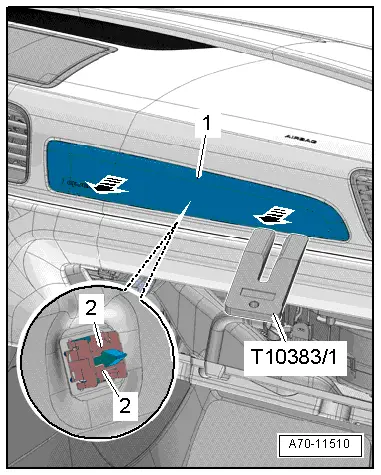
- Remove the trim panel -1- from the instrument panel using a Wedge -T10383/1--arrows-.
- Use the Trim Removal Wedge -3409- to release the catch on the clips -2-.
- Removing the trim for the instrument panel.
Installing
Install in reverse order of removal.
Installation notes, for example tightening specifications, replacing components. Refer to → Chapter "Overview - Instrument Panel".
Speaker Trim, Removing and Installing
Speaker Trim, Removing and Installing
Special tools and workshop equipment required
- Wedge Set -T10383-
Removing
 Note
Note
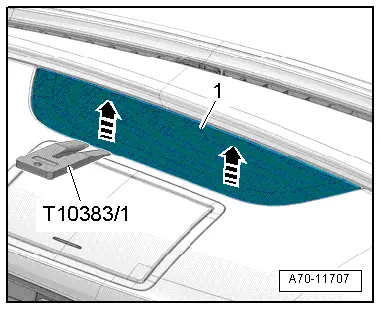
Proceed very carefully when removing and installing because it is relatively easy to damage the speaker trim.
- Carefully detach the speaker trim -1- from the rear pins in the direction of travel using a Wedge -T10383/1--arrows-.
- Fold the speaker trim upward and remove it toward the rear.
Installing
Install in reverse order of removal.
Installation notes, for example tightening specifications, replacing components. Refer to → Chapter "Overview - Instrument Panel".
Speaker Trim Mount, Removing and Installing
Special tools and workshop equipment required
- Trim Removal Wedge -3409-
- Wedge Set -T10383-
Removing
- Remove the speaker trim from the instrument panel. Refer to → Chapter "Speaker Trim, Removing and Installing".
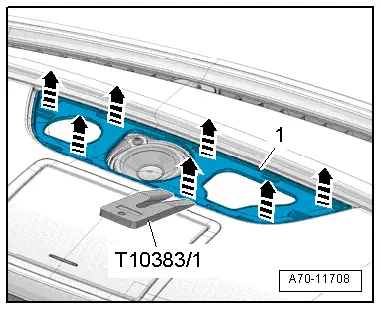
- Unclip and remove the -1- instrument panel speaker trim with the Wedge -T10383/1- and the Trim Removal Wedge -3409--arrows- and remove.
Installing
Install in reverse order of removal.
Installation notes, for example tightening specifications, replacing components. Refer to → Chapter "Overview - Instrument Panel".
READ NEXT:
 Instrument Panel, Removing and Installing
Instrument Panel Storage Compartment, Removing and Installing
Special tools and workshop equipment
required
Trim Removal Wedge -3409-
Removing
- Remove the center instrument panel vent
Instrument Panel Vent, Removing and Installing
Side Instrument Panel Vent, Removing and Installing
Special tools and workshop equipment
required
Hook Tool -T40207-
Removing
Note
The vent has a hole on inside for attaching the
Instrument Panel Central Tube
Overview - Instrument Panel Central Tube
1 - Bolt
20 Nm
2 - Nut
23 Nm
Quantity: 2
Always replace if removed
3 - Threaded Pin
20 Nm
SEE MORE:
Battery Charger -VAS5903- Support Mode
General Information
The support mode provides the vehicle electrical system with
voltage when the Battery -A- is removed or disconnected.
For more information. Refer to the Battery Charger -VAS5903-
Operating Instructions.
The support mode is used for the following situations:
Vehicle ele
Heater Core, Removing and Installing
Special tools and workshop equipment
required
Hose Clamps - Up To 25mm -3094-
Engine Bung Set -VAS6122-
Compressed air gun, commercially available
Note
Depending on the engine version to support the engine
coolant pump an After-Run Coolant Pump -V51-/Heater Support Pump
-V
