Audi Q3: Instrument Panel Central Tube
Overview - Instrument Panel Central Tube
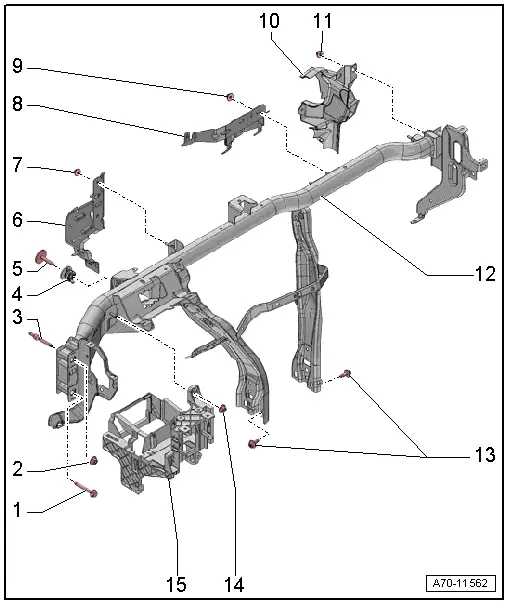
1 - Bolt
- 20 Nm
2 - Nut
- 23 Nm
- Quantity: 2
- Always replace if removed
3 - Threaded Pin
- 20 Nm
- Quantity: 2
4 - Balancing Element
- Clip in on the central tube
- Check the balancing element adjusting nut for ease of movement
- Rotate the adjusting nut all the way down but do not tightening it.
5 - Bolt
- 20 Nm
6 - Bracket
- For A/C unit
- Removing and Installing. Refer to → Front Heater and A/C Unit; Conditioning; Rep. Gr.87; Front Heater and A/C Unit; Overview - Heater and A/C Unit and Air Intake Manifold Components
7 - Nut
- 9 Nm
- Quantity: 2
8 - Bracket
- for A/C unit
- Removing and Installing. Refer to → Front Heater and A/C Unit; Conditioning; Rep. Gr.87; Front Heater and A/C Unit; Overview - Heater and A/C Unit and Air Intake Manifold Components
9 - Nut
- 9 Nm
- Quantity: 2
10 - Wiring Guide
11 - Nut
- 4.5 Nm
- Quantity: 2
12 - Central Tube
- For the instrument panel
- Removing and installing. Refer to → Chapter "Instrument Panel Central Tube, Removing and Installing".
13 - Bolt
- 23 Nm
- Quantity: 4
14 - Nut
- 4.5 Nm
- Quantity: 2
15 - Mount
Instrument Panel Central Tube, Removing and Installing
Removing
- Remove the instrument panel. Refer to → Chapter "Instrument Panel, Removing and Installing".
- Remove the windshield wiper motor. Refer to → Electrical Equipment; Rep. Gr.92; Windshield Wiper System; Windshield Wiper MotorV Removing and Installing.
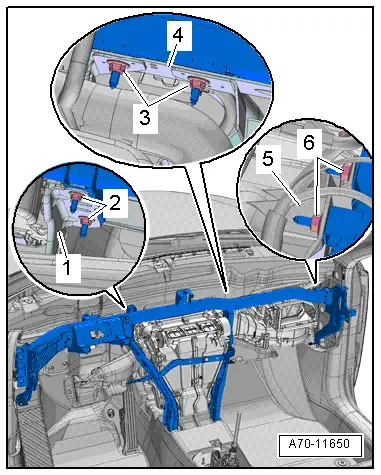
- Remove the bolt -1- from the plenum chamber bulkhead.
- Remove the instrument panel vent center air guide. Refer to → Heating, Ventilation, and Air Conditioning; Rep. Gr.87; Air Ducts; Air Distribution Channels, Removing and Installing.
- Remove the windshield air duct and defroster vent. Refer to → Heating, Ventilation, and Air Conditioning; Rep. Gr.87; Air Ducts; Air Distribution Channels, Removing and Installing.

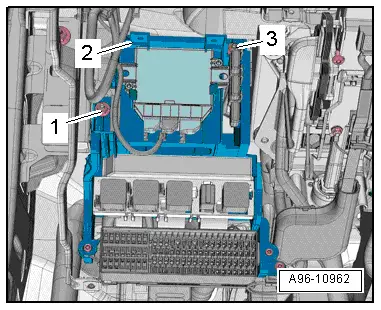
- Remove the nuts -1- and -3-.
- Disengage the mount -2- for the control module, relay and fuse panel from the instrument panel central tube and free up.
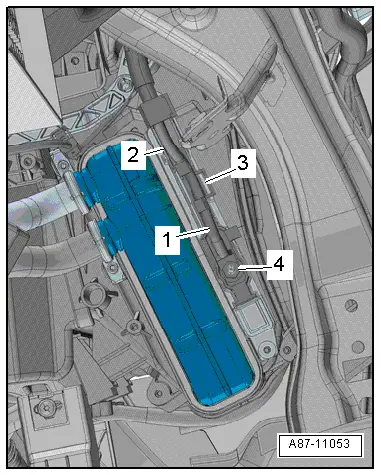
- Remove nut -4- and ground wire -1-.
- Disconnect the connector -2- and open the tab -3-.
- Unclip the wire for the instrument panel central tube and free up.
- Unbolt steering column from the instrument panel central tube and lay it on the floor of the vehicle. Refer to → Suspension, Wheels Steering; Rep. Gr.48; Steering Column; Steering Column Removing and Installing.
 Caution
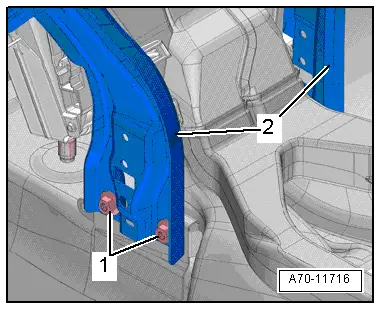
Mark height and side position on instrument panel central tube for reinstallation.
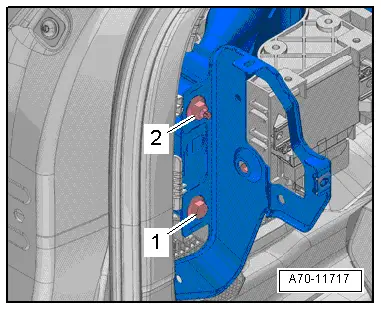
- Remove left and right bolts -1- for instrument panel central tube supports -2-.
- Remove the bolt -1- from the instrument panel central tube.
- Remove the nut -2- for the instrument panel central tube from the A-pillar on the passenger and driver side.

- Remove the nuts -2-, -3- and -6- from the front bracket on the instrument panel central tube.
- Disconnect the connectors, unclip wires on the instrument panel central tube and free them up.
 Note
Note
Two technicians are needed to remove instrument panel central tube.
- Carefully pivot the instrument panel central tube on the top rearward.
- Remove the instrument panel central tube on the A-pillar from the threaded pin and at the same time disengage the bracket -1-, -4- and -5-.
- Remove the instrument panel central tube from the vehicle interior.
Installing
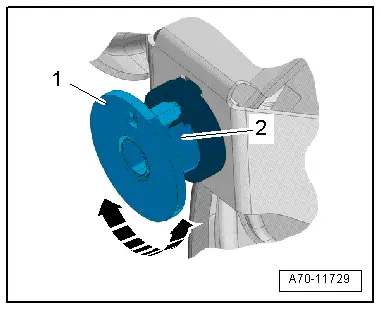
- Check the balancing element -2- adjusting nut -1- for ease of movement -arrows-.
- Rotate the adjusting nut all the way down but do not tightening it.
- Carefully insert the instrument panel central tube in the body.
- Engage the instrument panel central tube on the threaded pin on the A-pillar and on the bracket.
- Align instrument panel central tube according to the marks applied to the A-pillar during removal.
- Tighten the nuts and bolts for the instrument panel central tube near the A-pillar on both the driver and front passenger sides.
Installation is performed in reverse order of removal, while noting the following:
- Install the steering column. Refer to → Suspension, Wheels Steering; Rep. Gr.48; Steering Column; Steering Column Removing and Installing.
Check the Installation Location of the Instrument Panel Central Tube
- Insert instrument panel to test.
- Secure instrument panel at left and right to instrument panel central tube.
- Close doors.
- Check whether gap dimension between instrument panel and left and right doors is even.
- Check whether height of instrument panel aligns with molding in door trim.
- If the adjustment is incorrect, note lateral and/or vertical deviation.
- Loosen instrument panel central tube screws.
- Insert instrument panel central tube according to the noted deviations.
- Tighten the bolt -1- and nut -2- for the instrument panel central tube near the A-pillar on both the driver and front passenger sides.
 WARNING
Ignition must be on when connecting battery. If pyrotechnic components (for example, airbag, belt tensioner) are not repaired correctly, they may deploy unintentionally after connecting battery. There must not be anyone inside the vehicle when connecting the battery.
- Connect the battery ground cable with the ignition turned on. Refer to → Electrical Equipment; Rep. Gr.27; Battery; Battery, Disconnecting and Connecting.
 Note
Note
If the Airbag Indicator Lamp -K75- indicates a fault, check the DTC memory, erase it and check it again using the Vehicle Diagnostic Tester → Vehicle diagnostic tester.
Installation notes, for example tightening specifications, replacing components. Refer to → Chapter "Overview - Instrument Panel Central Tube".
READ NEXT:
 Component Location Overview - Passenger Compartment Trim
1 - Cover
Overview. Refer to
→ Chapter "Overview - C-Pillar Trim Panel".
2 - Rear Sill Panel Strip
Overview. Refer to
→ Chapter "Overview - Rear Sill
Overview - A-Pillar Trim Panel
1 - Lower Clamp
Without hooks
Replace damaged or deformed clips
Insert in the trim panel
Remove any remaining clips in the body mounting points using the
Omega Clip Tool -T4028
Sill Panel Strip, Removing and Installing
Front Sill Panel Strip, Removing and Installing
Special tools and workshop equipment
required
Trim Removal Wedge -3409-
Omega Clip Tool -T40280-
Removing
- Remove the instrument pane
SEE MORE:
Overview - Front Brakes
Overview - Front Brakes, 1LJ 1ZD Brakes
1 - Bolt
12 Nm
2 - Brake Rotor
Allocation, refer to the Parts Catalog.
Dimensions, refer to
→ Chapter "Brakes Technical Data"
Wear limit.
Must always be replaced together on both sides of the axle
Do not
Relay and Fuse Carriers Behind Instrument Panel on Driver Side, Removing and
Installing
Relay Carrier on Vehicle Electrical System Control Module, Removing and
Installing
Removing
- Remove the driver side instrument panel cover. Refer to
→ Body Interior; Rep. Gr.68; Storage Compartments/Covers; Driver
Side Instrument Panel Cover, Removing and Installing.
-
