Audi Q3: Component Location Overview - Passenger Compartment Trim
Audi Q3 (8U) 2011-2018 Service Manual / Body / Body Interior / Interior Trim / Component Location Overview - Passenger Compartment Trim
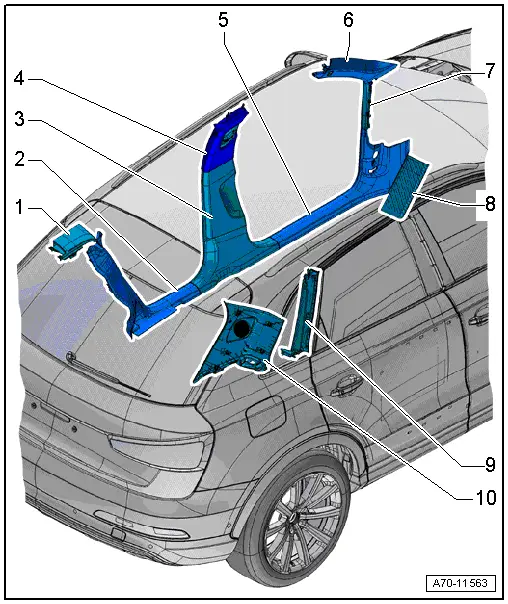
1 - Cover
- Overview. Refer to → Chapter "Overview - C-Pillar Trim Panel".
2 - Rear Sill Panel Strip
- Overview. Refer to → Chapter "Overview - Rear Sill Panel Strip".
3 - Lower B-Pillar Trim Panel
- Overview. Refer to → Chapter "Overview - B-Pillar Trim Panel".
4 - Upper B-Pillar Trim Panel
- Overview. Refer to → Chapter "Overview - B-Pillar Trim Panel".
5 - Front Sill Panel Strip
- Overview. Refer to → Chapter "Overview - Front Sill Panel Strip".
6 - Upper A-Pillar Trim Panel
- Overview. Refer to → Chapter "Overview - A-Pillar Trim Panel".
7 - A-Pillar Gap Cover
- Overview. Refer to → Chapter "Overview - Front Sill Panel Strip".
8 - Footrest/Floor Covering
- Overview. Refer to → Chapter "Overview - Foot Rest and Carpet".
9 - C-Pillar Trim Panel
- Overview. Refer to → Chapter "Overview - C-Pillar Trim Panel".
10 - D-Pillar Trim Panel
- Overview. Refer to → Chapter "Overview - D-Pillar Trim Panel".
Overview - Sill Panel Strip
Overview - Front Sill Panel Strip
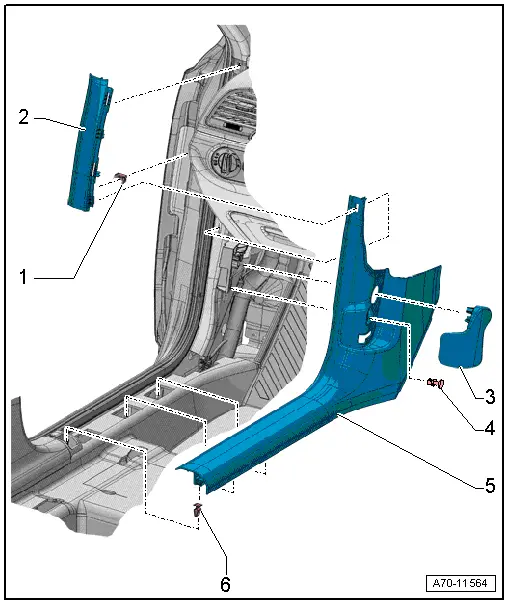
1 - Clip
- Replace any damaged or deformed clips
- install inside the body
- Remove any remaining clips in the body mounting points using the Omega Clip Tool -T40280-. To install, insert into the gap cover.
2 - A-Pillar Gap Cover
- Removing and installing. Refer to → Chapter "Front Sill Panel Strip, Removing and Installing".
- Clip in the upper A-pillar trim and the front sill panel
- Stretch the door seal lip over
3 - Operating Lever
- Hood release cable
- Driver side only
- Removing and installing. Refer to → Body Exterior; Rep. Gr.55; Hood; Hood Release Lever, Removing and Installing.
- Push off the bracket mount and secure with clip.
4 - Expanding Clip
- Driver side only
5 - Front Sill Panel Strip
- Removing and installing. Refer to → Chapter "Front Sill Panel Strip, Removing and Installing".
- Press on until it engages audibly
- Stretch the door seal lip over
6 - Clip
- Quantity: 3
- Insert in the sill panel strip
- Remove the clips left in the mounting points of the body and use for installation in the sill panel strip
- Remove any remaining clips in the body mounting points using the Omega Clip Tool -T40280-. To install, insert into the sill panel strip.
- Replace damaged or deformed clips
Overview - Rear Sill Panel Strip
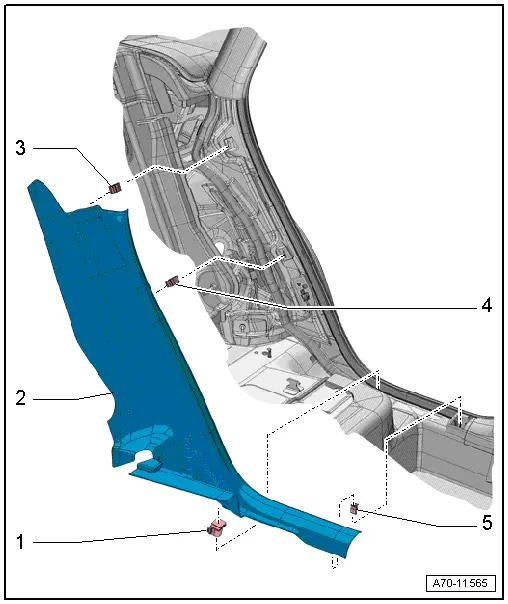
1 - Clip
- Insert in the sill panel strip
2 - Rear Sill Panel Strip
- Removing and installing. Refer to → Chapter "Rear Sill Panel Strip, Removing and Installing".
- Place the sill panel strip in the belt guide and the C-pillar trim.
- Press on until it engages audibly
- Stretch the door seal lip over
3 - Clip
- Insert in the sill panel strip
- Remove any remaining clips in the body mounting points using the Omega Clip Tool -T40280-. To install, insert into the sill panel strip.
- Replace damaged or deformed clips
4 - Clip
- insert in the sill panel strip
- Remove any remaining clips in the body mounting points using the Omega Clip Tool -T40280-. To install, insert into the sill panel strip.
- Replace damaged or deformed clips
5 - Clip
- insert in the sill panel strip
- Remove any remaining clips in the body mounting points using the Omega Clip Tool -T40280-. To install, insert into the sill panel strip.
- Replace damaged or deformed clips
READ NEXT:
 Overview - A-Pillar Trim Panel
1 - Lower Clamp
Without hooks
Replace damaged or deformed clips
Insert in the trim panel
Remove any remaining clips in the body mounting points using the
Omega Clip Tool -T4028
Sill Panel Strip, Removing and Installing
Front Sill Panel Strip, Removing and Installing
Special tools and workshop equipment
required
Trim Removal Wedge -3409-
Omega Clip Tool -T40280-
Removing
- Remove the instrument pane
A-Pillar Trim Panel, Removing and Installing
Special tools and workshop equipment
required
Pry Lever -80-200-
Omega Clip Tool -T40280-
Removing
WARNING
Follow all safety precautions when working with
pyrotechnic componen
SEE MORE:
General Information
Vehicles with a High Voltage System (Hybrid Vehicles)
Extremely Dangerous Due to High-Voltage
The high-voltage system is under high-voltage. Death or serious
bodily injury by electric shock.
- Individuals with electronic/medical life- and health sustaining
machines in or on their person
Refrigerant Cut-Off Valve
Note
There are different versions of the shut-off valve with
different functions and with different names. The following
illustrated Hybrid Battery Refrigerant Shut-Off Valve 1 -N516-
is for example installed on an Audi Q7 hybrid. Refer to
→ Heating, Ventilation and Air Co
© 2019-2025 Copyright www.auq3.net
