Audi Q3: Sill Panel Strip, Removing and Installing
Front Sill Panel Strip, Removing and Installing
Special tools and workshop equipment required
- Trim Removal Wedge -3409-
- Omega Clip Tool -T40280-
Removing
- Remove the instrument panel side cover. Refer to → Chapter "Instrument Panel Side Cover, Removing and Installing".
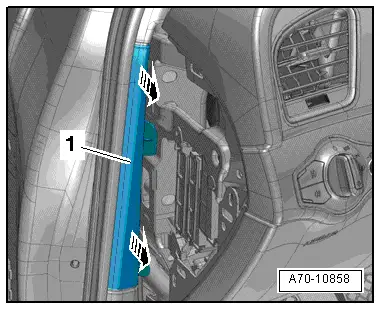
- Unclip the A-pillar gap cover -1- using the Trim Removal Wedge -3409--arrows- and remove.
Driver side:
- Remove the hood release cable operating lever. Refer to → Body Exterior; Rep. Gr.55; Hood; Hood Release Lever, Removing and Installing.
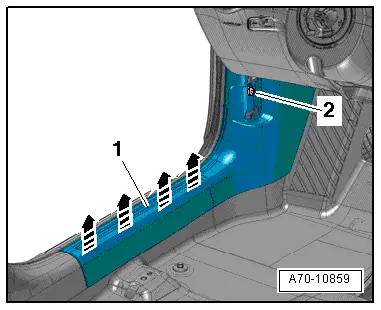
- Remove the front sill panel expanding clip -2-.
Procedure for both sides of vehicle:
- Unclip the front sill panel strip -1- from the sill panel starting at the back using the Trim Removal Wedge -3409--arrows- and remove it toward the rear.
- Remove the front sill panel strip.
Installing
Install in reverse order of removal. Note the following:
- Driver side: engage the front sill panel trim on the operating lever mount and push it into the foot compartment.
- Front passenger side: slide the front sill panel trim guide into the carpet.
Installation notes, for example tightening specifications, replacing components. Refer to → Chapter "Overview - Front Sill Panel Strip".
Rear Sill Panel Strip, Removing and Installing
Special tools and workshop equipment required
- Trim Removal Wedge -3409-
- Omega Clip Tool -T40280-
Removing
- Remove the rear bench seat. Refer to → Chapter "Bench Seat/Single Seat, Removing and Installing".
- Versions with a side cushion: remove the side cushion. Refer to → Chapter "Rear Side Padding With Side Airbag, Removing and Installing".
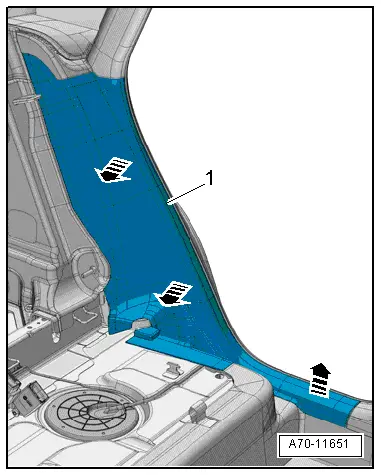
- Unclip the sill panel strip -1- from the sill panel strip and side panel starting at the front -arrows- using a Trim Removal Wedge -3409-.
- Remove the lower sill panel strip from the belt guide and C-pillar trim.
- Remove the sill panel strip.
Installing
Install in reverse order of removal.
Installation notes, for example tightening specifications, replacing components. Refer to → Chapter "Overview - Rear Sill Panel Strip".
READ NEXT:
 A-Pillar Trim Panel, Removing and Installing
Special tools and workshop equipment
required
Pry Lever -80-200-
Omega Clip Tool -T40280-
Removing
WARNING
Follow all safety precautions when working with
pyrotechnic componen
Foot Rest, Removing and Installing
Special tools and workshop equipment
required
Trim Removal Wedge -3409-
Removing
- Remove the front driver side sill panel trim. Refer to
→ Chapter "Front Sill Panel Strip, Remo
Component Location Overview - Luggage Compartment Trim Panels
1 - Lock Carrier Trim
Overview. Refer to
→ Chapter "Overview - Lock Carrier Trim".
2 - Luggage Compartment Floor Covering
Overview. Refer to
→ Chapte
SEE MORE:
Modular Wiring Routing with Corrugated Tube
Opening the corrugated tube and removing the individual wire
WARNING
Follow all safety precautions when working with
pyrotechnic components. Refer to
→ Chapter "Pyrotechnic Components Safety Precautions".
Before handling pyrotechnic components (for example,
disconnectin
Rear Brake Pads, Removing and Installing
Brake Pads, Removing and Installing, Brakes 1KU
If old brake pads are being replaced with new ones, then it
is necessary to check the brake rotor thickness for wear. Pay
attention to the wear specifications for the brake rotor, refer
to
→ Chapter "Brakes Technical Data".
Special too
