Audi Q3: Foot Rest, Removing and Installing
Special tools and workshop equipment required
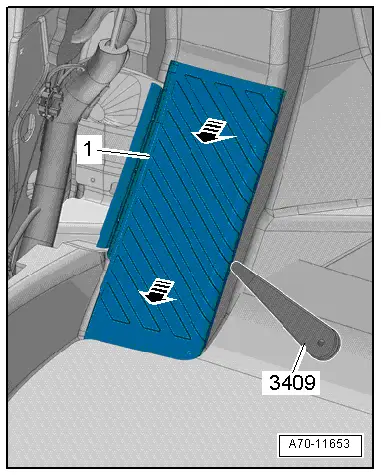
- Trim Removal Wedge -3409-
Removing
- Remove the front driver side sill panel trim. Refer to → Chapter "Front Sill Panel Strip, Removing and Installing".
- Unclip foot rest -1- using the Trim Removal Wedge -3409--arrow- and remove.
Installing
Install in reverse order of removal.
Installation notes, for example tightening specifications, replacing components. Refer to → Chapter "Overview - Foot Rest and Carpet".
Carpet, Removing and Installing
Steering Column Trim, Removing and Installing
Removing
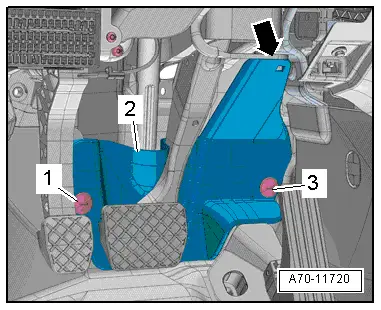
- Remove the press buttons -1- and -3- with a screwdriver.
- Unclip the upper steering column trim -2- from the air conditioner -arrow-.
Installing
Install in reverse order of removal.
Installation notes, for example tightening specifications, replacing components. Refer to → Chapter "Overview - Foot Rest and Carpet".
Carpet, Removing and Installing
Removing
- Remove the front seats. Refer to → Chapter "Front Seat, Removing and Installing".
- Remove the rear bench seat. Refer to → Chapter "Bench Seat/Single Seat, Removing and Installing".
- Remove the front sill panel strip. Refer to → Chapter "Front Sill Panel Strip, Removing and Installing".
- Remove the rear sill panel strip. Refer to → Chapter "Rear Sill Panel Strip, Removing and Installing".
- Remove the front belt end fitting. Refer to → Chapter "Front Belt End Fitting, Removing and Installing".
- Remove the B-pillar lower trim piece. Refer to → Chapter "Lower B-Pillar Trim Panel, Removing and Installing".
- Remove the center console. Refer to → Chapter "Center Console, Removing and Installing".
- Remove the footwell trim panel. Refer to → Chapter "Front Footwell Center Console Trim Panel, Removing and Installing".
- Remove the steering column trim. Refer to → Chapter "Steering Column Trim, Removing and Installing".
- Remove the accelerator Pedal Module from the accelerator Pedal Position Sensor. Refer to → Rep. Gr.20; Accelerator Pedal Module; Accelerator Pedal Position Sensor G79/G185 Removing and Installing.
- Remove the center console bracket and lower the shift mechanism. Refer to → Chapter "Center Console Bracket, Removing and Installing".
- Remove the rear air guide channel. Refer to → Heating, Ventilation, and Air Conditioning; Rep. Gr.87; Air Ducts; Air Distribution Channels, Removing and Installing.
USA and Canada market versions:
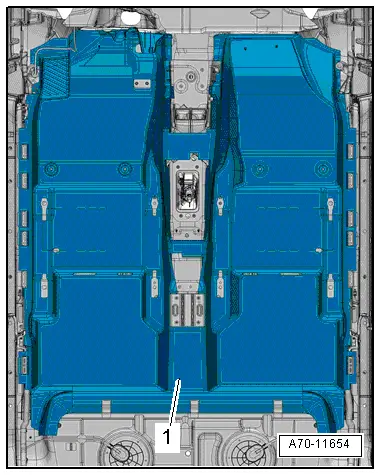
- Remove the nuts -arrows- for the carpet reinforcement.
- Disengage the carpet -1- with reinforcement from the sill panel.
- Repeat the procedure on the other side of the vehicle.
Continuation for all vehicles:
- Remove the floor mats.
- Lift the rear carpet -1- and pull rearward.
 Note
Note
Make sure the floor covering does not tear at the openings.
- Fold floor covering and remove through the door.
Installing
- Fold floor covering and lay it in the vehicle.
- Push floor covering forward and align it so that the openings align.
Install in reverse order of removal.
Installation notes, for example tightening specifications, replacing components. Refer to → Chapter "Overview - Foot Rest and Carpet".
Rear Shelf, Removing and Installing
Front Rear Shelf, Removing and Installing
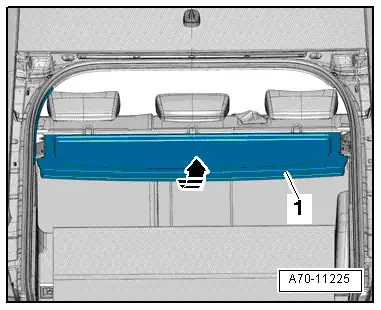
Removing
- Pull out the rear shelf -1- toward the rear -arrow- and remove.
Installing
Install in reverse order of removal.
Installation notes, for example tightening specifications, replacing components. Refer to → Chapter "Overview - Rear Shelf".
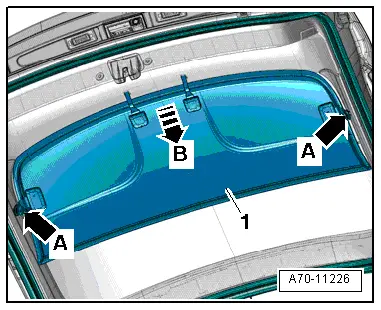
Rear Shelf Rear Section, Removing and Installing
Removing
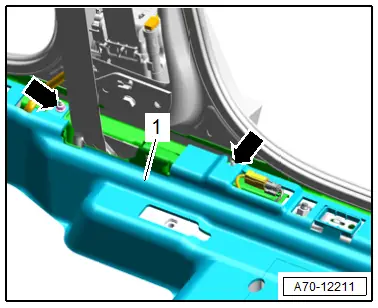
- Disengage the rear shelf -1- from the rear lid trim panel -arrows A- and pull it out -arrow B-.
Installing
- Insert the rear shelf into the rear lid trim panel and engage it into the mounts on the left and right sides -arrows A-.
Installation notes, for example tightening specifications, replacing components. Refer to → Chapter "Overview - Rear Shelf".
READ NEXT:
 Component Location Overview - Luggage Compartment Trim Panels
1 - Lock Carrier Trim
Overview. Refer to
→ Chapter "Overview - Lock Carrier Trim".
2 - Luggage Compartment Floor Covering
Overview. Refer to
→ Chapte
Lower Rear Lid Trim Panel, Removing and Installing
Lower Rear Lid Trim Panel, Removing and Installing
Special tools and workshop equipment
required
Pry Lever -80-200-
Omega Clip Tool -T40280-
Removing
- If installed, remove the rear
Luggage Compartment Side Trim Panel, Removing and Installing
Special tools and workshop equipment
required
Pry Lever -80-200-
Omega Clip Tool -T40280-
Removing
- If installed, remove the luggage compartment roller cover.
- Remove the rear
SEE MORE:
Component Location Overview - Storage Compartment/Covers
1 - Center Console
Overview. Refer to
→ Chapter "Overview - Center Console".
2 - Driver Side Instrument Panel Cover
Overview. Refer to
→ Chapter "Overview - Driver Side Instrument Panel Cover".
3 - Trim Panel
For the steering column
Driver/Front Passenger Seat Heating Element -Z6-/-Z8-, Removing and
Installing
Driver/Front Passenger Seat Heating Element -Z6-/-Z8-, Removing and
Installing, Fabric Cover Versions
Procedure
- Separate the seat cover from the seat cushion. Refer to
→ Chapter "Seat Pan Cover and Cushion, Separating".
Standard seat and folding seat:
- Disconnect the wire
