Audi Q3: Component Location Overview - Luggage Compartment Trim Panels
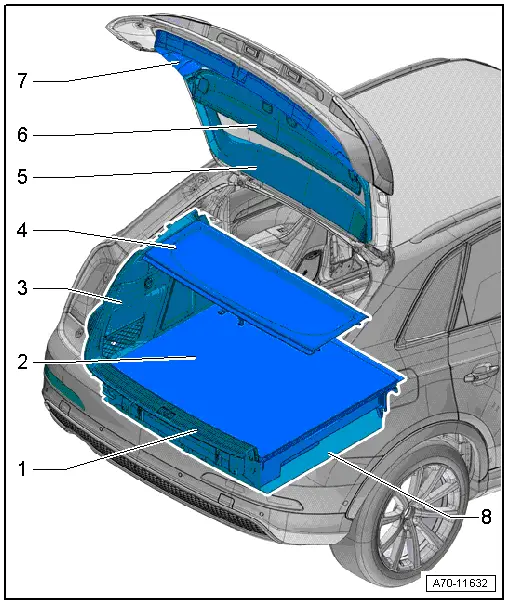
1 - Lock Carrier Trim
- Overview. Refer to → Chapter "Overview - Lock Carrier Trim".
2 - Luggage Compartment Floor Covering
- Overview. Refer to → Chapter "Overview - Luggage Compartment Floor".
3 - Luggage Compartment Side Trim Panel
- Overview. Refer to → Chapter "Overview - Luggage Compartment Side Trim Panel".
4 - Front of the Rear Shelf
- Equipment levels
- Overview. Refer to → Chapter "Overview - Rear Shelf".
5 - Upper Rear Lid Trim Panel
- Overview. Refer to → Chapter "Overview - Lower Rear Lid Trim Panel".
6 - Rear Shelf Rear Section
- Equipment levels
- Overview. Refer to → Chapter "Overview - Rear Shelf".
7 - Lower Rear Lid Trim Panel
- Overview. Refer to → Chapter "Overview - Lower Rear Lid Trim Panel".
8 - Luggage Compartment Floor Trim Panel
- Equipment levels
- Removing and installing. Refer to → Chapter "Luggage Compartment Floor Panel Trim, Removing and Installing".
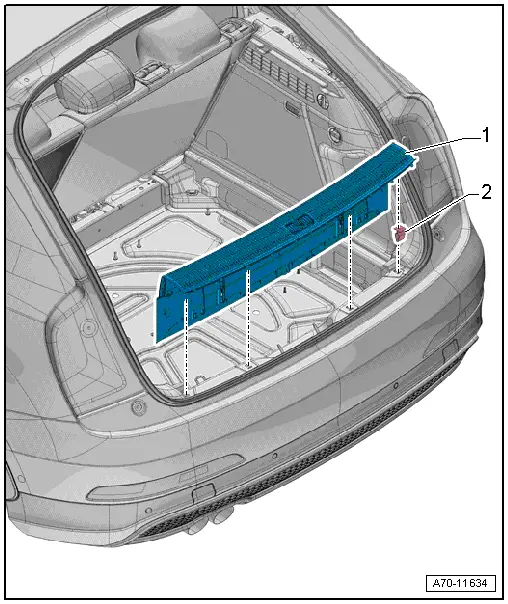
Overview - Luggage Compartment Side Trim Panel
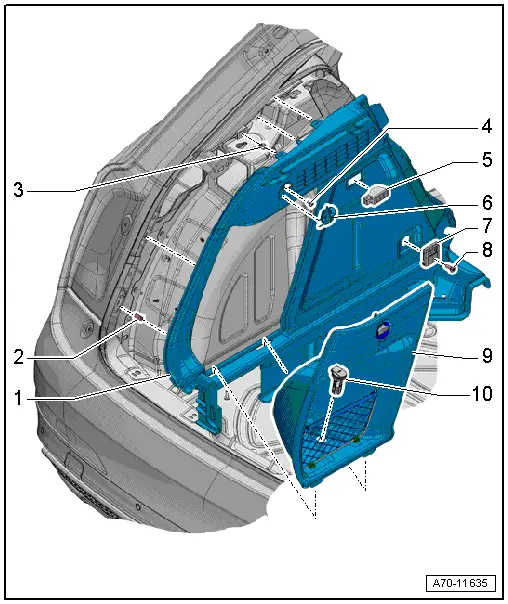
1 - Luggage Compartment Side Trim Panel
- Removing and installing. Refer to → Chapter "Luggage Compartment Side Trim Panel, Removing and Installing".
- Press on until it engages audibly
- Stretch the rear lid seal lip
2 - Clip
- Quantity: 3
- Insert in the trim panel
- Remove any remaining clips in the body mounting points using the Omega Clip Tool -T40280-. To install, insert into the trim panel.
- Replace damaged or deformed clips
3 - Clip
- Quantity: 2
- Insert in the trim panel
- Remove clips left in the mounting points and use for installation in the trim
- Replace damaged or deformed clips
4 - Bolt
- 3 Nm
5 - Left Luggage Compartment Lamp -W18-
- Right: Right Luggage Compartment Lamp -W35-
- Removing and Installing. Refer to → Electrical Equipment; Rep. Gr.96; Lamps; Component Location Overview - Luggage Compartment Lamps.
6 - Coat Hooks
- Removing and installing. Refer to → Chapter "Coat Hooks, Removing and Installing".
- Place in the mount and turn clockwise until stop.
7 - Tie Down
- Removing and installing. Refer to → Chapter "Tie Down, Removing and Installing".
8 - Bolt
- 6 Nm
9 - Cover
- for the luggage compartment side trim
10 - Socket -U-
- Equipment levels
- Removing and installing. Refer to → Electrical Equipment; Socket; Overview - 12 Volt Socket.
Overview - Luggage Compartment Floor
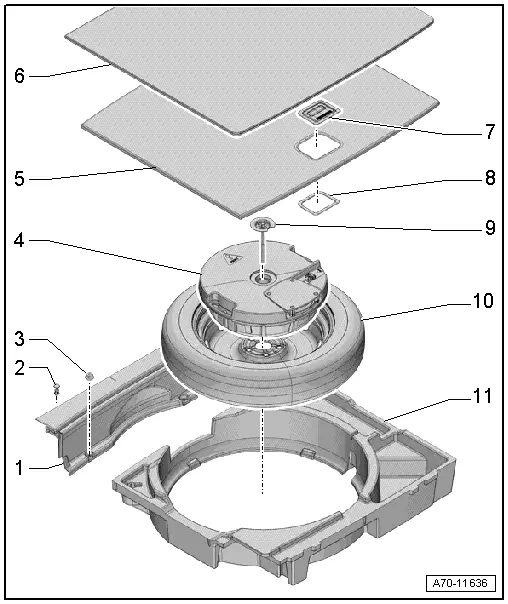
1 - Front Luggage Compartment Floor
- Equipment levels
- Removing and installing. Refer to → Chapter "Luggage Compartment Floor Panel, Removing and Installing".
2 - Expanding Rivet
- Quantity: 3
3 - Nut
- Quantity: 2
- 3 Nm
4 - Subwoofer -R211-
- Equipment levels
- Removing and Installing. Refer to → Communication; Rep. Gr.91; Sound System; SubwooferR211 Removing and Installing.
5 - Rear Luggage Compartment Floor
- Equipment levels
6 - Luggage Compartment Floor Covering
- Equipment levels
7 - Handle
- For the luggage compartment floor
- Removing and installing. Refer to → Chapter "Rear Luggage Compartment Floor Handle, Removing and Installing".
8 - Frame
- For the luggage compartment floor panel handle
- Can be pressed down in one position on luggage compartment floor handle.
- Press on until it engages audibly
9 - Spare Wheel Mounting
- With wing nut
- Tightening specification. Refer to the Owner's Manual.
10 - Spare Tire
- Equipment levels
11 - Tool Box
- Equipment levels
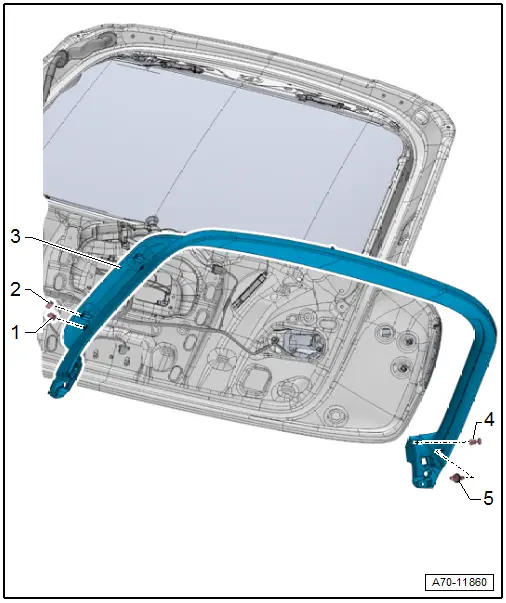
Overview - Lower Rear Lid Trim Panel
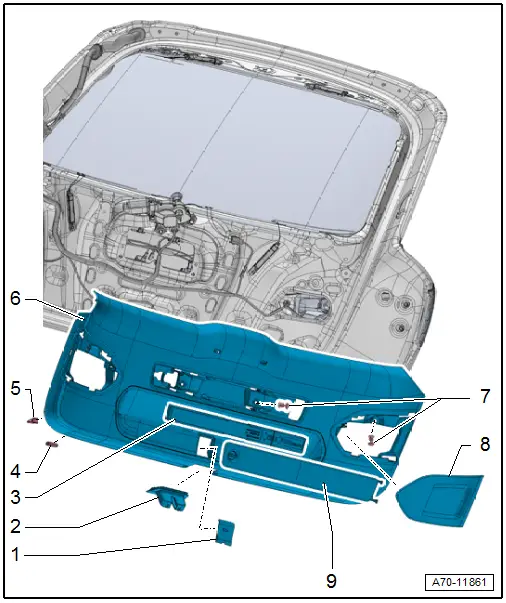
1 - Cover
- For the emergency release
- Removing and installing. Refer to → Chapter "Emergency Release Cover, Removing and Installing".
- Clip into the rear lid trim panel
2 - Trim Panel
- For rear lid lock
- Removing and installing. Refer to → Chapter "Rear Lid Lock Trim Panel, Removing and Installing".
- Press on until it engages audibly
3 - Warning Triangle
4 - Rubber Buffer
- Quantity: 6
- Insert in the trim panel
5 - Clip
- Quantity: 10
- Insert in the trim panel
- Remove any remaining rear lid clips using Omega Clip Tool -T40280- and use them to install the trim.
- Replace damaged or deformed clips
6 - Lower Rear Lid Trim Panel
- Removing and installing. Refer to → Chapter "Lower Rear Lid Trim Panel, Removing and Installing".
- Press on until it engages audibly
7 - Expanding Clip
- Quantity: 4
8 - Cover
- For tail lamps
- Removing and installing. Refer to → Chapter "Tail Lamp Cover, Removing and Installing".
- Clip into the rear lid trim panel
9 - Cover
- For the warning triangle
- Removing and installing. Refer to → Chapter "Emergency Triangle Cover, Removing and Installing".
- Engage in the rear lid trim panel
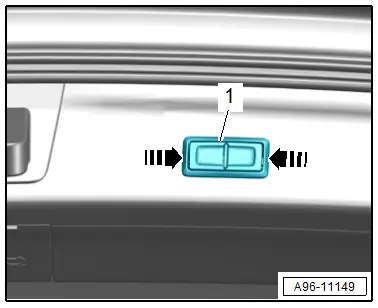
Rear Lid Closing Button -E574-
- Remove the Rear Lid Closing Button - E574-. Refer to → Electrical Equipment; Rep. Gr.96; Controls; Component Location Overview - Luggage Compartment Controls.
- 1 - Rear Lid Closing Button -E574-
Overview - Upper Rear Lid Trim Panel
1 - Clip
- Quantity: 9
- Insert in the trim panel
- Remove any remaining rear lid clips using Omega Clip Tool -T40280- and use them to install the trim.
- Replace damaged or deformed clips
2 - Rubber Buffer
- Quantity: 7
- Insert in the trim panel
3 - Upper Rear Lid Trim Panel
- Removing and installing. Refer to → Chapter "Upper Rear Lid Trim Panel, Removing and Installing".
- Press on until it engages audibly
4 - Expanding Clip
- Quantity: 2
5 - Mount
- For the rear shelf rear section
- Quantity: 2
Overview - Lock Carrier Trim
1 - Lock Carrier Trim
- With Rear Lid -Closed- Sensor 1 -G525-/Rear Lid -Closed- Sensor 2 -G526-
- Removing and installing. Refer to → Chapter "Lock Carrier Trim Panel, Removing and Installing".
- Press on until it engages audibly
- Stretch the rear lid seal lip
2 - Clip
- Quantity: 4
- Insert in the trim panel
- Remove any remaining clips in the body mounting points using the Omega Clip Tool -T40280-. To install, insert into the trim panel.
- Replace damaged or deformed clips
READ NEXT:
 Lower Rear Lid Trim Panel, Removing and Installing
Lower Rear Lid Trim Panel, Removing and Installing
Special tools and workshop equipment
required
Pry Lever -80-200-
Omega Clip Tool -T40280-
Removing
- If installed, remove the rear
Luggage Compartment Side Trim Panel, Removing and Installing
Special tools and workshop equipment
required
Pry Lever -80-200-
Omega Clip Tool -T40280-
Removing
- If installed, remove the luggage compartment roller cover.
- Remove the rear
Rear Luggage Compartment Floor Handle, Removing and Installing
Special tools and workshop equipment
required
Pry Lever -80-200-
Removing
- Remove the luggage compartment floor panel.
- Release the mounting bracket -1-
from the underside of
SEE MORE:
Instrument Panel Side Cover, Removing and Installing
Special tools and workshop equipment
required
Trim Removal Wedge -3409-
Removing
- Pry off the cover -1- for the
instrument panel side cover using the Trim Removal Wedge -3409--arrow-.
- Remove the cover rearward from the A-pillar gap cover.
Installing
Install in reverse ord
All wheel drive (quattro)
Description
Applies to: vehicles with all wheel drive
The all-wheel drive system distributes the driving
power variably to the front and rear axle to improve
the driving characteristics. It works together
with selective wheel torque control, which can
activate when driving through curves.
The all-
