Audi Q3: Lower Rear Lid Trim Panel, Removing and Installing
Lower Rear Lid Trim Panel, Removing and Installing
Special tools and workshop equipment required
- Pry Lever -80-200-
- Omega Clip Tool -T40280-
Removing
- If installed, remove the rear shelf. Refer to → Chapter "Rear Shelf Rear Section, Removing and Installing".
- Remove the tail lamp cover. Refer to → Chapter "Tail Lamp Cover, Removing and Installing".
- Open the emergency triangle cover and remove the emergency triangle. Refer to → Chapter "Emergency Triangle Cover, Removing and Installing".
- Remove the expanding clips -1-.
- Unclip the rear lid lower trim panel -2- clamps all the way around using the Pry Lever -80 - 200--arrows-.
- Equipment level: disconnect the Rear Lid Closing Button -E574- connector.
- Remove the lower rear lid trim panel.
Installing
Install in reverse order of removal.
Installation notes, for example tightening specifications, replacing components. Refer to → Chapter "Overview - Lower Rear Lid Trim Panel".
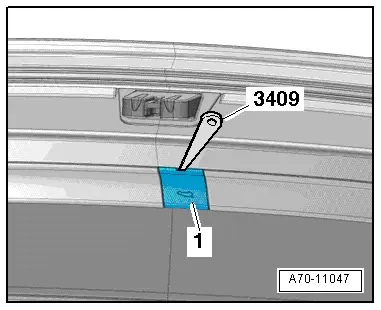
Emergency Release Cover, Removing and Installing
Special tools and workshop equipment required
- Trim Removal Wedge -3409-
Removing
- Place the Trim Removal Wedge -3409- on the opening and unclip the emergency release cover -1- from the lower rear lid trim panel.
Installing
Install in reverse order of removal.
Installation notes, for example tightening specifications, replacing components. Refer to → Chapter "Overview - Lower Rear Lid Trim Panel".
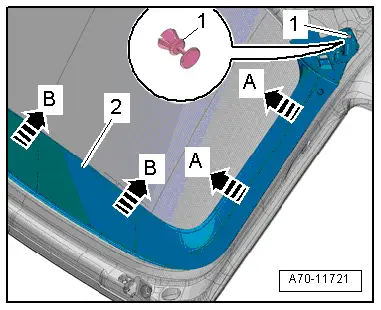
Upper Rear Lid Trim Panel, Removing and Installing
Special tools and workshop equipment required
- Pry Lever -80-200-
- Omega Clip Tool -T40280-
Removing
- Remove the lower rear lid trim panel. Refer to → Chapter "Lower Rear Lid Trim Panel, Removing and Installing".
- Remove the expanding clip -1-.
- First unclip the rear lid upper trim panel -2- from the sides of the rear lid -A arrows- using the Pry Lever -80 - 200-.
- Then unclip the rear lid upper trim panel using the Pry Lever -80 - 200- from the rear lid -B arrows- and remove.
Installing
Install in reverse order of removal.
Installation notes, for example tightening specifications, replacing components. Refer to → Chapter "Overview - Lower Rear Lid Trim Panel".
READ NEXT:
 Luggage Compartment Side Trim Panel, Removing and Installing
Special tools and workshop equipment
required
Pry Lever -80-200-
Omega Clip Tool -T40280-
Removing
- If installed, remove the luggage compartment roller cover.
- Remove the rear
Rear Luggage Compartment Floor Handle, Removing and Installing
Special tools and workshop equipment
required
Pry Lever -80-200-
Removing
- Remove the luggage compartment floor panel.
- Release the mounting bracket -1-
from the underside of
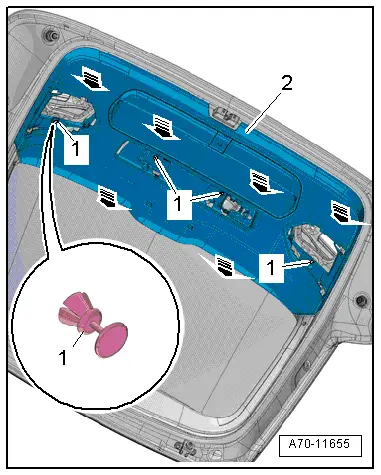
Roof Trim Panels
Component Location Overview - Roof Trim Panel
1 - Roof Grab Handle
Overview. Refer to
→ Chapter "Overview - Sun Visors".
2 - Sun Visor
Overview. Refer to
â
SEE MORE:
Checking Pressures on Vehicles with Expansion Valve and Receiver/Dryer
(with Internally Regulated Compressor)
General Information
Note
Connect the A/C service station. Refer to
→ Chapter "A/C Service Station, Connecting".
Observe the test requirements. Refer to
→ Chapter "Pressures, Checking".
- With the ignition switched off, check the pressure in the
refrigerant
Overview - Drive Axle
Overview - Drive Axle, Drive Axle with CV Joint VL107
1 - Bolt
200 Nm +180Âş
Always replace if removed
Loosening and tightening the twelve-point bolt
→ Chapter "Drive Axle Threaded Connection, Loosening and Tightening"
Before installing, clean the threads in the CV jo
