Audi Q3: Modular Wiring Routing with Corrugated Tube
Opening the corrugated tube and removing the individual wire
 WARNING
- Follow all safety precautions when working with pyrotechnic components. Refer to → Chapter "Pyrotechnic Components Safety Precautions".
- Before handling pyrotechnic components (for example, disconnecting the connector), the person handling it must "discharge static electricity". This can be done by touching the door striker, for example.
- Remove the front seat. Refer to → Chapter "Front Seat, Removing and Installing".
- Fasten the front seat on the Engine/Transmission Holder - Seat Repair Fixture -VAS6136-. Refer to → Chapter "Front Seat, Mounting on Fixture for Seat Repair".
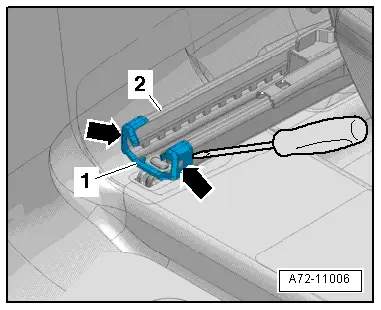
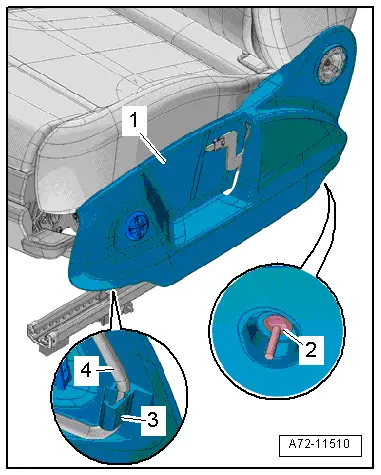
- Open the rear wiring holder -1- for modular wire routing on the seat pan lower frame using a screwdriver -arrow- and remove the corrugated tube -2-.
 Note
Note
Open the corrugated tube to replace a faulty wire or side airbag. Refer to → Electrical Equipment; Rep. Gr.97; Connector; Repairing Wiring Harnesses and Connectors or → Chapter "Front Side Airbag with Igniter, Removing and Installing".
Installing Individual Wires and Closing the Corrugated Tube
Install in reverse order of removal. Note the following:
- When bundling and placing individual wires in the corrugated tube, make sure the wires are not twisted.
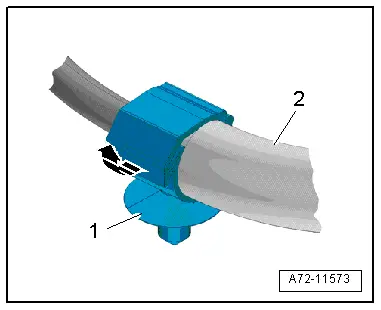
- Insert the corrugated tube -2- in the wiring bracket -1- in such a way that it terminates flush with the wiring bracket.
 Note
Note
- When installing, position all cable ties, wire holders and retaining clips in same place.
- Make sure the connectors are installed correctly and are secure.
 WARNING
- Follow all safety precautions when working with pyrotechnic components. Refer to → Chapter "Pyrotechnic Components Safety Precautions".
- Before handling pyrotechnic components (for example, connecting the connector), the person handling it must "discharge static electricity". This can be done by touching the door striker, for example.
- Observe all measures when installing the front seat. Refer to → Chapter "Front Seat, Removing and Installing".
Installation notes, for example tightening specifications, replacing components. Refer to → Chapter "Overview - Seat Pan, Modular Wiring Routing".

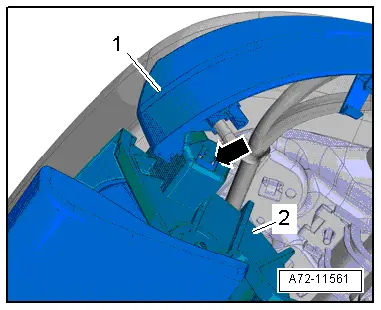
Seat Rail Cover, Removing and Installing
 Note
Note
Proceed very carefully when removing and installing because it is relatively easy to damage the cover.
Removing
- Bring the front seat all the way to the rear and then into its highest position.
- Remove the cover -1- from the seat rail -2- to do this unclip the cover at the sides from the retaining hooks -arrows-.
Installing
Install in reverse order of removal.
Installation notes, for example tightening specifications, replacing components. Refer to → Chapter "Overview - Front Seat, Manual Standard Seat/Sport Seat".
Seat Forward/Back Adjustment Handle, Removing and Installing
 Note
Note
- Removal and installation can be done with front seat installed.
- It is not possible to remove the seat forward/back adjustment without damaging it.
Removing
- Bring the front seat all the way to the rear and then into its highest position.
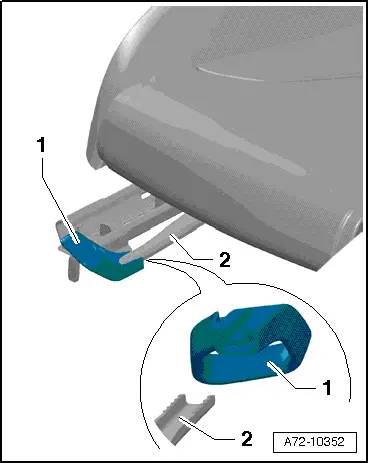
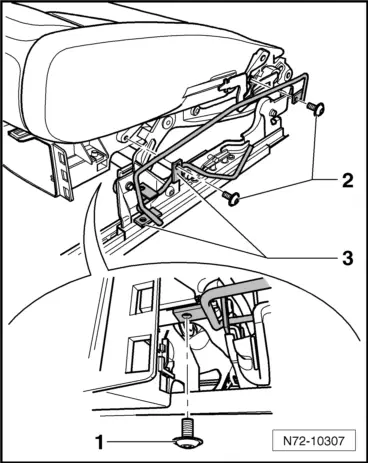
- Remove the seat forward/back adjustment handle -1- from its mount -2- using a rubber or plastic mallet.
 Note
Note
For better illustration the seat forward/back adjustment is turned 180Âş.
Installing
- Push the seat forward/back adjustment on the handle mount.
 Caution
Be careful not to damage the seat forward/back adjustment handle when hitting it with the rubber hammer.
- Hit the seat forward/back adjustment handle all the way back on with a rubber hammer.
Installation notes, for example tightening specifications, replacing components. Refer to → Chapter "Overview - Front Seat, Manual Standard Seat/Sport Seat".
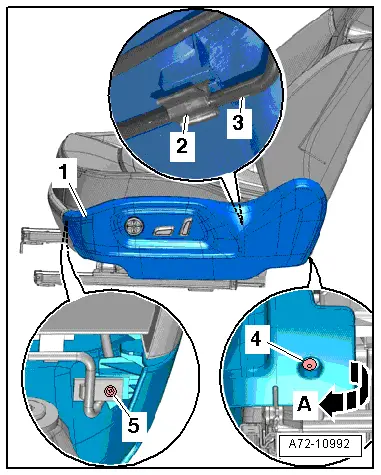
Seat Side Trim on Sill Panel Side, Removing and Installing, Manual Front Seat
Removing
- Move the front seat all the way forward/up.
- Remove the backrest adjustment hand wheel. Refer to → Chapter "Backrest Adjustment Hand Wheel, Removing and Installing".
- Remove the seat height adjustment handle. Refer to → Chapter "Seat Height Adjuster, Removing and Installing".
Standard Seat:
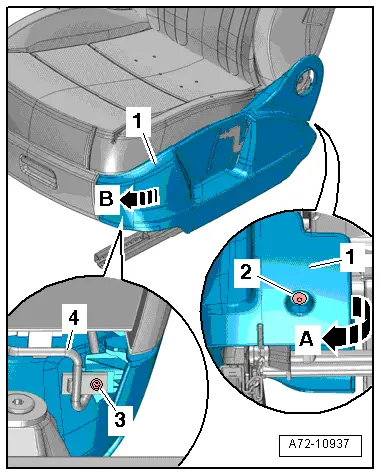
- Remove the expanding rivet -2- from the sill panel seat side trim.
- Remove the bolt -3-.
- Disengage the seat side sill trim -1- from the backrest hinge and lower seat frame -arrow A-.
- Pull the trim slightly toward the rear, remove it from the bracket -4- and then remove it forward -arrow B-.
Sport Seat:
- Remove the expanding rivet -2- from the sill panel seat side trim.
- Open the clip -3- with a screwdriver.
- Disengage the seat side sill trim -1- from the backrest hinge and lower seat frame.
- Pull the trim slightly toward the rear, remove it from the bracket -4- and then remove it forward.
Procedure for all Seat Versions:
- Vehicles with four-way lumbar support: Disconnect the connector -4- on the lumbar support adjustment switch -1-.
- Remove the seat side trim sill panel -3-.
 Note
Note
Ignore -item 2-.
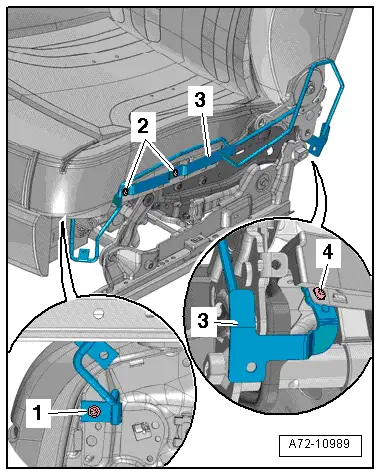
Bracket for the Seat Side Trim Sill Panel, Standard Seat:
- Remove the bolt -1-, if applicable.
- Remove the bolts -2- and bracket -3- from the front seat.

Bracket for the Seat Side Trim Sill Panel, Spot Seat:
- Remove the bolts -1- and -2-.
- Remove the bracket -3- from the front seat. Loosen the cable tie off the bracket if necessary.
Installing
Install in reverse order of removal. Note the following:
 Note
Note
Make sure the connectors are installed correctly and are secure.
Installation notes, for example tightening specifications, replacing components. Refer to → Chapter "Overview - Seat Pan, Sill Panel/Tunnel Side Seat Side Trim on Manual Front Seat".
Seat Side Trim on Sill Panel Side, Removing and Installing, Passenger Folding Seat
 Note
Note
The removal and installing can take place with the seat still installed.
Removing
- Move the front seat all the way forward/up.
- Removing release lever. Refer to → Chapter "Backrest Release, Removing and Installing".
- Remove the seat height adjustment handle. Refer to → Chapter "Seat Height Adjuster, Removing and Installing".
- Remove the bolt -3- and the remove the trim spreader clip -2-.
- Disengage the trim -1- from the rear of the seat -arrow A-.
- Pull the trim slightly toward the rear, remove it from the bracket -4- and then remove it forward -arrow B-.

Sill Panel Seat Side Trim Bracket
- Remove the bolt -1-, if applicable.
- Remove the bolts -2- and remove the bracket -3-.
Installing
Install in reverse order of removal.
Installation notes, for example tightening specifications, replacing components. Refer to → Chapter "Overview - Seat Pan, Sill Panel/Tunnel Side Seat Side Trim on Folding Passenger Seat".
Seat Side Trim on Sill Panel Side, Removing and Installing, Power Front Seat
Removing
- Move the front seat all the way forward/up.
- Remove the expanding rivet -4- from the seat side sill trim.
- Remove the bolt -5-.
- Open the clip -2- with a screwdriver.
- Disengage the seat side sill trim -1- from the backrest hinge and lower seat frame -arrow A-.
- Slightly lift the trim and disengage from the bracket -3-.
 Note
Note
Be careful not to damage the bracket when removing the trim.
- Release the catch -arrow- on the storage compartment -2- and remove the sill panel seat side trim -1- upward.
- Remove the sill panel seat side trim slightly forward off the bracket and remove it upward.
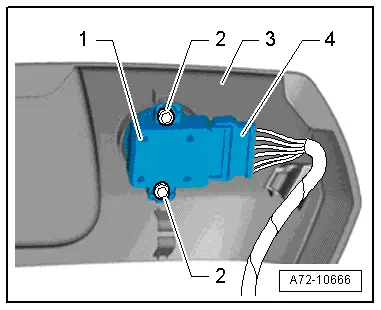
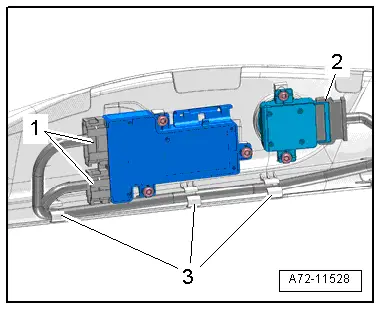
- Disconnect the connectors:
1 - Driver Seat Adjustment Control Head -E470-/ Front Passenger Seat Adjustment Control Head -E471-
2 - Driver Seat Lumbar Support Adjustment Switch -E176-/ Front Passenger Seat Lumbar Support Adjustment Switch -E177-
- Free up electrical wire on the bracket -3-.
- Remove the seat side sill trim.
Sill Panel Seat Side Trim Bracket
- Remove the bolts -1, 2 and 4-.
- Remove the bracket -3- from the front seat. Loosen the cable tie off the bracket if necessary.
Installing
Install in reverse order of removal. Note the following:
 Note
Note
- Make sure the connectors are installed correctly and are secure.
- Route the connectors and wires as illustrated.
Installation notes, for example tightening specifications, replacing components. Refer to → Chapter "Overview - Seat Pan, Sill Panel/Tunnel Side Seat Side Trim on Power Front Seat".
Driver/Front Passenger Seat Adjustment Control Head -E470-/-E471-, Removing and Installing
Special tools and workshop equipment required
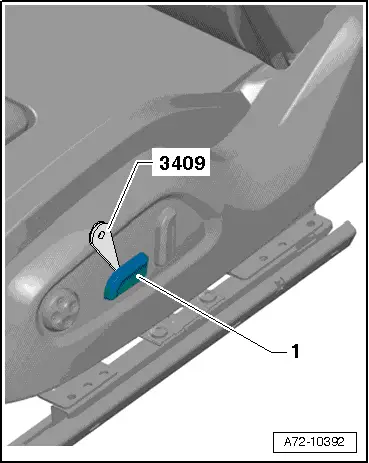
- Trim Removal Wedge -3409-
Removing
- Carefully remove the Seat adjustment control for backrest adjustment -1- with the Trim Removal Wedge -3409- from the catch.
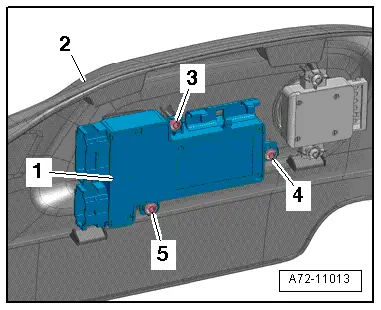
- Remove the seat side sill panel trim. Refer to → Chapter "Seat Side Trim on Sill Panel Side, Removing and Installing, Power Front Seat".
- Remove the bolts -3, 4 and 5-.
- Remove the control head -1- from the sill panel side seat side trim -2-.
Installing
Install in reverse order of removal.
Installation notes, for example tightening specifications, replacing components. Refer to → Chapter "Overview - Seat Pan, Power Seat Adjustment Control Head".
READ NEXT:
 Seat Side Trim on the Tunnel Side, Removing and Installing
Removing
WARNING
Follow all safety precautions when working with
pyrotechnic components. Refer to
→ Chapter "Pyrotechnic Components Safety Precautions".
Before handling pyr
Seat Depth Adjuster, Removing and Installing
Special tools and workshop equipment
required
Trim Removal Wedge -3409-
Removing
WARNING
Follow all safety precautions when working with
pyrotechnic components. Refer to
â†
Backrest Release, Removing and Installing
Note
Release is only on front passenger side folding seat.
Removing
- Remove cap -2- using
screwdriver.
- Open the tabs with a screwdriver
-arrows- and remove the release le
SEE MORE:
Vision
Adjusting exterior mirrors
Fig. 42 Driver's door: knob for the exterior mirrors
Turn the knob in the driver's door to the desired
position:
- Deactivates all adjustment
functions.
- Selects the left or right
exterior mirror.
To adjust the mirror glass in a mirror, press the
knob in the desired
Map update
Introduction
Applies to: vehicles with navigation system
You can update the map data in the MMI with a
map update. The functions depend on the country
and vehicle equipment.
Map update through online map update.
Import a map update from the USB connection
to your MMI.
Online map update
Applies
