Audi Q3: Seat Depth Adjuster, Removing and Installing
Special tools and workshop equipment required
- Trim Removal Wedge -3409-
Removing
 WARNING
- Follow all safety precautions when working with pyrotechnic components. Refer to → Chapter "Pyrotechnic Components Safety Precautions".
- Before handling pyrotechnic components (for example, disconnecting the connector), the person handling it must "discharge static electricity". This can be done by touching the door striker, for example.
- Remove the front seat. Refer to → Chapter "Front Seat, Removing and Installing".
- Fasten the front seat on the Engine/Transmission Holder - Seat Repair Fixture -VAS6136-. Refer to → Chapter "Front Seat, Mounting on Fixture for Seat Repair".
- Equipment level with storage compartment: remove the storage compartment. Refer to → Chapter "Storage Compartment, Removing and Installing".
- Move the seat depth adjuster all the way forward.
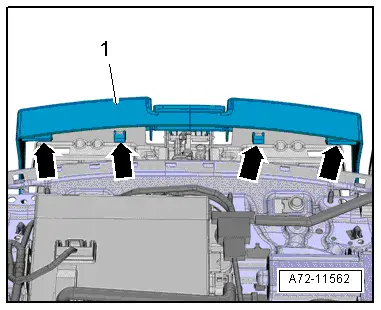
- Unclip the tabs -arrows- on the trim -1- using a Trim Removal Wedge -3409-.
- Remove the trim from the seat depth adjuster.
- Move the seat depth adjuster -1- all the way forward -arrow-.
- Unclip catches -2- using the Trim Removal Wedge -3409-.

- Swivel the support with the seat cushion and seat cover -1- for the seat depth adjuster upward so that the tabs -arrow A- and -arrow B- remain unlocked.
 Note
Note
The illustration shows the padding disengaged.
- Remove the support with the seat cushion and seat cover for the seat depth adjuster upward and toward the front.
- Disengage the tabs -arrow C- on the seat depth adjuster -2- and move the support with the seat cushion and seat cover upward.
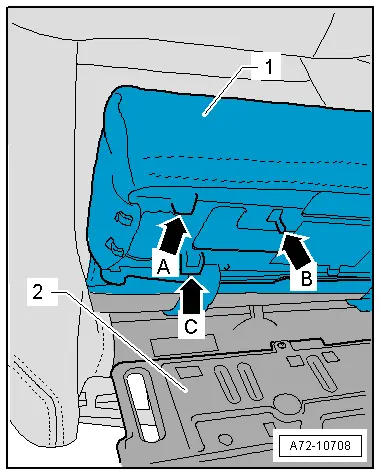
- Lay the support -2- with the seat cushion and seat cover on the front seat.
 Note
Note
The illustration does not show the seat pan lower frame.
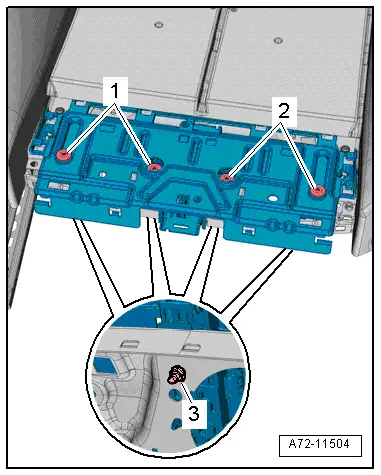
- Remove the cushion retaining channels -1, 3 and 4- across and at the sides from the seat depth adjustor.
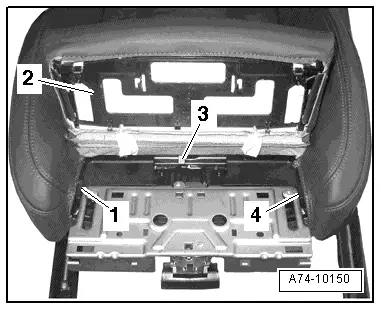
- To do this, unclip the retaining channels -1- and -2- in the direction of the -arrow- out from the tabs -3-.
 Note
Note
Proceed very carefully when removing and installing because it is relatively easy to damage the tabs.
- Remove the bolts -1-, -2- and nuts -3- from the seat depth adjuster.
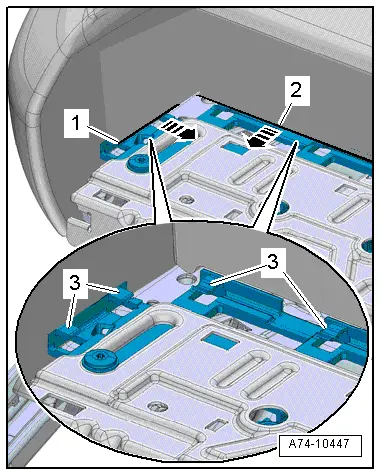
- Unclip the retaining tabs -1- and -3- using the Trim Removal Wedge -3409-.
- Remove the seat depth adjuster -2- from the seat pan upward and forward -arrows-.
- Disengage the tabs -4- from the seat pan while doing this.
- Remove the seat depth adjuster from the front seat.
Installing
 WARNING
- Follow all safety precautions when working with pyrotechnic components. Refer to → Chapter "Pyrotechnic Components Safety Precautions".
- Before handling pyrotechnic components (for example, connecting the connector), the person handling it must "discharge static electricity". This can be done by touching the door striker, for example.
- Observe all measures when installing the front seat. Refer to → Chapter "Front Seat, Removing and Installing".
Install in reverse order of removal.
Installation notes, for example tightening specifications, replacing components. Refer to → Chapter "Overview - Seat Pan, Seat Depth Adjuster".
Seat Pan Frame, Replacing, Manual Seat
 Note
Note
The seat lower section is not designed to be separated from the seat upper section (seat frame) on the manual front seats.
Removing
 WARNING
- Follow all safety precautions when working with pyrotechnic components. Refer to → Chapter "Pyrotechnic Components Safety Precautions".
- Before handling pyrotechnic components (for example, disconnecting the connector), the person handling it must "discharge static electricity". This can be done by touching the door striker, for example.
 Caution
Move the front seat to the highest possible position. This reduces the spring force when removing and installing the seat height adjuster.
- Move the front seat all the way forward and raise it as high as possible. Then lower it one stroke.
- Remove the front seat. Refer to → Chapter "Front Seat, Removing and Installing".
- Remove the backrest. Refer to → Chapter "Front Backrest, Removing and Installing".
- Remove the seat cover with seat cushion:
- Front Standard Seat/Folding Seat. Refer to → Chapter "Seat Pan Cover and Padding, Removing and Installing, Standard/Folding Seat".
- Sport seat. Refer to → Chapter "Seat Pan Cover and Padding, Removing and Installing, Sport Seat".
 Note
Note
Remove the wiring and components and install them in the new seat pan frame.
- Remove the front seat belt latch. Refer to → Chapter "Front Seat Belt Latch, Removing and Installing".
- Remove the seat height adjuster. Refer to → Chapter "Seat Height Adjuster, Removing and Installing".
- Remove the Standard seat drawer mount. Refer to → Chapter "Drawer Mount, Removing and Installing".
- Remove the Sport seat storage compartment. Refer to → Chapter "Storage Compartment, Removing and Installing".
- Remove the seat angle adjuster for Sport seats. Refer to → Chapter "Seat Angle Adjuster, Removing and Installing".
- Remove the seat depth adjuster for Sport seats. Refer to → Chapter "Seat Depth Adjuster, Removing and Installing".
- Remove the wiring harness and individual wires from the seat pan frame.
Installing
 WARNING
- Follow all safety precautions when working with pyrotechnic components. Refer to → Chapter "Pyrotechnic Components Safety Precautions".
- Before handling pyrotechnic components (for example, connecting the connector), the person handling it must "discharge static electricity". This can be done by touching the door striker, for example.
- Observe all measures when installing the front seat. Refer to → Chapter "Front Seat, Removing and Installing".
Install in reverse order of removal. Note the following:
- Install all components and wires in the new seat pan cushion.
Installation notes, for example tightening specifications, replacing components. Refer to → Chapter "Overview - Front Seat, Manual Standard Seat/Sport Seat".
Upper Seat Frame, Removing and Installing, Power Front Seat
 Note
Note
The following describes removing and installing a seat pan without a seat depth adjuster. Removing and installing a seat pan with a seat depth adjuster is identical.
Removing
 WARNING
- Follow all safety precautions when working with pyrotechnic components. Refer to → Chapter "Pyrotechnic Components Safety Precautions".
- Before handling pyrotechnic components (for example, disconnecting the connector), the person handling it must "discharge static electricity". This can be done by touching the door striker, for example.
 Caution
Move the front seat to the highest possible position. This reduces the spring force when removing and installing the torsion bar and the risk of damaging the threaded connections between upper/lower frames of the seat pan.
- Remove the front seat. Refer to → Chapter "Front Seat, Removing and Installing".
- Remove the backrest. Refer to → Chapter "Front Backrest, Removing and Installing, Standard/Sport Seat".
- Remove the seat cover with seat cushion:
- Standard seat. Refer to → Chapter "Seat Pan Cover and Padding, Removing and Installing, Standard/Folding Seat".
- Sport seat. Refer to → Chapter "Seat Pan Cover and Padding, Removing and Installing, Sport Seat".
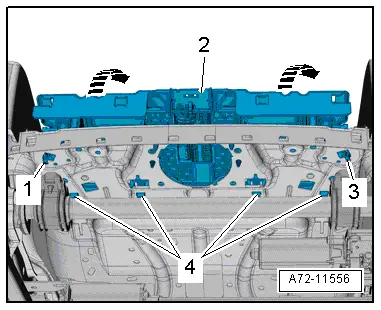
- Disconnect the connector on the seat forward/back adjustment motor.
- Unclip modular wire routing bracket on the seat pan lower frame.
- Disconnect the connector from the front seat belt latch.
- Unclip the wire from the seat pan and set aside.
 Caution
Danger of damaging the threaded holes or the bushing in the bearing points (connecting upper/ lower frame).
A second technician is needed to be pushing on the seat via the backrest while removing the following screws.
- Remove the bolt -5-.
- Unscrew the bolts -1, 3, 4, and 7- and remove the upper frame -2- from the lower frame -6-.

 Caution
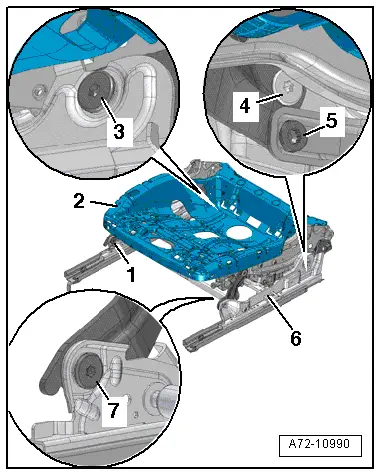
Risk of damaging the bushings -1- in the bearing points -2- (upper/lower frame bolted connection).
- The bushings cannot be replaced with workshop materials.
- If the bushings are damaged, the corresponding assembly parts must be replaced.
- Vehicles with seat depth adjuster: remove the seat depth adjuster. Refer to → Chapter "Seat Depth Adjuster, Removing and Installing".
- Remove the seat depth adjustment motor -V245-/-V246-. Refer to → Chapter "Driver/Front Passenger Seat Height Adjustment Motor -V245-/-V246-, Removing and Installing".
- Remove the seat angle adjustment motor -V243-/-V244-. Refer to → Chapter "Driver/Front Passenger Seat Angle Adjustment Motor -V243-/-V244-, Removing and Installing".
- Remove wiring harnesses and individual wires from seat pan upper frame.
Installing
 WARNING
- Follow all safety precautions when working with pyrotechnic components. Refer to → Chapter "Pyrotechnic Components Safety Precautions".
- Before handling pyrotechnic components (for example, connecting the connector), the person handling it must "discharge static electricity". This can be done by touching the door striker, for example.
- Observe all measures when installing the front seat. Refer to → Chapter "Front Seat, Removing and Installing".
Install in reverse order of removal.
Information for installation: for example, tightening specifications, replacing body parts. Refer to → Chapter "Overview - Seat Pan, Power Front Seat" and → Chapter "Overview - Seat Pan, Seat Height Adjustment Motor".

Seat Pan, Removing and Installing, Power Front Seat
The driver/front passenger seat forward/back adjustment motor -V28-/-V31- is integrated in the seat pan lower frame and can be replaced only together with the seat pan lower frame.
Removing
 WARNING
- Follow all safety precautions when working with pyrotechnic components. Refer to → Chapter "Pyrotechnic Components Safety Precautions".
- Before handling pyrotechnic components (for example, disconnecting the connector), the person handling it must "discharge static electricity". This can be done by touching the door striker, for example.
- Move front seat to the highest position possible to keep the torsion bar tension as low as possible.
- Remove the front seat. Refer to → Chapter "Front Seat, Removing and Installing".
- Remove the front seat belt latch. Refer to → Chapter "Front Seat Belt Latch, Removing and Installing".
- Unclip the wire from the seat pan and set aside.
- Disconnect the connector on the seat forward/back adjustment motor.
- Unclip modular wire routing bracket on the seat pan lower frame.
 Caution
Danger of damaging the threaded holes or the bushing in the bearing points (connecting the upper/ lower frame).
A second technician is needed to be pushing on the seat via the backrest while removing the following screws.
- Remove the bolt -5-.
- Remove the bolts -1, 3, 4 and 7-.
- Remove upper frame -2- from the lower frame -6-.
 Caution
Risk of damaging the bushings -1- in the bearing points -2- (upper/lower frame bolted connection).
- The bushings cannot be replaced with workshop materials.
- If the bushings are damaged, the corresponding assembly parts must be replaced.
Installing
 WARNING
- Follow all safety precautions when working with pyrotechnic components. Refer to → Chapter "Pyrotechnic Components Safety Precautions".
- Before handling pyrotechnic components (for example, connecting the connector), the person handling it must "discharge static electricity". This can be done by touching the door striker, for example.
- Observe all measures when installing the front seat. Refer to → Chapter "Front Seat, Removing and Installing".
Install in reverse order of removal.
Information for installation: for example, tightening specifications, replacing body parts. Refer to → Chapter "Overview - Seat Pan, Power Front Seat" and → Chapter "Overview - Seat Pan, Seat Height Adjustment Motor".
READ NEXT:
 Backrest Release, Removing and Installing
Note
Release is only on front passenger side folding seat.
Removing
- Remove cap -2- using
screwdriver.
- Open the tabs with a screwdriver
-arrows- and remove the release le
Overview - Bench Seat/Single Seat
1 - Front Mount
For securing the rear bench seat
Welded to the floor panel.
2 - Cover
For child seat anchor
Quantity: 4
Removing and installing. Refer to
→&n
Bench Seat/Single Seat, Removing and Installing
Removing
- Move the front seats all the way forward.
- Unclip the child seat anchor guides (quantity: four)
-1- from anchorages. Refer to
→ Chapter "Child Seat Anchor Guide, Remov
SEE MORE:
Head restraints
General information
Applies to: vehicles with adjustable head restraints
Fig. 55 Correctly-adjusted head restraint
Make sure that:
The upper edge of the head restraint is as even
as possible with the top of your head.
The head restraint is as close as possible to the
back of the head.
The hea
Side assist
Description
Applies to: vehicles with side assist
Fig. 110 Driving situations and displays in the exterior mirror
General information
Side assist monitors the blind spot and traffic behind
your vehicle and provides assistance when
you are changing lanes. If the system detects an
object approaching
