Audi Q3: Bench Seat/Single Seat, Removing and Installing
Removing
- Move the front seats all the way forward.
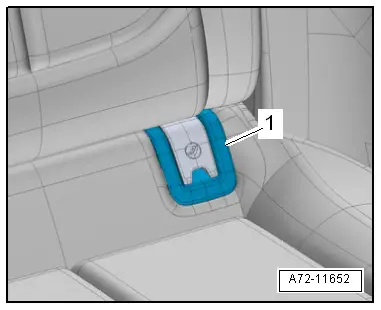
- Unclip the child seat anchor guides (quantity: four) -1- from anchorages. Refer to → Chapter "Child Seat Anchor Guide, Removing and Installing, Rear".
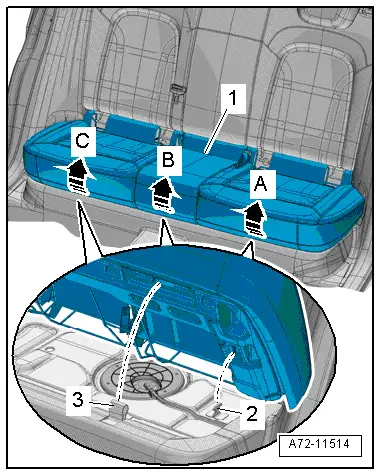
- With both hands, grasp the rear bench seat under the seat frame.
- Using both hands, forcefully pull the rear bench seat -1- upward -arrow A- to release the rear bench seat frame from the front mount -3-.
- Repeat the procedure in the center and on the opposite side of the rear bench seat -B and C arrows-.
- Push the rear bench seat back on the side to release the rear bench seat frame from the side mount -2-.
- Repeat the process on the opposite side of the rear bench seat.
- Remove the rear bench seat from the vehicle.
Installing
- Install the rear bench seat, thread the seat belt latch and push the seat frame -1- using force in the mount -2 and 3-.
Install in reverse order of removal.
Installation notes, for example tightening specifications, replacing components. Refer to → Chapter "Overview - Bench Seat/Single Seat".
Headrest, Removing and Installing
Removing
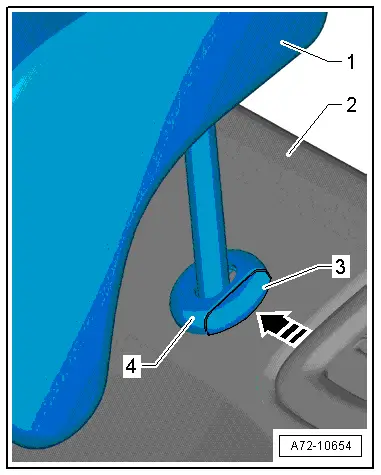
- Press the release button -3- for the head restraint height adjustment -4- in direction of -arrow- and pull the head restraint -1- out of the backrest -2- until it stops.
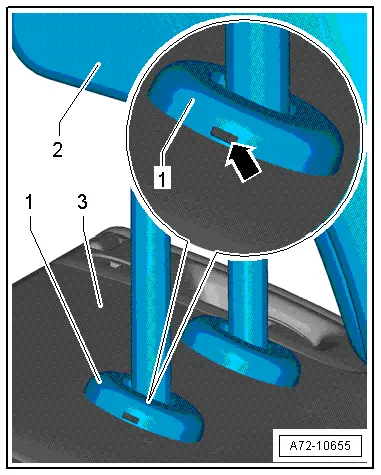
- Using a small flat-head screwdriver, press the locking spring as far as the stop through the opening -arrow- in the headrest guide -1-.
- At the same time, remove the headrest -2- from the rear seat backrest -3-.
Installing
Install in reverse order of removal.
Installation notes, for example tightening specifications, replacing components. Refer to → Chapter "Overview - Headrest and Headrest Guide".
Headrest Guide, Removing and Installing
Removing
- Remove the rear headrest. Refer to → Chapter "Headrest, Removing and Installing".
- Loosen the backrest cover with backrest cushion from the rear seat backrest frame. Refer to → Chapter "Cover and Cushion, Removing and Installing, Backrest".
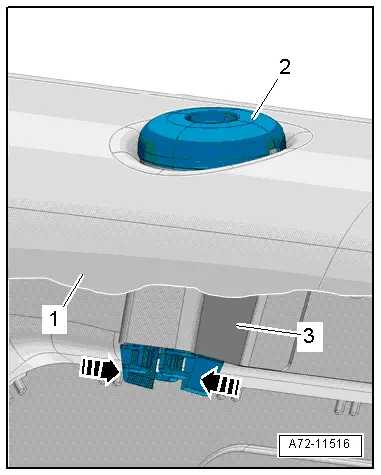
Right Headrest Guide:
- Move the backrest cover with the backrest cushion -1- as far up as possible until the headrest pipe -3- welded in the rear seat backrest frame and the headrest guide -2- is visible.
- Push the headrest guide retaining tab with piles inward -arrows- and at the same time remove the headrest guide from the rear seat backrest frame.
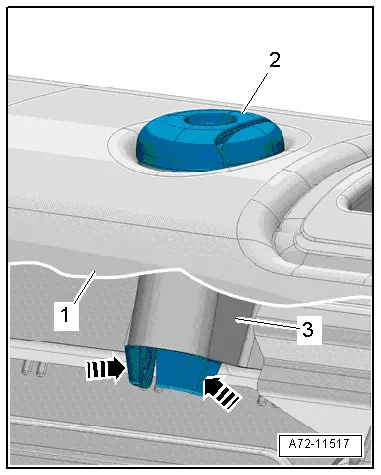
Left Headrest Guide:
- Move the backrest cover with the backrest cushion -1- as far up as possible until the headrest pipe -3- welded in the rear seat backrest frame and the headrest guide -2- is visible.
- Push the headrest guide retaining tab with piles inward -arrows- and at the same time remove the headrest guide from the rear seat backrest frame.
Installing
Install in reverse order of removal.
Installation notes, for example tightening specifications, replacing components. Refer to → Chapter "Overview - Headrest and Headrest Guide".

