Audi Q3: Overview - Trim Molding and Covers
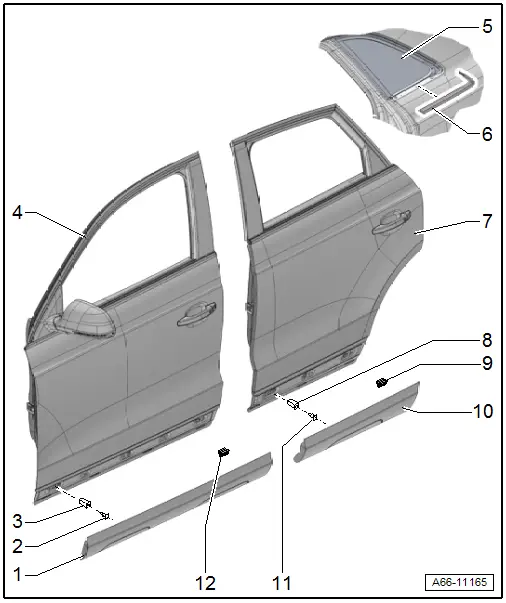
1 - Front Door Gap Cover
- Removing and installing. Refer to → Chapter "Door Gap Cover, Removing and Installing".
2 - Clip
- Quantity: 5
3 - Grommet
- For the clip
4 - Front Door
5 - Side Window
6 - Trim Strip
- Removing and installing. Refer to → Chapter "Trim Molding, Removing and Installing".
7 - Rear Door
8 - Grommet
- For the clip
9 - Rubber Buffer
- Quantity: 3
10 - Rear Door Gap Cover
- Removing and installing. Refer to → Chapter "Door Gap Cover, Removing and Installing".
11 - Clip
- Quantity: 7
12 - Rubber Buffer
- Quantity: 4
Overview - Sill Panel Trim
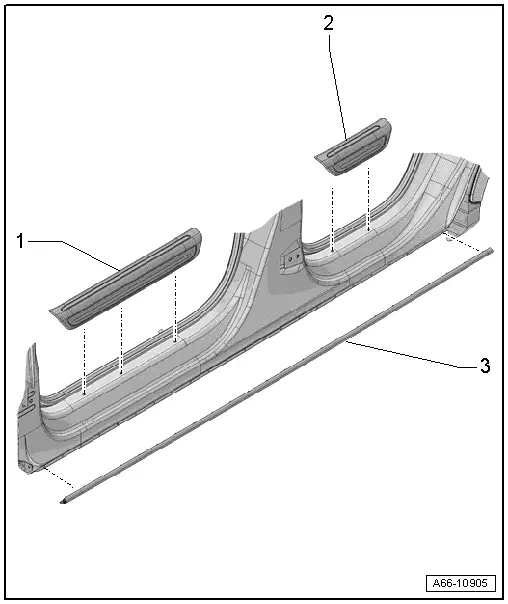
1 - Front Sill Panel Trim
- There are different versions. Refer to the Parts Catalog.
- Removing and installing. Refer to → Chapter "Sill Panel Trim, Removing and Installing".
2 - Rear Sill Panel Trim
- There are different versions. Refer to the Parts Catalog.
- Removing and installing. Refer to → Chapter "Sill Panel Trim, Removing and Installing".
3 - Sill Panel Trim
- Removing and installing. Refer to → Chapter "Sill Panel Trim, Removing and Installing".
Overview - B-Pillar Trim
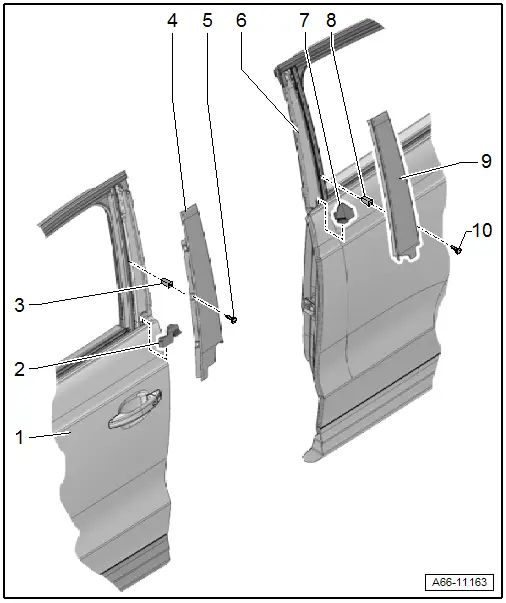
1 - Front Door
2 - Sealing Piece
- For the B-pillar front door trim
3 - Clip Nut
- Quantity: 3
4 - Front Door B-Pillar Trim
- Removing and installing. Refer to → Chapter "Front Door B-Pillar Trim, Removing and Installing".
5 - Bolt
- 2.5 Nm
- Quantity: 3
6 - Rear Door
7 - Sealing Piece
- For the B-pillar rear door trim
8 - Clip Nut
- Quantity: 3
9 - Rear Door B-pillar Trim
- Removing and installing. Refer to → Chapter "Rear Door B-Pillar Trim, Removing and Installing".
10 - Bolt
- 2.5 Nm
- Quantity: 3
Overview - C-Pillar Trim
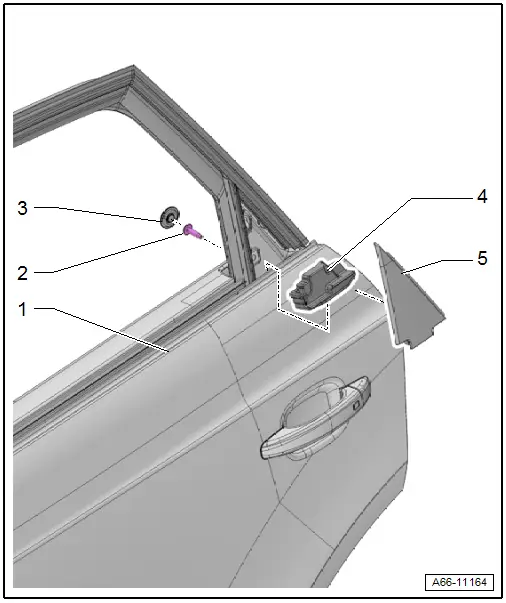
1 - Rear Door
2 - Bolt
- 2.5 Nm
3 - Grommet
4 - Sealing Piece
- For the c-pillar door trim
5 - C-pillar Door Trim
- Removing and installing. Refer to → Chapter "C-Pillar Door Trim, Removing and Installing".
Overview - Wheel Covers
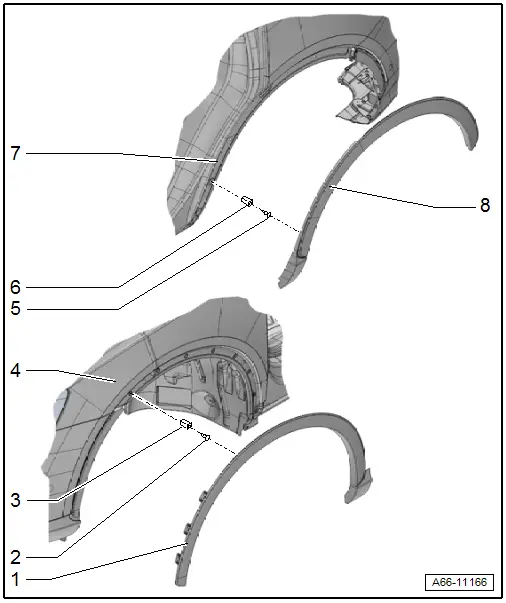
1 - Front Wheel Cover
 Caution
- In the area of the fender the protective film cannot be removed from the two-sided adhesive tape.
- The wheel cover is only glued to the bumper cover.
- Removing and installing. Refer to → Chapter "Front Wheel Cover, Removing and Installing".
2 - Clip
- Quantity: 9
3 - Grommet
- For the clip
4 - Fender
5 - Clip
- Quantity: 3
6 - Grommet
- For the clip
7 - Rear Side Panel
8 - Rear Wheel Cover
 Caution
- In the area of the side panel the protective film cannot be removed from the two-sided adhesive tape.
- The wheel cover is only glued to the bumper cover.
- Removing and installing. Refer to → Chapter "Rear Wheel Cover, Removing and Installing".
Overview - Heat Shield
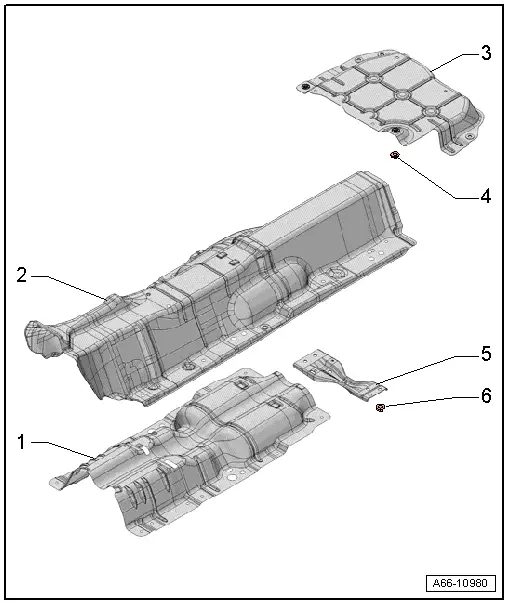
1 - Heat Shield
- For the driveshaft
- Removing and installing. Refer to → Chapter "Floor Heat Shield, Removing and Installing".
2 - Heat Shield
- For the center of the tunnel
- Removing and installing. Refer to → Chapter "Floor Heat Shield, Removing and Installing".
3 - Heat Shield
- For the rear muffler
- There are different versions. Refer to the Parts Catalog.
- Removing and installing. Refer to → Chapter "Floor Heat Shield, Removing and Installing".
4 - Lock Washer
- Quantity: 2
5 - Crossbrace
- Removing and installing. Refer to → Chapter "Tunnel Bridge, Removing and Installing".
6 - Nut
- 23 Nm
- Quantity: 4
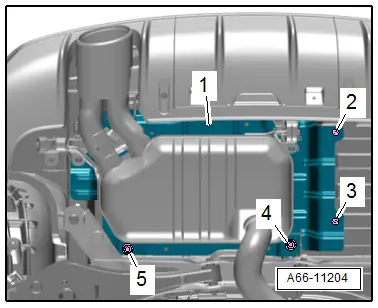
Heat shield tightening specification for rear muffler, Audi RS Q3
- Tighten bolts -2 and 3- to 2 Nm.
READ NEXT:
 Trim Molding, Removing and Installing
Special tools and workshop equipment
required
Wedge Set -T10383-
Removing
Note
Do not twist or bend the side window trim molding.
- Removing the roof trim molding. Refer to
Wheel Cover, Removing and Installing
Front Wheel Cover, Removing and Installing
Special tools and workshop equipment
required
Hot Air Blower VAG1416 -VAG1416-
Wedge Set -T10383-
Cleaning Solution -D 009 401 04-
Removing
-&
Floor Heat Shield, Removing and Installing
Center Tunnel Heat Shield, Removing and Installing
Removing
- Remove the left and right underbody cover. Refer to
→ Chapter "Underbody Panels, Removing and Installing".
- Remove t
SEE MORE:
Rear seats
General information
WARNING
To reduce the risk of an accident, only adjust
the seat when the vehicle is stationary.
Be careful when adjusting the seat. Unsupervised
or careless seat adjustment could
cause parts of the body to get pinched,
which increases the risk of injury.
Always pull forwa
Front Pull Handle, Removing and Installing
Front Pull Handle, Removing and Installing
Removing
- Remove the armrest. Refer to
→ Chapter "Front Armrest, Removing and Installing".
- Disconnect the connector for the window regulator control
head.
- Driver side: disconnect the connector for the Mirror
Adjusting Sw
