Audi Q3: Front Pull Handle, Removing and Installing
Front Pull Handle, Removing and Installing
Removing
- Remove the armrest. Refer to → Chapter "Front Armrest, Removing and Installing".
- Disconnect the connector for the window regulator control head.
- Driver side: disconnect the connector for the Mirror Adjusting Switch -E43-.
- Versions with ambient lighting: disconnect the connector for the driver/front passenger door ambient lighting bulb -L164-/-L165-.
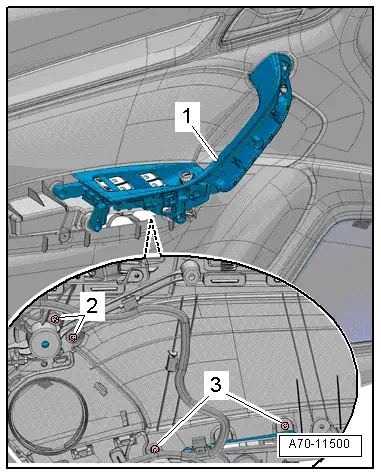
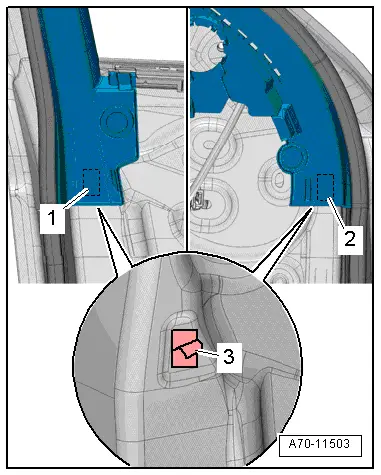
- Remove the bolts -2- and -3- from the rear of the door trim.
- Remove the pull handle -1- from the door panel.
Installing
Install in reverse order of removal.
Installation notes, for example tightening specifications, replacing components. Refer to → Chapter "Overview - Front Door Trim Panel".
Pull Handle Grip Recess, Removing and Installing
Special tools and workshop equipment required
- Wedge Set -T10383-
Removing
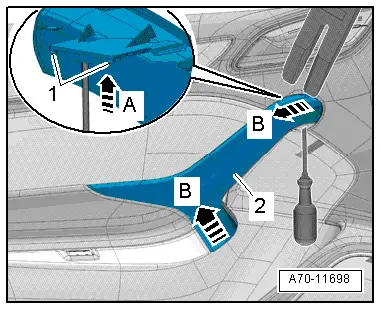
- Push a screwdriver through the opening in the pull handle and push the grip recess tabs upward -arrow A-. The retaining tabs -1- are released from this.
- Carefully pry the pull handle grip recess -2- with the Wedge -T10383/1- along the pull handle seam -B arrows-.
- Disengage the rear pull handle grip recess and remove.
Installing
Install in reverse order of removal.
Installation notes, for example tightening specifications, replacing components. Refer to → Chapter "Overview - Front Door Trim Panel".
Interior Door Mechanism, Removing and Installing
Removing
- Remove the front door trim panel. Refer to → Chapter "Front Door Trim Panel, Removing and Installing".
- Disconnect and free up the connectors and wire.
- Remove the bolts -1--2- from the rear of the door trim.
- Remove the interior door mechanism -3- from the door trim -arrow-, to do this release the catches -A-.
Installing
Install in reverse order of removal.
Installation notes, for example tightening specifications, replacing components. Refer to → Chapter "Overview - Front Door Trim Panel".

Window Frame Trim, Removing and Installing
Special tools and workshop equipment required
- Trim Removal Wedge -3409-
Removing
- Lower the door window.
- Remove the front door trim panel. Refer to → Chapter "Front Door Trim Panel, Removing and Installing".
- Remove the treble speaker trim. Refer to → Chapter "Treble Speaker Trim, Removing and Installing".
- Versions with lane change assistance: unclip and free up the Lane Change Assistance Button -E530- wires.
- Versions with treble speaker: remove the treble speaker and free up the wire.
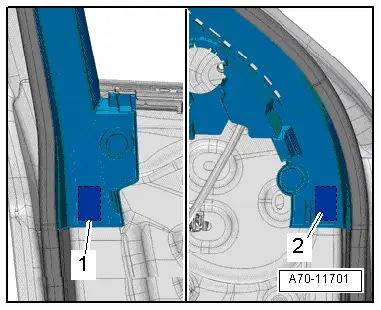
- Loosen the trim on the ends from the adhesive pads -1- and -2- from the door frame, using the Trim Removal Wedge -3409-.
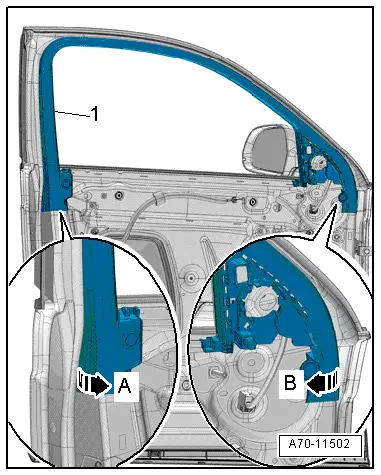
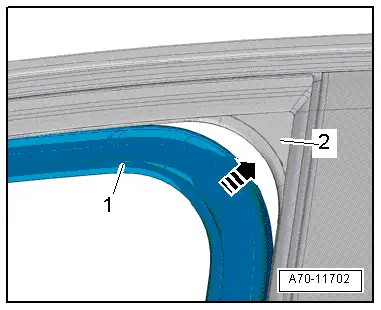
- Carefully pry off window frame trim -1- using the Trim Removal Wedge -3409- from the lower front along the length of the window guide to the upper rear -arrow B-.
- Then, carefully pry off the window frame trim at the lower rear using the Trim Removal Wedge -3409- along the length of the window guide -arrow B-.
- Pull down the window frame trim from the window frame and remove.
Installing
- Insert window frame trim -1- at upper rear in the window guide -2--arrow-.
- Install window frame trim along the entire length of the window guide.
- Attach the adhesive pads -1- and -2- on the door frame and press on door frame.
- Remove the protective film -3- from the adhesive pads.
- Push on the trim panel in the area of the adhesive pads.
Install in reverse order of removal.
Installation notes, for example tightening specifications, replacing components. Refer to → Chapter "Overview - Front Door Trim Panel".
READ NEXT:
 Overview - Rear Door Trim Panel
1 - Pull Handle
With switch mount
Removing and installing. Refer to
→ Chapter "Rear Pull Handle, Removing and Installing".
2 - Left Rear Entry Lamp -W33-
Ri
Interior Door Mechanism, Removing and Installing
Removing
- Remove the rear door trim panel. Refer to
→ Chapter "Rear Door Trim Panel, Removing and Installing".
- Remove insulation mat.
- Disconnect and free up the connecto
Component Location Overview - Instrument Panel
1 - Center Console
Overview. Refer to
→ Chapter "Overview - Center Console".
2 - Driver Side Instrument Panel Cover
Overview. Refer to
→ Chapter "Ove
SEE MORE:
Tires, Mounting, Run-Flat Tires
Caution
It is mandatory for run-flat tires to have a tire
pressure monitoring system in the vehicle.
- Coat rim flanges, tire beads and inside of upper tire beads
thoroughly with tire mounting paste.
WARNING
The minimum mounting temperature for a tire may not
be be
Heating, Ventilation
Component Location Overview - Heating
Component Location Overview - Components Outside of Passenger
Compartment
Note
At the start of production, only one Air Conditioning (A/C)
system was offered for the Audi Q3.
From MY 2014 as a running change, a heater without an A/C
system
