Audi Q3: Trim Molding, Removing and Installing
Special tools and workshop equipment required
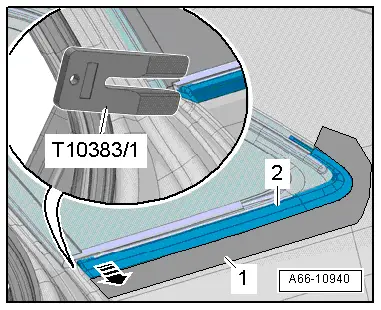
- Wedge Set -T10383-
Removing
 Note
Note
Do not twist or bend the side window trim molding.
- Removing the roof trim molding. Refer to → Chapter "Roof Trim Molding, Removing and Installing".
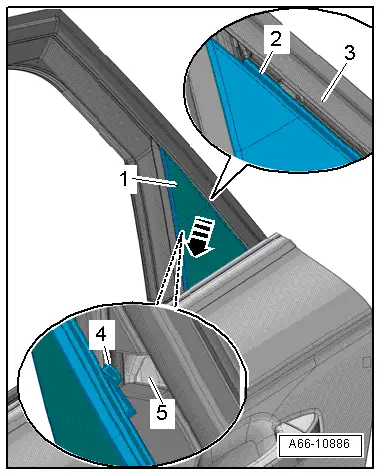
- Tape off the area around the side window trim molding -2- with adhesive tape -1- as shown to protect the paint.
- Press off the side window decorate trim using the Wedge -T10383/1- from the clips.
- Remove the side window trim molding.
Installing
Install in reverse order of removal. Note the following:
- Coat the rubber strips and the side window trim molding with tire mounting paste.
 Caution
Danger of causing damage to the rubber strip.
- If the rubber strip is not behind the trim molding, then it will get damage the next time the trim molding is removed.
- A damaged rubber strip must be replaced, Replacing the side window.
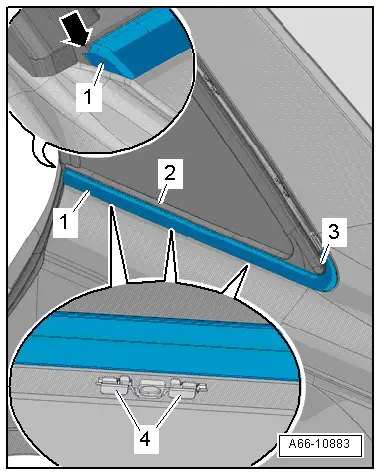
- Mount the side window trim molding -1- to the body at the C-pillar at the corner -arrow- of the rubber strip as illustrated.
- The rubber strip -2- must be above the trim molding.
- The clips -4- must be parallel to the side window trim molding.
- Press the side window trim molding onto the clips until it clicks into place.
- The rubber strip must cover the side window trim molding.
- The rubber strip -3- must be installed into the curve in the side window trim molding using Wedge -T10383/1-.
- Install the roof trim molding. Refer to → Chapter "Roof Trim Molding, Removing and Installing".
Sill Panel Trim, Removing and Installing
Special tools and workshop equipment required
- Trim Removal Wedge -3409-
- Hot Air Blower VAG1416 -VAG1416-
- Cleaning Solution -D 009 401 04-
Removing
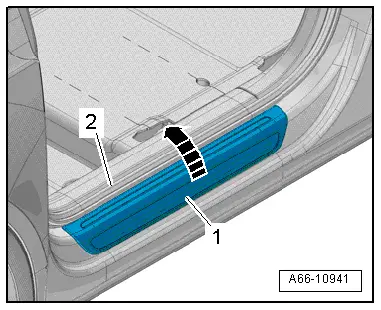
- Carefully warm the sill panel trim -1- using the Hot Air Blower -VAS1978/14A-.
- Carefully pry off the sill panel trim -2- using the Trim Removal Wedge -3409--arrow-.
Installing
Install in reverse order of removal. Note the following:
- Clean the adhesive surface on the vehicle body with Cleaning Solution -D 009 401 04-.
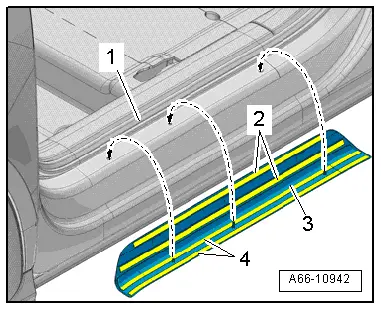
- Remove the protective film from the adhesive tape -2 and 4-.
- Place the sill panel strip -3- on the sill panel -1- by pressing the locating pins in the mounts -arrows-.
- Press the sill panel strip onto the sill panel strip over the entire length.
- Resting time approximately two hours at room temperature
Drip Rail, Removing and Installing
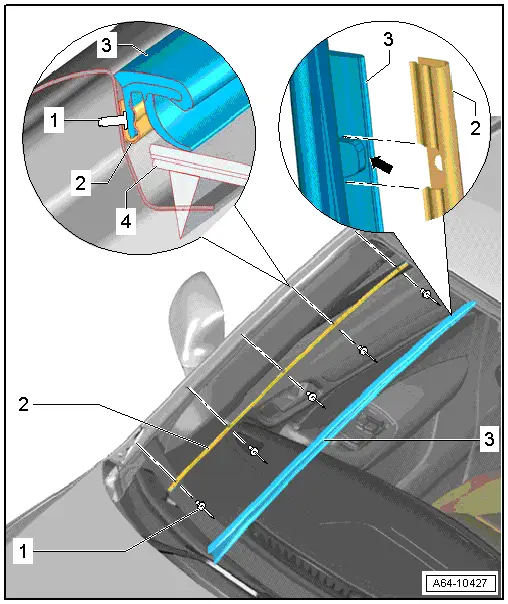
1 - Blind Rivet
- Quantity: 5
- Rivet the guide rails beginning at the top.
2 - Clamping Strip
- To remove, drill out rivet heads and drive out rivet shafts.
3 - Drip Rail
- Push the upper drip rail in the guide rail starting from the securing lobe -arrow- downward continuing until stop.
- Check for flushness at the transition to the "A-pillar".
4 - Windshield
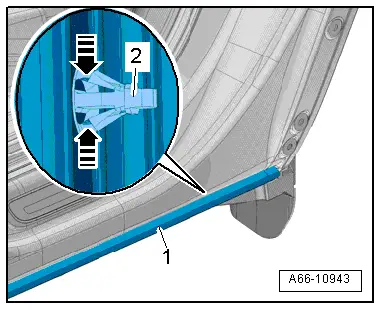
Sill Panel Trim, Removing and Installing
Removing
- Oren the doors.
- Loosen the rear wheel cover in the area of the sill panel trim. Refer to → Chapter "Rear Wheel Cover, Removing and Installing".
- Release the retaining tabs -arrows- on the clip -2- with a narrow screwdriver and remove the sill panel trim -1-.
Installing
Install in reverse order of removal. Note the following:
- Clean the contact surface in the sill panel trim area. Contact surfaces must be free of wax and grease.
- Place the sill panel trim on the body and push in until it engages audibly.
- Install the rear wheel cover. Refer to → Chapter "Rear Wheel Cover, Removing and Installing".
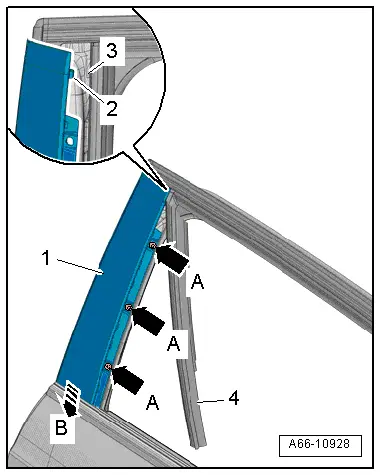
B-Pillar Door Trim, Removing and Installing
Front Door B-Pillar Trim, Removing and Installing
Removing
- Lower the door window.
- Remove the window frame trim panel. Refer to → Body Interior; Rep. Gr.70; Front Door Trim; Window Frame Trim Removing and Installing.
- Remove the seal -1- in the area of the B-pillar trim from the rear window guide.
- Remove the bolts -A arrows-.
- Push the B-pillar trim -4- downward -arrow B-. While doing this, the tab -3- will disengage from the body opening -2-.
- Push the B-pillar trim to the outside until it disengages.
- Remove the B-pillar trim upward from the door opening.
Installing
Install in reverse order of removal. Note the following:
- Install the window guide seal. Refer to → Chapter "Window Guide, Removing and Installing".
- Install the window frame trim panel. Refer to → Body Interior; Rep. Gr.70; Front Door Trim; Window Frame Trim Removing and Installing.

Rear Door B-Pillar Trim, Removing and Installing
Removing
- Remove the rear door window. Refer to → Chapter "Rear Door Window, Removing and Installing".
- Remove the seal -4- in the area of the B-pillar trim from the front window guide.
- Remove the bolts -A arrows-.
- Push the B-pillar trim -1- downward -arrow B-. While doing this, the tab -2- will disengage from the opening in the body -3-.
- Push the B-pillar trim to the outside until it disengages.
- Remove the B-pillar trim upward from the door opening.
Installing
Install in reverse order of removal. Note the following:
- Install the rear door window. Refer to → Chapter "Rear Door Window, Removing and Installing".
C-Pillar Door Trim, Removing and Installing
Removing
- Move the window into the "open" position.
- Remove the window frame trim panel. Refer to → Body Interior; Rep. Gr.70; Front Door Trim; Window Frame Trim Removing and Installing.
- Pry out the grommet -1-.
- Remove the bolt -2-.
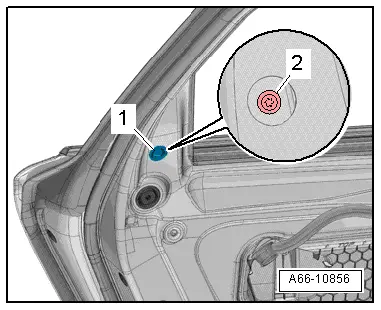
- Push the C-pillar door trim -1- downward -arrow-. While doing this, the tab -2- will disengage from the window seal -3- and the pin -4- will disengage from the body -5-.
- Remove the C-pillar door trim upward and out of the door opening.
Installing
Install in reverse order of removal. Note the following:
- Install the window frame trim panel. Refer to → Body Interior; Rep. Gr.70; Front Door Trim; Window Frame Trim Removing and Installing.
READ NEXT:
 Wheel Cover, Removing and Installing
Front Wheel Cover, Removing and Installing
Special tools and workshop equipment
required
Hot Air Blower VAG1416 -VAG1416-
Wedge Set -T10383-
Cleaning Solution -D 009 401 04-
Removing
-&
Floor Heat Shield, Removing and Installing
Center Tunnel Heat Shield, Removing and Installing
Removing
- Remove the left and right underbody cover. Refer to
→ Chapter "Underbody Panels, Removing and Installing".
- Remove t
Noise Insulation
Overview - Noise Insulation
1 - Bolt
2.5 Nm
Quantity: 3
2 - Front Noise Insulation
For the engine
Removing and installing. Refer to
→ Chapter "Noise Insu
SEE MORE:
General, Technical data
Identification
Brake PR Numbers
The PR number on the vehicle data label describes which
brake system is installed in the vehicle.
Example of a Vehicle Data Sticker:
A - Front Brakes (example)
B - Rear Brakes (example)
Allocation, refer to the Parts Catalog.
The table
Special Tools
Special tools and workshop equipment required
Bearing Installer - Wheel Hub/Bearing Kit -T10205-
Torque Wrench 1332 40-200Nm -VAG1332-
Hydraulic Press -VAS6178-
Pneumatic/Hydraulic Foot Pump -VAS6179-
Hydraulic Press - Bushing Tool Kit -VAS6779-
Shock Absorber Set -T10001-
