Audi Q3: Noise Insulation
Audi Q3 (8U) 2011-2018 Service Manual / Body / Body Exterior / Exterior Equipment / Noise Insulation
Overview - Noise Insulation
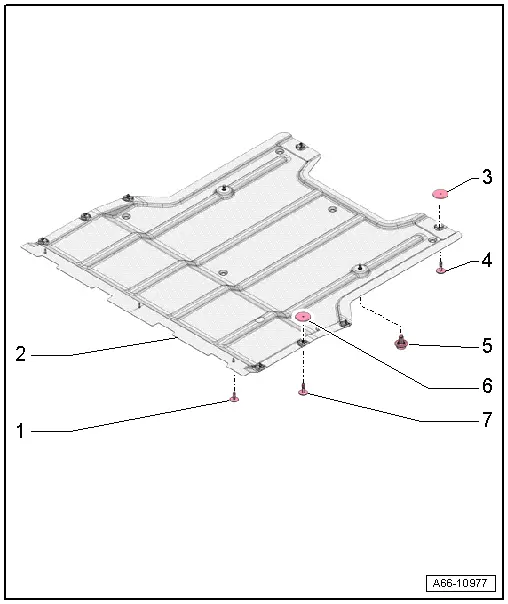
1 - Bolt
- 2.5 Nm
- Quantity: 3
2 - Front Noise Insulation
- For the engine
- Removing and installing. Refer to → Chapter "Noise Insulation, Removing and Installing".
3 - Rubber Washer
- Quantity: 2
4 - Quick Release
- Quantity: 2
5 - M8 bolt
- 6 Nm
- Through MY 2014: quantity - 2
- From MY 2015: quantity - 3
6 - Rubber Washer
- Quantity: 6
7 - Quick Release
- Quantity: 6
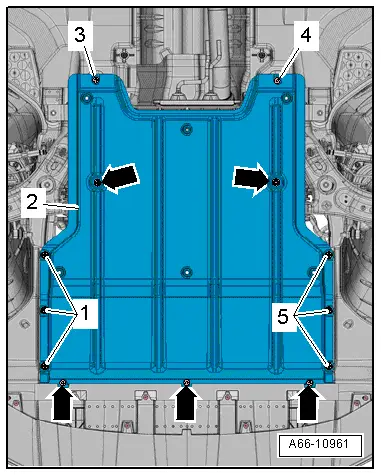
Noise Insulation, Removing and Installing
Removing
- Remove the bolts -arrows- and quick-release fasteners -1, 3, 4, 5-.
- Remove the front noise insulation -2- to the rear.
- The guide tabs for the front noise insulation will disengage while doing this.
- Remove the front noise insulation.
Installing
Install in reverse order of removal.
READ NEXT:
 Underbody Panel
Overview - Underbody Panels
1 - Nut
2 Nm
Quantity: 11
2 - Spring Nut
For the quick release
3 - Underbody Panel
Removing and installing. Refer to
Roof Bars/Roof Rails
Overview - Roof Railing
1 - Nut
Quantity: 4
Install with locking compound. For the correct locking compound,
refer to the Parts Catalog.
Tightening sequence. Refer to
→
Roof Railing, Removing and Installing
Roof Railing, Removing and Installing
WARNING
Follow all Safety Precautions when working with
pyrotechnic components. Refer to
→ Body Interior; Rep. Gr.00; Safety Prec
SEE MORE:
Ground Cable with Battery Monitoring Control Module -J367-, Removing and
Installing
Ground Cable with Battery Monitoring Control Module -J367-, Removing and
Installing, Engine Compartment Battery Version 1
Removing
- Turn off the ignition.
- Vehicles with ignition lock: Remove the key.
- Push the release button -1- and
pivot the battery cover -2- upwards
at
Online media
Applies to: vehicles with Audi connect Infotainment and online
media
You can play and operate various online media
services, such as music streaming services, using
the MMI.
Requirement: a supported online media service
must be available in the country where the vehicle
is being operated. you must
© 2019-2025 Copyright www.auq3.net
