Audi Q3: Roof Railing, Removing and Installing
Roof Railing, Removing and Installing
 WARNING
Follow all Safety Precautions when working with pyrotechnic components. Refer to → Body Interior; Rep. Gr.00; Safety Precautions; when working with Pyrotechnic Components.
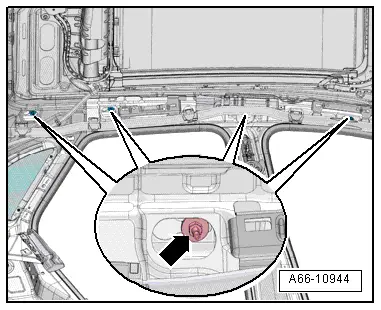
Removing
- Lower the headliner. Refer to → Body Interior; Rep. Gr.70; Roof trim; Headliner, removing and installing.
- Remove the nuts -arrow-.
- Remove the roof rail upward.
Installing
Install in reverse order of removal. Note the following:
 Note
Note
- Clean the threaded pin threads on the roof rail with a wire brush.
- Carefully clean the threads of the nuts that are coating with locking fluid free of locking fluid residue using a thread cutter. Otherwise, the threaded pins could lock up when installed and shear off when removed again.
- Install the roof rail with the guide pins in the mount on the vehicle roof.
- Install the nuts with locking fluid and tighten. Refer to → Fig. "Roof Rail - Tightening Specification and Sequence".
- Install the headliner. Refer to → Body Interior; Rep. Gr.70; Roof trim; Headliner, removing and installing.
Balancing Element, Removing and Installing
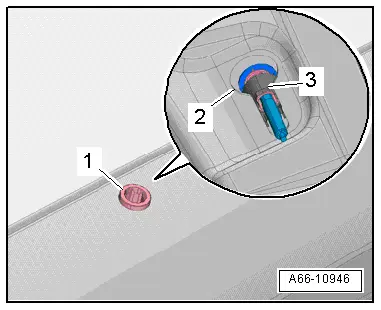
Removing
- Remove the roof rail. Refer to → Chapter "Roof Railing, Removing and Installing".
- Press the adjusting screw -1- in the balancing element -3-.
- Slide the balancing element and remove inward from roof cutout -2-.
Installing
Install in reverse order of removal. Note the following:
 Note
Note
- Use a wire brush to clean the threads of bolts that were screwed in with locking compound.
- All threaded bores in which bolts with locking fluid were installed must be carefully cleaned of remaining locking fluid using a thread cutter. If the holes are not cleaned, then the bolts could break off the next time they are removed.
- Replace a damaged gasket.
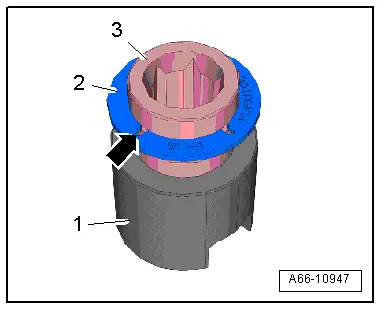
- Check the seal -2- for damage.
- The seal most sit in the groove -arrow-.
- Install the adjustment screw -3- with locking fluid in the balancing element -1-, place in the roof cut out and secure.
- Install the roof rail. Refer to → Chapter "Roof Railing, Removing and Installing".
Roof Trim Molding, Removing and Installing
Special tools and workshop equipment required
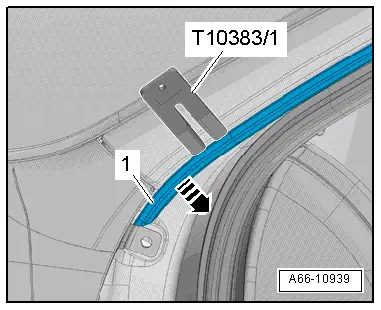
- Wedge Set -T10383-
Removing
 Note
Note
- Do not bend the roof trim molding.
- Tape around the roof trim molding on the A-pillar to prevent damaging the paint.
- Open the front and rear doors.
- Using the Wedge -T10383/1- pry up the roof trim molding -1- beginning at the A-pillar from the clips -arrows-.
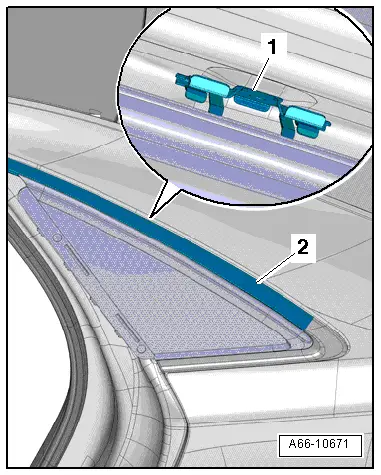
- Remove the roof trim molding from the clips -1- in the area around the rear side window -2-.
- Have a second technician hold the roof trim molding to keep it from damaging the paint.
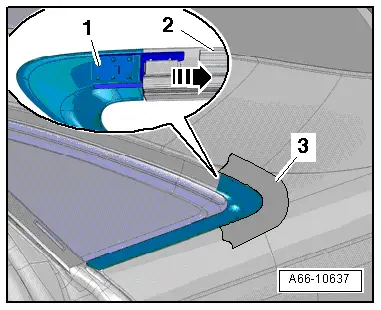
- Tape off the area around the side window trim molding -1- with adhesive tape, as illustrated, -3- to protect the paint.
- Pull the roof trim molding -2- out of the clips -1- in the side window in direction of -arrow-.
- Remove the roof trim molding.
Installing
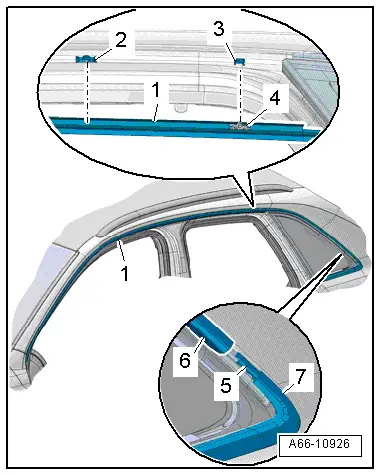
- Install the roof trim molding -1- into the side window trim molding -7-.
- The clamp -5- must fit correctly into the guide -6-.
- The roof trim molding be touching the end of the side window trim molding.
- Place the roof trim molding with the alignment pins -4- in the clip mount -3- in the vehicle roof.
- Push the roof trim molding in the area of the side window in the clamps and clips -2- until it engages audibly.
READ NEXT:
 Exterior Rearview Mirror
Overview - Exterior Rearview Mirror
1 - Bolt
1 Nm
2 - Mirror Adjusting Unit
Removing and installing. Refer to
→ Chapter "Mirror Adjusting Unit, Removing and
Wheel Housing Liner
Overview - Front Wheel Housing Liner
1 - Front Wheel Spoiler
Removing and installing. Refer to
→ Chapter "Front Wheel Spoiler, Removing and Installing".
2 - Bolt
Name Badges and Emblems
Overview - Name Badges and Emblems
Overview - Name Badges and Emblems, Vehicles through MY 2014
1 - Audi Rings
Removing and installing. Refer to
→ Chapter "Front Emblem, RemSEE MORE:
Snow chains
Snow chains improve both driving and braking in
winter road conditions.
Only install snow chains on the front wheels.
Check and correct the seating of the snow
chains after driving a few feet, if necessary. Follow
the instructions from the manufacturer.
Note the maximum speed of 30 mph
(50 km
Overview - Antenna Systems
The antenna system consists of the Roof Antenna -R216- and
the window antenna.
Roof Antenna -R216-
GPS Antenna -R50-, only on 7T2, 7T6 and 7Q4
Telephone Antenna -R65-, only on 9ZF and 9ZW
Satellite Antenna -R170-, only North America and QV8
Auxiliary Heater Antenna -R182-, only Europe a