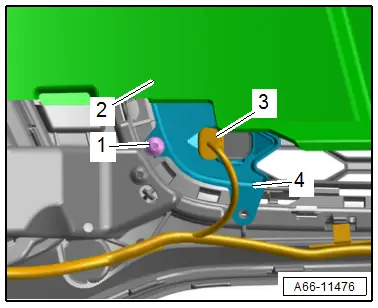
Audi Q3: Radiator Grille, Removing and Installing
Radiator Grille, Removing and Installing, Audi Q3 through MY 2014
Removing
- Remove the bumper cover. Refer to → Chapter "Bumper Cover, Removing and Installing".
- Remove the bumper cover outer panel. Refer to → Chapter "Bumper Cover Outer Panel, Removing and Installing, Audi Q3".
- If the radiator grille is replaced:
- Remove the reinforcement brace. Refer to → Chapter "Reinforcement Brace, Removing and Installing, Version 1".
- quattro-name badge removing. Refer to → Chapter "Name Badges, Removing and Installing".
- Remove parking aid sensor mounts. Refer to → Chapter "Front Parking Aid Sensor Mount, Removing and Installing".
- Removing the Audi-rings. Refer to → Chapter "Front Emblem, Removing and Installing".
Installing
Install in reverse order of removal. Note the following:
- Install the bumper cover outer panel. Refer to → Chapter "Bumper Cover Outer Panel, Removing and Installing, Audi Q3".
Radiator Grille, Removing and Installing, Audi Q3 Offroad/S-line
Removing
- Remove the center grill:
- Audi Q3 Offroad. Refer to → Chapter "Center Grille. Removing and Installing, Audi Q3 Offroad".
- Audi Q3 S-line. Refer to → Chapter "Center Grille, Removing and Installing, Audi Q3 S Line through MY 2014".
- Remove the molded foam part. Refer to → Chapter "Molded Foam Part, Removing and Installing, Audi Q3 through MY 2014".
- Disconnect the connector -2- and free up the wiring harness -1-.
- Remove the bolts -arrows-.
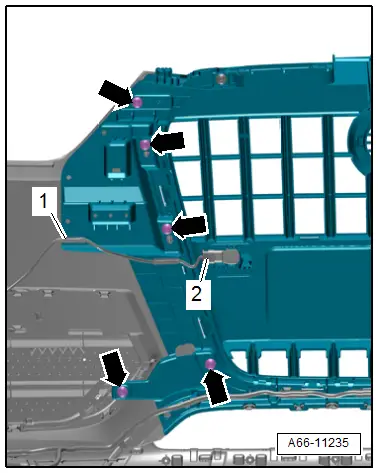
- Release the catches -1, 2 and 3- and remove the radiator grille -4- rearward.
Installing
Install in reverse order of removal. Note the following:
- Install the center grille:
- Audi Q3 Offroad. Refer to → Chapter "Center Grille. Removing and Installing, Audi Q3 Offroad".
- Audi Q3 S-line. Refer to → Chapter "Center Grille, Removing and Installing, Audi Q3 S Line through MY 2014".
- Install the molded foam part. Refer to → Chapter "Molded Foam Part, Removing and Installing, Audi Q3 through MY 2014".
Radiator Grille, Removing and Installing, Vehicles from MY 2015
Removing
- Remove the center grille. Audi Q3: Refer to → Chapter "Center Grille, Removing and Installing, Audi Q3 from MY 2015". Audi RS Q3: Refer to → Chapter "Lower Center Grille, Removing and Installing, Audi RS Q3".
- Remove the reinforcement brace. Refer to → Chapter "Reinforcement Brace, Removing and Installing, Version 2".
- Disconnect the connector from the front parking aid sensor and free up the wiring harness.
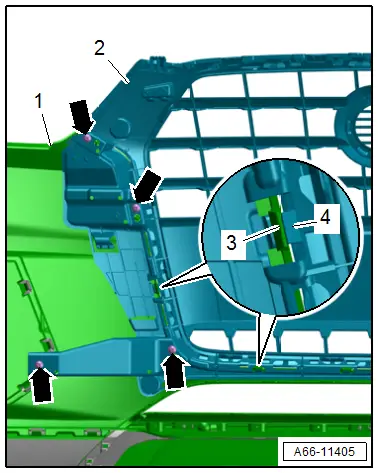
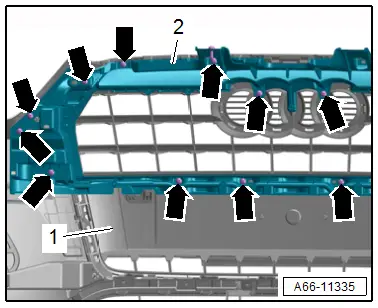
- Remove the bolts -arrows-.
- Lift the securing tab -4- and release the tab -3-.
- Remove radiator grille -2- towards the rear from the bumper cover -1-.
Installing
Install in reverse order of removal.
Radiator Grille, Removing and Installing, Audi RS Q3 through MY 2014
Removing
- Remove the upper bolts from the grille center. Refer to → Chapter "Lower Center Grille, Removing and Installing, Audi RS Q3".
- Remove the front parking aid sensor mount and free up the wiring harness. Refer to → Chapter "Front Parking Aid Sensor Mount, Removing and Installing, Audi RS Q3 through MY 2014".
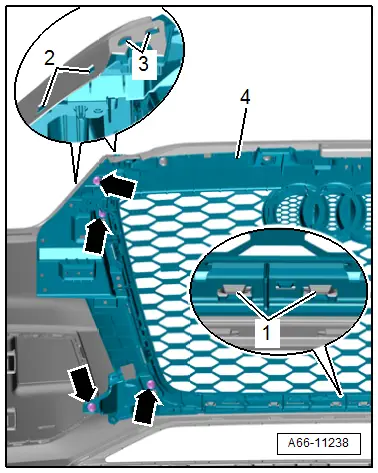
- Remove the screws -arrows-.
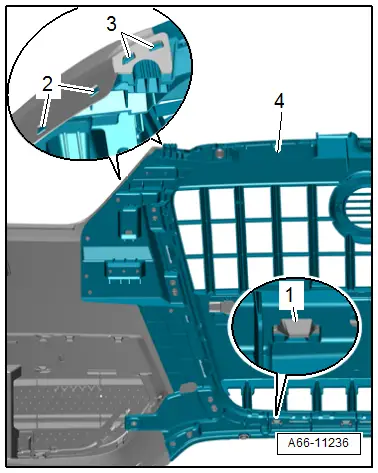
- Release the catches -1, 2 and 3- and remove the radiator grille -4- rearward.
Installing
Install in reverse order of removal. Note the following:
- Install the front parking aid sensor mount. Refer to → Chapter "Front Parking Aid Sensor Mount, Removing and Installing, Audi RS Q3 through MY 2014".
- Install the radiator grille. Refer to → Chapter "Lower Center Grille, Removing and Installing, Audi RS Q3".
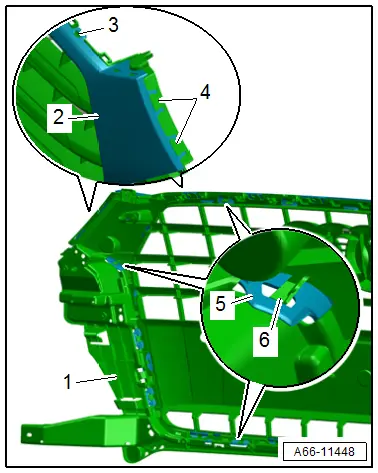
Radiator Grille Decorative Frame, Removing and Installing, Vehicles from MY 2015
Removing
- Remove the radiator grille. Refer to → Chapter "Radiator Grille, Removing and Installing, Vehicles from MY 2015".
- Release the securing tab -3- and the tabs -4-.
- Lift the securing tab -6- and release the tab -5-.
- Remove the decorative frame -2- forward from the radiator grille -1-.
Installing
Install in reverse order of removal.
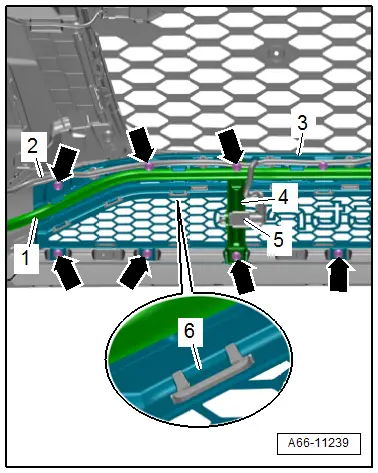
Lower Center Grille, Removing and Installing, Audi RS Q3
Removing
- Remove the bumper cover. Refer to → Chapter "Bumper Cover, Removing and Installing".
- Remove the front bumper cover end plate. Refer to → Chapter "Front Bumper Cover End Plate, Removing and Installing".
- If equipped, free up the washer fluid hose -1-.
- Disconnect the connector -5- and free up the wiring harness -2-.
- Remove the bolts -arrows-.
- Remove the reinforcement brace -4-.
- Release the retainers -6- and remove the center grille -4- to the rear.
Installing
Install in reverse order of removal. Note the following:
- Install the bumper cover. Refer to → Chapter "Bumper Cover, Removing and Installing".
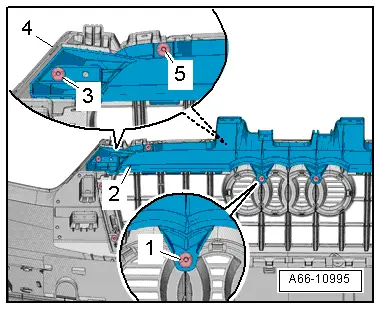
Reinforcement Brace, Removing and Installing, Version 1
Removing
- Remove the front bumper cover. Refer to → Chapter "Bumper Cover, Removing and Installing".
- Remove the screws -1, 3 and 5-.
- Remove the reinforcement brace -2- from the bumper cover -4-.
Installing
Install in reverse order of removal. Note the following:
- Install the front bumper cover. Refer to → Chapter "Bumper Cover, Removing and Installing".
Reinforcement Brace, Removing and Installing, Version 2
Removing
- Remove the molded foam part. Refer to → Chapter "Molded Foam Part, Removing and Installing, Audi Q3 through MY 2014".
- Remove the bolts -arrows-.
- Remove the reinforcement brace -2- from the radiator grille -1-.
Installing
Install in reverse order of removal. Note the following:
- Install the molded foam part. Refer to → Chapter "Molded Foam Part, Removing and Installing, Audi Q3 through MY 2014".
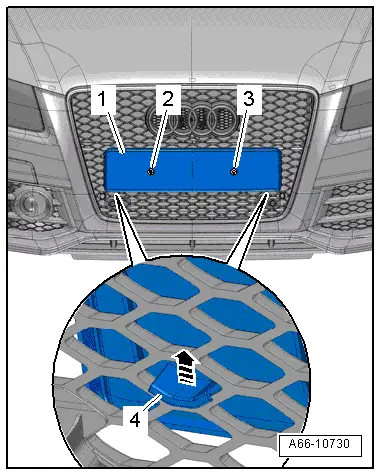
License Plate, Removing and Installing, Audi RS Q3
Removing
- Remove the license plate.
- Remove the bolts -2- and -3-.
- Detach license plate bracket -1- upward out of the honeycomb-structured grille -arrow- while detaching clips -4-.
- Remove the license plate bracket.
Installing
Install in reverse order of removal. Note the following:
- The license plate bracket must be fully inserted into the honeycomb-structured grille.
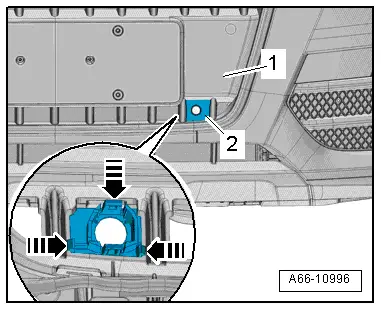
Front Parking Aid Sensor Mount, Removing and Installing
Removing
- Remove the front bumper cover end plate. Refer to → Chapter "Front Bumper Cover End Plate, Removing and Installing".
- Remove the front parking aid sensor. Refer to → Electrical Equipment; Rep. Gr.94; Overview - Parking Aid .
- Release the hooks -arrows- and remove the mount -2- for the parking aid sensor forward from the radiator grille -1-.
Installing
Install in reverse order of removal. Note the following:
- Install the front parking aid sensor. Refer to → Electrical Equipment; Rep. Gr.94; Overview - Parking Aid .
- Install the front bumper cover end plate. Refer to → Chapter "Front Bumper Cover End Plate, Removing and Installing".
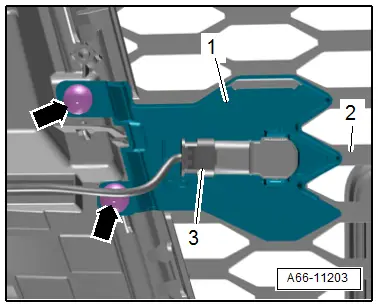
Front Parking Aid Sensor Mount, Removing and Installing, Audi RS Q3 through MY 2014
Removing
- Remove the molded foam part mount. Refer to → Chapter "Molded Foam Part, Removing and Installing, Audi RS Q3".
- Disconnect the connector -3-.
- Remove the bolts -arrows- and the mount -1- from the radiator grille -2-.
- If the mount is replaced, remove the parking aid sensor. Refer to → Electrical Equipment; Rep. Gr.94; Parking Aid, Front Parking Aid Sensor, Removing and Installing.
Installing
Install in reverse order of removal. Note the following:
- Install the molded foam part mount. Refer to → Chapter "Molded Foam Part, Removing and Installing, Audi RS Q3".
Front Parking Aid Sensor Mount, Removing and Installing, Audi RS Q3 from MY 2015
Removing
- Remove the lower center grille. Refer to → Chapter "Lower Center Grille, Removing and Installing, Audi RS Q3".
- Disconnect the connector -3-.
- Remove the bolt -1-.
- Lift the molded foam part mount -2- slightly and remove the parking aid sensor mount -4- downward from the radiator grille.
 Note
Note
If the mount cannot be removed as described, then the molded foam part mount needs to be removed. Refer to → Chapter "Molded Foam Part Mount, Removing and Installing, Audi RS Q3 from MY 2015".
- If the mount is replaced, remove the parking aid sensor. Refer to → Electrical Equipment; Rep. Gr.94; Parking Aid, Front Parking Aid Sensor, Removing and Installing.
Installing
Install in reverse order of removal.
