Audi Q3: Windshield Wiper Arms, Removing and Installing
Special tools and workshop equipment required
- Puller - Wiper Arm Kit -T10369-
Removing
 Note
Note
If the windshield wiper motor is to be run during the work procedure, the hood must be closed. Otherwise, the voltage supply of the wiper motor will be interrupted.
- Bring the windshield wiper into service position. Refer to → Chapter "Wiper, Moving Into Service Position".
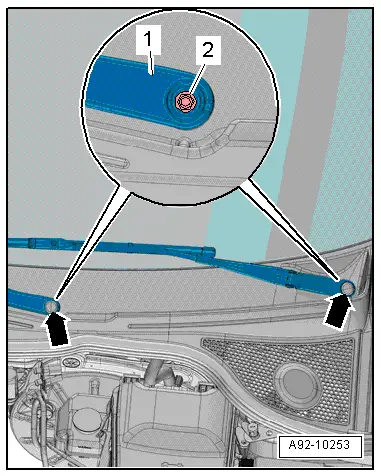
- Pry the caps -arrows- off of the windshield wiper arms -1- with a screwdriver.
- Loosen the nuts -2- a few turns.
- Position the Puller - Wiper Arm Kit - Puller 1 -T10369/1- on the wiper arm -1- as illustrated.
- Position the thrust piece -2- on the wiper axle.
- Rotate the bolt -3- clockwise until the wiper arm is removed from the axle.

- Remove the nuts and remove the wiper arm.
Installing
 Caution
There is a risk of damaging the body.
The driver and passenger side wiper arms are different lengths.
Install in reverse order of removal. Note the following:
- Adjust the windshield wiper arms. Refer to → Chapter "Windshield Wiper Arms, Adjusting".

Windshield Wiper Arms, Adjusting
Procedure
 Note
Note
If the windshield wiper motor is to be run during the work procedure, the hood must be closed. Otherwise, the voltage supply of the wiper motor will be interrupted.
- Remove the windshield wiper arms. Refer to → Chapter "Windshield Wiper Arms, Removing and Installing".
- Turn on the ignition.
- Activate "one-tap wiping" and let the wiper motor run into its end position.
 Note
Note
- Every second time the windshield wiper motor is switched off, it returns the wiper arms to a lower rest position, thus tipping the wiper blade lips the other way.
- To do so, the windshield wiper motor moves the wiper arms farther down than to rest position and then a bit up again. This lower rest position must not be used to adjust the wiper crank.
- Only use end position where wiper arms run directly into the end position with no understroke. Activate "One-touch wiping" again if necessary.
- Turn off the ignition.
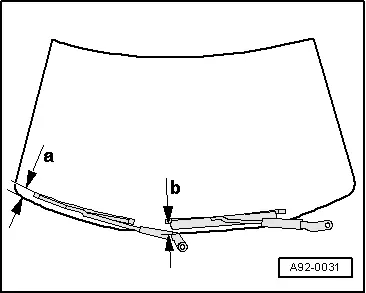
- Position wiper arm with wiper blade installed at wiper axle and align wiper blade at windshield as follows:
- Dimension -a- = 21 + 10 mm.
- Dimension -b- = 14 + 10 mm.
 Note
Note
The dimensions give the distance of the wiper blade tips to the cowl panel trim on the lower edge of the windshield.
- Tighten the nuts -2- on the windshield wiper arms -1-.
- Turn on the ignition.
- Activate "one-tap wiping" and let the windshield wiper arms run into their end position.
- Turn off the ignition.
- Check the position of the wiper arms one more time and adjust if necessary.
- Press the caps -arrows- onto the wiper arms.
Windshield Wiper Motor -V-, Removing and Installing
Removing
- Remove the windshield wiper arms. Refer to → Chapter "Windshield Wiper Arms, Removing and Installing".
- Remove the plenum chamber cover. Refer to → Body Exterior; Rep. Gr.50; Bulkhead; Plenum Chamber Cover, Removing and Installing.
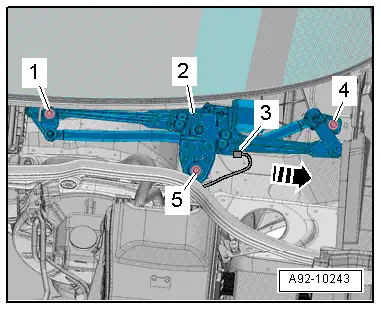
- Disconnect the connector -3-.
- Remove the bolts -1, 4 and 5-.
- Remove the wiper frame -2- with linkage and the wiper motor to the left from the plenum chamber in direction of -arrow-.
Installing
Install in reverse order of removal. Note the following:
- Install the windshield wiper motor and the windshield wiper frame.
- Tighten the bolts. Refer to → Fig. " Windshield Wiper Motor -V- - Tightening Specification and Sequence".
- Adjust the windshield wiper arms. Refer to → Chapter "Windshield Wiper Arms, Adjusting".
Windshield Wiper Motor, Replacing
Procedure
- If replacing the control module, select the "Replace Control Module" function Vehicle Diagnostic Tester.
READ NEXT:
 Rain/Light Recognition Sensor, Removing and Installing
Rain/Light Recognition Sensor -G397-, Removing and Installing
Special tools and workshop equipment
required
D 009 401 04 -Cleaning Solution-
Removing
- Turn off the ignition.
- V
Windshield Washer System
Overview - Windshield Washer System
Overview - Windshield Washer System, through MY 2014
1 - Washer Fluid Reservoir
Removing and installing. Refer to
→ Chapter "Windshield W
Rear Window Wiper System
Overview - Rear Window Washer System
1 - Water Hose
For the rear window washer system
2 - Nut
8 Nm
3 - Rear Window Wiper Motor -V12-
Removing and ins
SEE MORE:
Wheel Bearing Unit, Removing and Installing
Special tools and workshop equipment
required
Torque Wrench 1332 40-200Nm -VAG1332-
Removing
- Loosen the drive axle threaded connection on the wheel side.
Refer to
→ Chapter "Drive Axle Threaded Connection, Loosening and
Tightening".
- If installed, remove the nut
Securing child safety seats to the lower
LATCH anchors
Fig. 65 Rear bench seat: lower LATCH anchors
In the United States and Canada, child safety
seats can be secured without safety belts using
the LATCH system. LATCH stands for Lower Anchors
and Tethers for Children. In Canada, similar
systems are called UCRA, LUAS, or UAS.
The lower LATCH anchors in
