Audi Q3: Windshield Washer System
Overview - Windshield Washer System
Overview - Windshield Washer System, through MY 2014
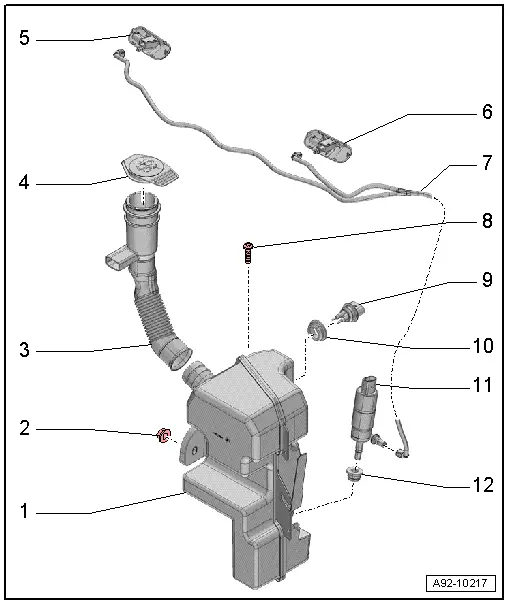
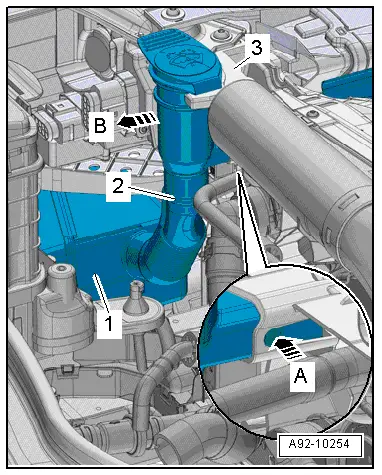
1 - Washer Fluid Reservoir
- Removing and installing. Refer to → Chapter "Windshield Washer Fluid Reservoir, Removing and Installing".
2 - Nut
- 8 Nm
- Quantity: 2
3 - Filler Tube
- For the washer fluid reservoir
- Removing and installing. Refer to → Chapter "Washer Fluid Reservoir Filler Tube, Removing and Installing".
4 - Cap
- For the filler neck
5 - Right Spray Nozzle
- Vehicle equipment version with Right Washer Nozzle Heater -Z21-
- Removing and installing. Refer to → Chapter "Spray Nozzles, Removing and Installing".
- Adjusting. Refer to → Chapter "Spray Nozzles, Adjusting".
6 - Left Spray Nozzle
- Vehicle equipment version with Left Washer Nozzle Heater -Z20-
- Removing and installing. Refer to → Chapter "Spray Nozzles, Removing and Installing".
- Adjusting. Refer to → Chapter "Spray Nozzles, Adjusting".
7 - Washer Fluid Hose
- For the headlamp washer system
8 - Bolt
- 8 Nm
9 - Windshield Washer Fluid Level Sensor -G33-
- Removing and installing. Refer to → Chapter "Windshield Washer Fluid Level Sensor, Removing and Installing".
10 - Grommet
- Replace if damaged.
11 - Windshield Washer Pump -V5-
- Removing and installing. Refer to → Chapter "Windshield Washer Pump, Removing and Installing".
12 - Grommet
- Replace if damaged.
Overview - Windshield Washer System, from MY 2015
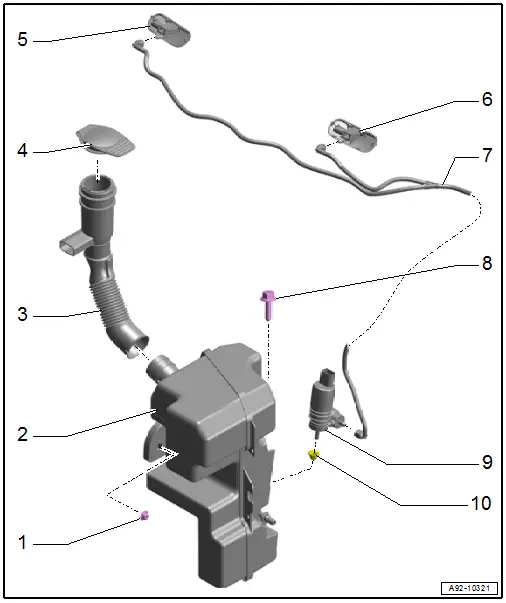
1 - Washer Fluid Reservoir
- With Windshield Washer Fluid Level Sensor -G33- Cannot be replaced separately if faulty.
- Removing and installing. Refer to → Chapter "Windshield Washer Fluid Reservoir, Removing and Installing".
2 - Nut
- 8 Nm
- Quantity: 2
3 - Filler Tube
- For the washer fluid reservoir
- Removing and installing. Refer to → Chapter "Washer Fluid Reservoir Filler Tube, Removing and Installing".
4 - Cap
- For the filler neck
5 - Right Spray Nozzle
- Vehicle equipment version with Right Washer Nozzle Heater -Z21-
- Removing and installing. Refer to → Chapter "Spray Nozzles, Removing and Installing".
- Adjusting. Refer to → Chapter "Spray Nozzles, Adjusting".
6 - Left Spray Nozzle
- Vehicle equipment version with Left Washer Nozzle Heater -Z20-
- Removing and installing. Refer to → Chapter "Spray Nozzles, Removing and Installing".
- Adjusting. Refer to → Chapter "Spray Nozzles, Adjusting".
7 - Washer Fluid Hose
- For the headlamp washer system
8 - Bolt
- 8 Nm
9 - Windshield Washer Pump -V5-
- Removing and installing. Refer to → Chapter "Windshield Washer Pump, Removing and Installing".
10 - Grommet
- Replace if damaged.
Windshield Washer Fluid Reservoir, Removing and Installing
Washer Fluid Reservoir, Removing and Installing
Special tools and workshop equipment required
- Drip tray
Removing
- Remove the washer fluid reservoir filler tube. Refer to → Chapter "Washer Fluid Reservoir Filler Tube, Removing and Installing".
- Vehicles through MY 2014: Remove the left fog lamp. Refer to → Chapter "Fog Lamp, Removing and Installing".
- Vehicles from MY 2015: Remove the headlamp housing. Refer to → Chapter "Headlamp, Removing and Installing".
- Remove the wheel spoiler and the left front wheel housing liner. Refer to → Body Exterior; Rep. Gr.66; Wheel Housing Liner; Front Wheel Housing Liner, Removing and Installing.
- Place a drip tray under the windshield washer fluid reservoir.
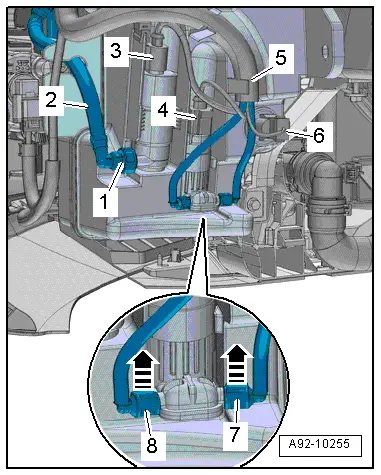
- Disconnect the connectors -3, 4 and 6-, and loosen the wiring harness -5- from the mount on the washer fluid reservoir.
- Release the locking clamps -7 and 8- in direction of -arrows- and remove the water hose from the windshield washer pump.
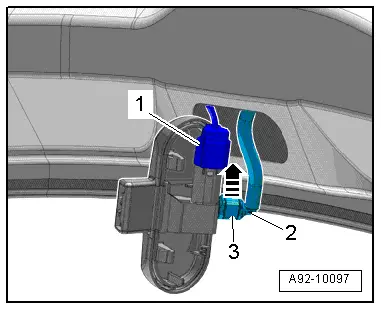
- Press the release button -1- and remove the water hose -2- from the headlamp washer pump.
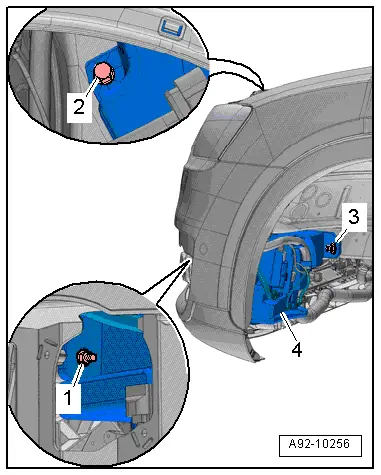
- Remove the nuts -1 and 3- and the bolt -2-.
- Remove the washer fluid reservoir -4-.
Installing
Install in reverse order of removal. Note the following:
- Washer fluid hose must engage audibly into connection for washer fluid pump.
Washer Fluid Reservoir Filler Tube, Removing and Installing
Removing
- If equipped, remove the air filter housing. Refer to → Rep. Gr.23; Air Filter; Air Filter Housing, Removing and Installing or → Rep. Gr.24; Air Filter; Air Filter Housing, Removing and Installing.
- Remove the filler neck from the bracket -3- in direction of -arrow B-, to do this release the release button in direction of -arrow A-.
- Remove the filler tube -2- with the filler neck from the washer fluid reservoir -1-.
Installing
Install in reverse order of removal. Note the following:
- Push the filler tube -4- all the way onto the windshield washer fluid reservoir -1-.
- The tab -2- must fit into the opening -3- on the filler tube.

Windshield Washer Fluid Level Sensor, Removing and Installing
Special tools and workshop equipment required
- Drip tray
 Note
Note
This procedure applies only to vehicles through MY 2014.
Removing
- Remove the left front wheel spoiler. Refer to → Body Exterior; Rep. Gr.66; Wheel Housing Liner; Front Wheel Housing Liner, Removing and Installing.
- Place a drip tray under the windshield washer fluid reservoir.
- Remove the Windshield Washer Fluid Level Sensor -G33--2- from the washer fluid reservoir.
- Disconnect the connector -1-.
Installing
Install in reverse order of removal. Note the following:
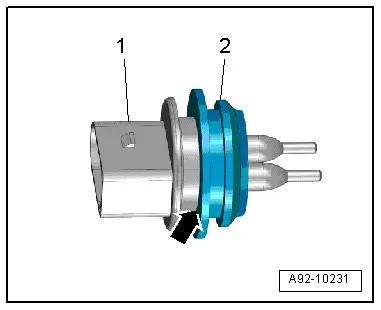
- Remove the grommet from the washer fluid reservoir and check for damage.
- Push the Windshield Washer Fluid Level Sensor -G33- with grommet in the washer fluid reservoir.
 Note
Note
If the Windshield Washer Fluid Level Sensor -G33-is pushed in with the replaced grommet if the grommet is not seated correctly in the mount the washer fluid reservoir can leak.
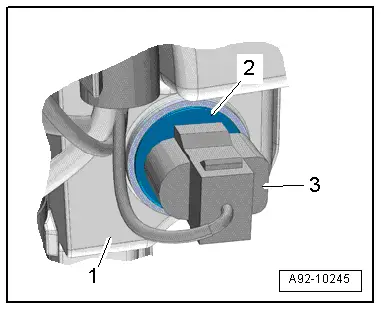
- Push the grommet -2- until the first detent -arrow- on the Windshield Washer Fluid Level Sensor -G33--arrow 1-.
Tightening Specifications
- Wheel spoiler.
Windshield Washer Pump, Removing and Installing
Special tools and workshop equipment required
- Drip tray
Removing
- Remove the left front wheel spoiler. Refer to → Body Exterior; Rep. Gr.66; Wheel Housing Liner; Front Wheel Housing Liner, Removing and Installing.
- Place a drip tray under the windshield washer fluid reservoir.
- Disconnect the connector -2-.
- Release the locking clamps -3 and 4- in direction of -arrows- and remove the water hose from the windshield washer pump -2-
- Remove the windshield washer pump upward from the windshield washer fluid reservoir.
Installing
Install in reverse order of removal. Note the following:
- Check the grommet for damage.
Tightening Specifications
- Wheel spoiler.

Spray Nozzles, Removing and Installing
Removing
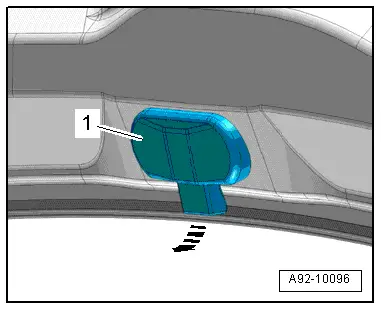
- Unclip the spray nozzle -1- for the windshield washer system from the hood -arrow-.
- Open the clip -3- in direction of -arrow- and disconnect the washer fluid hose -2- from the windshield washer spray nozzle.
- Disconnect the connector -1-, if applicable.
Installing
Install in reverse order of removal. Note the following:
- When connecting the washer fluid line, ensure that the securing clip engages audibly into the washer fluid line connection.
- Install the windshield washer spray nozzle into the hood.
Spray Nozzles, Adjusting
- Adjust the windshield washer spray nozzles.
- If the spray field does not correspond to the specifications, clean dirty spray jet.
Cleaning the Nozzle:
 Caution
Danger of damage.
Do not use any objects to clean the spray nozzles!
- Remove the spray nozzle. Refer to → Chapter "Spray Nozzles, Removing and Installing".
- Rinse the spray nozzle with clean water opposite the spray direction.
- To remove any remaining impurities, the nozzle must only be blown out opposite to spray direction using compressed air.
- If the spray field still does not correspond to the specifications, replace the spray nozzle.
READ NEXT:
 Rear Window Wiper System
Overview - Rear Window Washer System
1 - Water Hose
For the rear window washer system
2 - Nut
8 Nm
3 - Rear Window Wiper Motor -V12-
Removing and ins
Rear Window Washer System
Overview - Rear Window Washer System
1 - Windshield Washer Fluid Reservoir
The combined washer fluid reservoir for the front and rear washer
systems is located in the left wheel hou
Headlamp Washer System
Overview - Headlamp Washer System
1 - Washer Fluid Hose
For the right spray nozzle
2 - Bolt
0.9 Nm
Quantity: 2
3 - Right Spray Nozzle
Removing and SEE MORE:
Cooling system
Coolant
The engine cooling system is filled with a mixture
of purified water and coolant additive at the factory.
This coolant must not be not changed.
The coolant level is monitored using the
indicator
light. However, you should occasionally
check the coolant level.
Messages
The following messag
Steering Column Electronics Control Module -J527-, Removing and Installing
Steering Column Electronics Control Module -J527-, Removing and
Installing, with Mechanical Ignition Lock
The Airbag Spiral Spring/Return Spring with Slip Ring -F138-
and the Steering Angle Sensor -G85- are integrated in the
Steering Column Electronics Control Module -J527-.
- If replac