Audi Q3: Rear Window Washer System
Overview - Rear Window Washer System
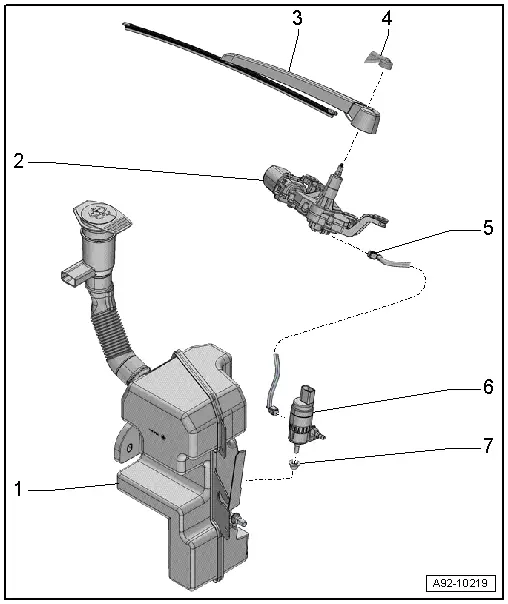
1 - Windshield Washer Fluid Reservoir
- The combined washer fluid reservoir for the front and rear washer systems is located in the left wheel housing.
- Removing and installing. Refer to → Chapter "Washer Fluid Reservoir, Removing and Installing".
2 - Rear Window Wiper Motor -V12-
3 - Wiper Arm
4 - Spray Nozzle
- Removing and installing. Refer to → Chapter "Spray Nozzle, Removing and Installing".
- Adjusting. Refer to → Chapter "Spray Nozzle, Adjusting".
5 - Water Hose
- for the rear window washer system
6 - Windshield Washer Pump -V5-
- The Windshield Washer Pump -V5- for the windshield and the rear window washer system is inside the washer fluid reservoir. Component location: in the left front wheel housing.
- Removing and installing. Refer to → Chapter "Windshield Washer Pump, Removing and Installing".
7 - Grommet
- Replace if damaged.
Spray Nozzle, Removing and Installing
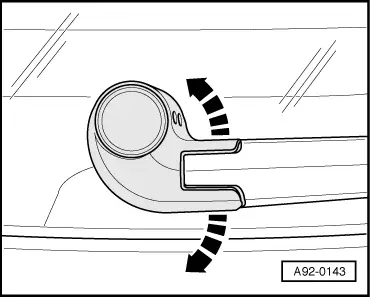
Removing
- Carefully expand the cap in direction of -arrows- and remove.
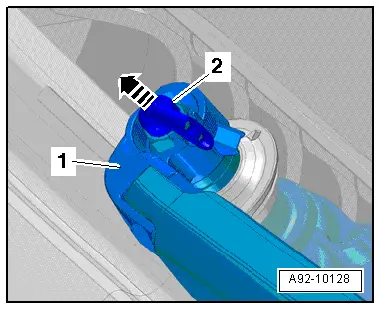
- Carefully remove the spray nozzle -2- from the connecting tube in direction of -arrow-.
Installing
Install in reverse order of removal. Note the following:
- Insert the spray nozzle so the spray opening faces the opening in the wiper arm -1-.
Spray Nozzle, Adjusting
- Adjust the rear window washer system spray nozzles.
- If the spray field does not correspond to the specifications, clean dirty spray jet.
Cleaning the Nozzle:
 Caution
Danger of damage.
Do not use any objects to clean the spray nozzles!
- Remove the spray nozzle. Refer to → Chapter "Spray Nozzle, Removing and Installing".
- Rinse the spray nozzle with clean water opposite the spray direction.
- To remove any remaining impurities, the nozzle must only be blown out opposite to spray direction using compressed air.
- If the spray field still does not correspond to the specifications, replace the spray nozzle.
READ NEXT:
 Headlamp Washer System
Overview - Headlamp Washer System
1 - Washer Fluid Hose
For the right spray nozzle
2 - Bolt
0.9 Nm
Quantity: 2
3 - Right Spray Nozzle
Removing and
Overview - Headlamp
Overview - Headlamp, Headlamp Mount
1 - Ventilation Hose
For the headlamp housing
2 - Lover Mount
For the headlamp housing
Removing and installing. Refer to
→&n
SEE MORE:
Driving with a trailer
Trailer brakes
If the trailer has its own brake system, then follow
the manufacturer specifications. However,
the brake system on the trailer must never be
connected to the vehicle brake system.
Safety chains
Make sure the safety chains are correctly applied
when pulling a trailer. The chains should
Driver Assistance Systems Front Camera
Driver Assistance Systems Front Camera, Calibrating
Special tools and workshop equipment
required
Setting Device Basic Set -VAS6430/1-
Wheel Alignment Computer
Vehicle Diagnostic Tester
Calibration is necessary if:
Note
Before calibrating the Driver Assistance Systems Front
