Audi Q3: Rear Seat Backrest, Removing and Installing
Rear Seat Backrest, Removing and Installing
 Note
Note
The following describes removing and installing the right 2/3 section of the backrest. Removing and installing the left 1/3 rear seat backrest is identical.
Special tools and workshop equipment required
- Trim Removal Wedge -3409-
Removing
- Remove the rear bench seat. Refer to → Chapter "Bench Seat/Single Seat, Removing and Installing".
- Right rear seat backrest 2/3: remove the rear center belt end fitting. Refer to → Chapter "Rear Seat Belt Latch, Removing and Installing".
- Fold the rear seat backrests forward.
- Remove the center support cover -1-.
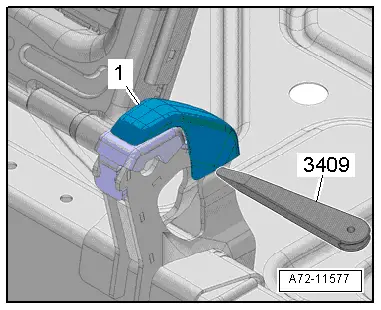
- Release the side cover retaining tabs with the Trim Removal Wedge -3409-.
 Note
Note
The cushion and cover are not shown in the illustration.
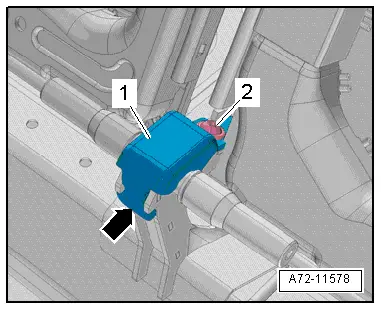
- Remove the securing bracket bolt -2-.
- Remove the securing bracket -1- from the center support -arrow-.
 Note
Note
The cushion and cover are not shown in the illustration.
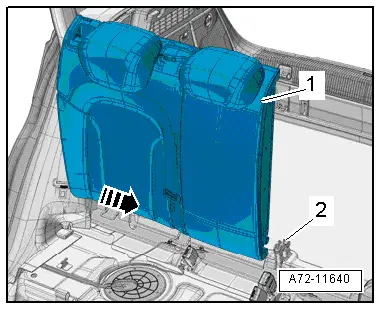
- Fold the rear seat backrest -1- slightly forward.
- Remove the rear seat backrest from the center support -2-.
- Remove the rear seat backrest from the outer mounting -arrow- toward the center of the vehicle and then remove it from the vehicle.
Remove the Inner Mounting Pin
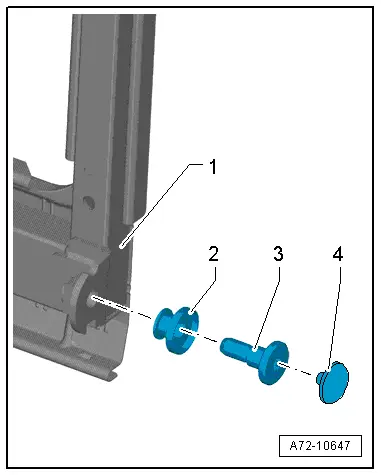
- Remove the chafe protection -4- and then remove the mounting pin -3- from the rear seat backrest frame -1-.
 Note
Note
The cushion and cover are not shown in the illustration.
- Remove the bearing sleeve -2- from the mounting pin.
Installing
Install in reverse order of removal.
Installation notes, for example tightening specifications, replacing components. Refer to → Chapter "Overview - Rear Seat Backrest".
Rear Side Padding With Side Airbag, Removing and Installing
Removing
- Remove the rear bench seat. Refer to → Chapter "Bench Seat/Single Seat, Removing and Installing".
 WARNING
- Follow all safety precautions when working with pyrotechnic components. Refer to → Chapter "Pyrotechnic Components Safety Precautions".
- Follow all regulations when disposing of pyrotechnic components. Refer to → Chapter "Airbag, Belt Tensioner and Battery Cut-Out Units, Storing, Transporting and Disposing".
- Disconnect the battery ground cable with the ignition turned on. Refer to → Electrical Equipment; Rep. Gr.27; Battery; Battery, Disconnecting and Connecting.
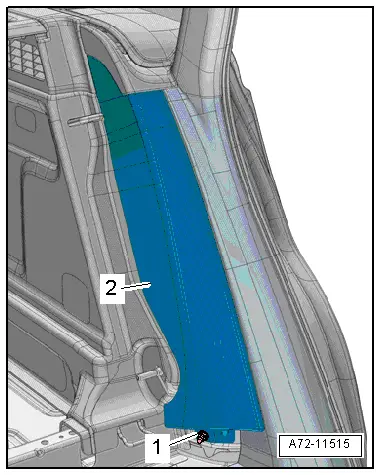
- Remove the nut -1-.
- Hold the seat belt webbing aside and remove the side cushion -2- downward from the threaded pins.
- Fold the rear seat backrest forward.
- Pull the side cushion downward and remove it from the belt guide.
 WARNING
Before handling pyrotechnic components (for example, disconnecting the connector), the person handling it must "discharge static electricity". This can be done by touching the door striker, for example.
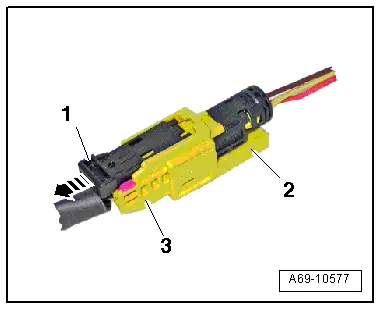
- Disconnect the connector (yellow) from the rear side airbag.
- Pull the locking mechanism -1- in the direction of the -arrow- and disconnect the electrical connectors -2- and -3-.
- Connect Airbag Lockout Connector -VAS6282- to the side airbag harness connector. Refer to → Chapter "Airbag Adapter, Connecting and Disconnecting".
Installing
Install in reverse order of removal. Note the following:
 WARNING
- Follow all safety precautions when working with pyrotechnic components. Refer to → Chapter "Pyrotechnic Components Safety Precautions".
- Before handling pyrotechnic components (for example, connecting the connector), the person handling it must "discharge static electricity". This can be done by touching the door striker, for example.
 Note
Note
Make sure the connectors are installed correctly and are secure.
 WARNING
Ignition must be on when connecting battery. If pyrotechnic components (for example, airbag, belt tensioner) are not repaired correctly, they may deploy unintentionally after connecting battery. There must not be anyone inside the vehicle when connecting the battery.
- Connect the battery ground cable with the ignition turned on. Refer to → Electrical Equipment; Rep. Gr.27; Battery; Battery, Disconnecting and Connecting.
 Note
Note
If the Airbag Indicator Lamp -K75- indicates a fault, check the DTC memory, erase it and check it again using the Vehicle Diagnostic Tester → Vehicle diagnostic tester.
Information for installation: for example, tightening specifications, replacing body parts. Refer to → Chapter "Overview - Rear Seat Backrest" and → Chapter "Overview - Rear Side Airbag".
READ NEXT:
 Locking Mechanism Trim, Removing and Installing
Special tools and workshop equipment
required
Trim Removal Wedge -3409-
Removing
- Unlock the rear seat backrest.
- Make sure the button -2-
(indicator) is in the "up" position.
Center Armrest, Removing and Installing
Center Armrest, Removing and Installing
Removing
- Fold up the rear center armrest 2/3.
- Remove the bolts -arrows-.
- Remove the rear center armrest -1-
from the pass-through doo
SEE MORE:
Refrigerant Circuit, Cleaning (Flushing), with Refrigerant R134a
General Information
Vehicles with a High Voltage System (Hybrid Vehicles)
Extremely Dangerous Due to High-Voltage
The high-voltage system is under high-voltage. Death or serious
bodily injury by electric shock.
- Individuals with electronic/medical life- and health sustaining
machines i
Molded Foam Part, Removing and Installing, Audi Q3 through MY 2014
Removing
- Remove the front bumper cover. Refer to
→ Chapter "Bumper Cover, Removing and Installing".
- Guide the molded foam piece -2-
at the top out of the bracket -arrow-
and at the bottom out of the holder -1-.
Installing
Install in reverse order of removal. Note the f
