Audi Q3: Locking Mechanism Trim, Removing and Installing
Special tools and workshop equipment required
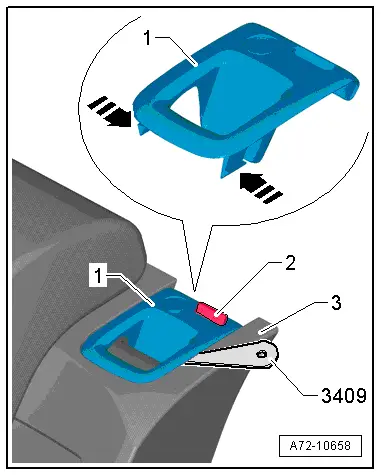
- Trim Removal Wedge -3409-
Removing
- Unlock the rear seat backrest.
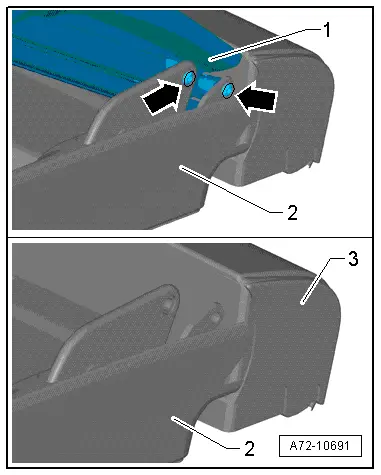
- Make sure the button -2- (indicator) is in the "up" position.
- Push the tabs -arrows- on both sides of the trim using a Trim Removal Wedge -3409-.
- Remove the trim -1- upward and off the rear seat backrest -3-.
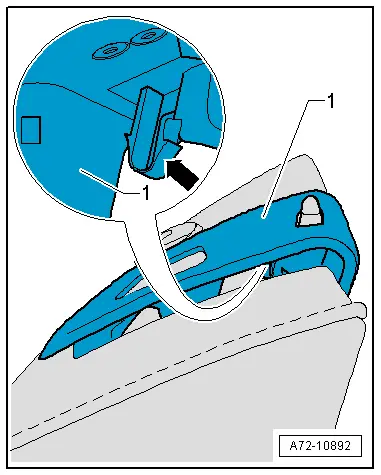
- Remove the trim -1- as far as possible upward from the rear seat backrest.
- Pry the catch -arrow- out of the locking mechanism using a flat blade screwdriver.
- Remove the trim upward from the rear seat backrest.
Installing
Install in reverse order of removal. Note the following:
- Make sure the button moves easily after installing the trim.
Installation notes, for example tightening specifications, replacing components. Refer to → Chapter "Overview - Locking Mechanism".
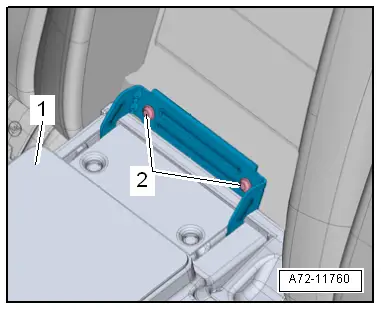
Rear Seat Backrest Locking Mechanism, Removing and Installing
Removing
- Remove the rear seat backrest. Refer to → Chapter "Rear Seat Backrest, Removing and Installing".
- Remove the headrest. Refer to → Chapter "Headrest, Removing and Installing".
- Remove the padding on the rear seat backrest around the locking mechanism. Refer to → Chapter "Cover and Cushion, Removing and Installing, Backrest".
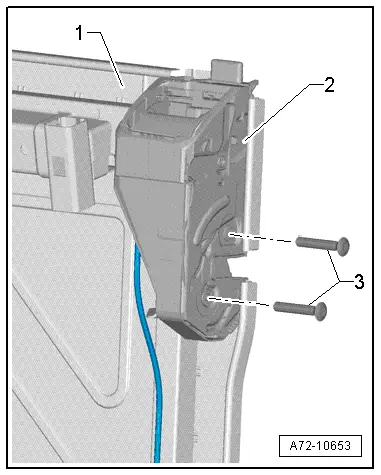
- Remove the bolts -3-.
- Remove the locking mechanism -2- from the rear seat backrest frame -1-.
Installing
Install in reverse order of removal.
Installation notes, for example tightening specifications, replacing components. Refer to → Chapter "Overview - Locking Mechanism".
Pass-Through Cover Frame, Removing and Installing
Special tools and workshop equipment required
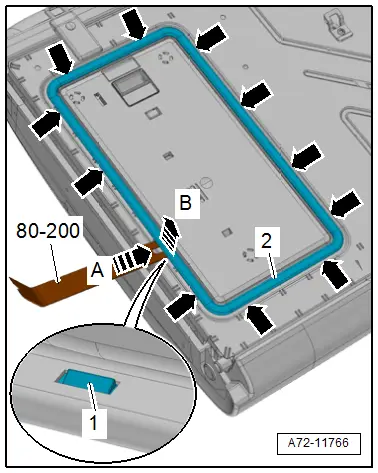
- Pry Lever -80-200-
Removing
- Fold down the rear center armrest and open the pass-through door.
- Release the cover frame retaining tabs -1- from the rear seat backrest; to do this push with the Pry Lever -80 - 200- on the cover frame -arrow A-.
- Pry the cover frame -2- from the rear seat backrest -arrow B-.
- Repeat the procedure for the rest of the retaining tabs -arrows-.
Installing
Install in reverse order of removal. Note the following:
- Make sure the cover frame engages completely in the rear seat backrest.
Installation notes, for example tightening specifications, replacing components. Refer to → Chapter "Overview - Center Armrest".
Pass-Through Cover, Removing and Installing
Removing
- Fold down the center armrest and open the pass-through door.
- Remove the bolts -2-.
- Remove the center armrest with the cover -1- for the pas through door.
- Fold up the rear center armrest -1-2/3.
- Remove the bolts -arrows-.
- Remove the pass-through door -2- from the center armrest.
- Remove the lower center cushion -3-. Refer to → Chapter "Center Cushion, Removing and Installing".
Installing
- Install the pass-through door -1- and the center armrest and tighten the bolts hand tight.
- Close the pass-through door and align.
- Tighten the bolts -2- on the rear seat backrest.
Install in reverse order of removal.
Installation notes, for example tightening specifications, replacing components. Refer to → Chapter "Overview - Center Armrest".

READ NEXT:
 Center Armrest, Removing and Installing
Center Armrest, Removing and Installing
Removing
- Fold up the rear center armrest 2/3.
- Remove the bolts -arrows-.
- Remove the rear center armrest -1-
from the pass-through doo
Overview - Seat Pan Cover and Cushion
Overview - Seat Pan Cover and Cushion, Standard/Folding Seat
Note
The illustration shows versions with a fabric cover.
1 - Seat Pan
2 - Seat Cushion
Seat cover aSEE MORE:
Component Location Overview - Luggage Compartment Trim Panels
1 - Lock Carrier Trim
Overview. Refer to
→ Chapter "Overview - Lock Carrier Trim".
2 - Luggage Compartment Floor Covering
Overview. Refer to
→ Chapter "Overview - Luggage Compartment Floor".
3 - Luggage Compartment Side Trim Panel
O
Left/Right Headlamp Beam Adjustment Motor -V48-/-V49-, Removing and
Installing
Left/Right Headlamp Beam Adjustment Motor -V48-/-V49-, Removing and
Installing, Halogen Headlamps
Removing
- Remove the headlamp housing. Refer to
→ Chapter "Headlamp, Removing and Installing, Halogen Headlamps".
- If equipped, remove the bolts -1 and
3-.
- Open the t