Audi Q3: Airbag Adapter, Connecting and Disconnecting
Connectors, Disconnecting and Connecting at Connector Station
Connector assignment. Refer to → Wiring diagrams, Troubleshooting & Component locations.
 Note
Note
The connector station is located in the vehicle floor sill panel under the front seat area.
Special tools and workshop equipment required
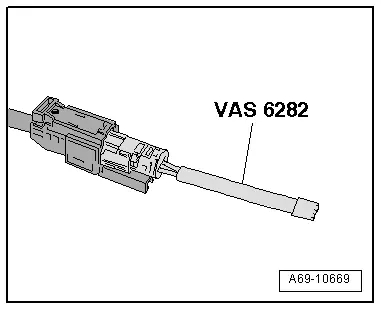
- Airbag Lockout Adapter -VAS6282-
Disconnecting
 WARNING
Follow all safety precautions when working with pyrotechnic components. Refer to → Chapter "Pyrotechnic Components Safety Precautions".
- Push the headrest into the lowest position.
- Move the front seat all the way to the rear and then into its highest position.
- Disconnect the battery ground cable with the ignition turned on. Refer to → Electrical Equipment; Rep. Gr.27; Battery; Battery, Disconnecting and Connecting.
- Fold up the section of the carpet.
1 - Side Airbag
2 - Seat Belt Latch
3 - Seat adjustment voltage supply
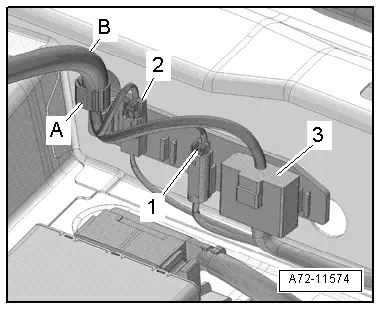
- Open the cable holder -A- for the modular wiring routing with a screwdriver and remove the corrugated tube -B-.
 Note
Note
The number of connectors may vary depending on equipment. The description shows the version with the most equipment possible.
 WARNING
Before handling pyrotechnic components (for example, disconnecting the connector), the person handling it must "discharge static electricity". This can be done by touching the door striker, for example.
- Disconnect side airbag electrical harness connector -1- by releasing retaining tabs.
- Connect the Airbag Lockout Adapter -VAS6282- to the side airbag connector. Refer to → Chapter "Airbag Adapter, Connecting and Disconnecting".
- Disconnect belt latch electrical harness connector -2- by releasing retaining tabs.
- Disconnect seat heater voltage supply electrical harness connector -3- by releasing retaining tabs.
Connection
 WARNING
- Follow all safety precautions when working with pyrotechnic components. Refer to → Chapter "Pyrotechnic Components Safety Precautions".
- Before handling pyrotechnic components (for example, connecting the connector), the person handling it must "discharge static electricity". This can be done by touching the door striker, for example.
Connecting the electrical wiring harnesses happens in reverse order, noting the following:
 Note
Note
Make sure the connectors are installed correctly and are secure.
 WARNING
Ignition must be on when connecting battery. If pyrotechnic components (for example, airbag, belt tensioner) are not repaired correctly, they may deploy unintentionally after connecting battery. There must not be anyone inside the vehicle when connecting the battery.
- Connect the battery ground cable with the ignition turned on. Refer to → Electrical Equipment; Rep. Gr.27; Battery; Battery, Disconnecting and Connecting.
 Note
Note
If the Airbag Indicator Lamp -K75- indicates a fault, check the DTC memory, erase it and check it again using the Vehicle Diagnostic Tester.
Airbag Adapter, Connecting and Disconnecting
Special tools and workshop equipment required
- Airbag Lockout Adapter -VAS6282-
Disconnecting the airbag connector
 WARNING
- Follow all safety precautions when working with pyrotechnic components. Refer to → Chapter "Pyrotechnic Components Safety Precautions".
- Before handling pyrotechnic components (for example, disconnecting the connector), the person handling it must "discharge static electricity". This can be done by touching the door striker, for example.
- Disconnect side airbag electrical harness connector. Refer to → Chapter "Connectors, Disconnecting and Connecting at Connector Station".
- Connect the Airbag Lockout Adapter -VAS6282- to the side airbag connector.
 Caution
The Airbag Lockout Adapter -VAS6282- must stay connected to seat until seat is installed again.
 Note
Note
Ensure airbag adapter engages correctly.
Airbag Connector, Connecting
Connecting the airbag wiring harnesses happens in reverse order, noting the following:
 WARNING
- Follow all safety precautions when working with pyrotechnic components. Refer to → Chapter "Pyrotechnic Components Safety Precautions".
- Before handling pyrotechnic components (for example, connecting the connector), the person handling it must "discharge static electricity". This can be done by touching the door striker, for example.
 Note
Note
Make sure the connectors are installed correctly and are secure.
 WARNING
Ignition must be on when connecting battery. If pyrotechnic components (for example, airbag, belt tensioner) are not repaired correctly, they may deploy unintentionally after connecting battery. There must not be anyone inside the vehicle when connecting the battery.
- Connect the battery ground cable with the ignition turned on. Refer to → Electrical Equipment; Rep. Gr.27; Battery; Battery, Disconnecting and Connecting.
 Note
Note
If the Airbag Indicator Lamp -K75- indicates a fault, check the DTC memory, erase it and check it again using the Vehicle Diagnostic Tester.
READ NEXT:
 Seat Height Adjuster, Removing and Installing
Seat Height Adjuster, Removing and Installing
Removing
Caution
Move the front seat to the highest possible
position. This reduces the spring force when removing
and installing the sea
Seat Angle Adjuster, Removing and Installing
Seat Angle Adjustment Handle, Removing and Installing
Note
Removal and Installation can be done with the seat
installed.
Removing
- Remove the seat side sill panel trim. Refer to
Backrest Adjuster, Removing and Installing
Backrest Adjustment Hand Wheel, Removing and Installing
Note
Only the hand wheel for the backrest adjustment wheel can be
removed and installed.
Special tools and workshop equipment
re
SEE MORE:
Turn signal and high beam lever
Fig. 38 Operating lever: switching the light functions on
and off
The lever operates the turn signals, the high
beams and the headlight flasher.
Turn signals
The turn signal will activate when you move the
lever into a turn signal position while the ignition
is switched on. The respective or
ind
Transmitted information
Data collection
Applies to: vehicles with data collection
Depending on the country, Audi may collect data
for the following purposes, for example: offer
and product optimization, public safety, provision
of Audi connect remote vehicle services, and
adaptation to customer expectations. For example,
v
