Audi Q3: Seat Angle Adjuster, Removing and Installing
Seat Angle Adjustment Handle, Removing and Installing
 Note
Note
Removal and Installation can be done with the seat installed.
Removing
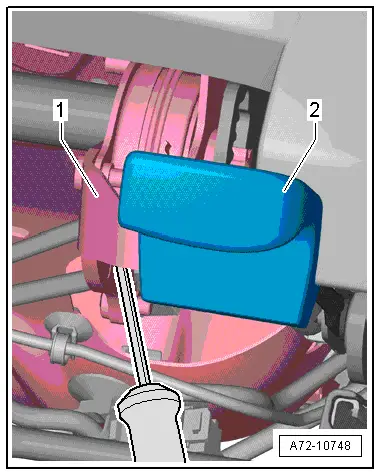
- Remove the seat side sill panel trim. Refer to → Chapter "Seat Side Trim on Sill Panel Side, Removing and Installing, Manual Front Seat".
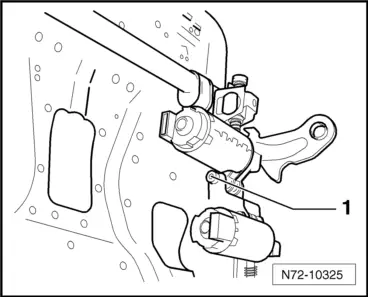
- Pry the handle -2- off the seat angle adjustment -1- by using a screwdriver to press down the clip spring tab.
Installing
Install in reverse order of removal. Note the following:
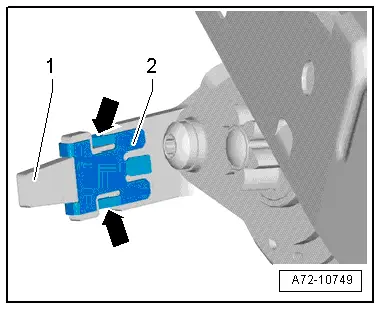
- Make sure the seat height adjustment handle engages correctly with the clip.
- The spring tabs -arrows- on the clamp -2- must be on the inner side of the lever -1-.
Installation notes, for example tightening specifications, replacing components. Refer to → Chapter "Overview - Seat Pan, Seat Angle Adjuster".
Seat Angle Adjuster, Removing and Installing
Removing
 WARNING
- Follow all safety precautions when working with pyrotechnic components. Refer to → Chapter "Pyrotechnic Components Safety Precautions".
- Before handling pyrotechnic components (for example, disconnecting the connector), the person handling it must "discharge static electricity". This can be done by touching the door striker, for example.
- Remove the front seat. Refer to → Chapter "Front Seat, Removing and Installing".
- Fasten the front seat on the Engine/Transmission Holder - Seat Repair Fixture -VAS6136-. Refer to → Chapter "Front Seat, Mounting on Fixture for Seat Repair".
- Remove the seat side sill panel trim. Refer to → Chapter "Seat Side Trim on Sill Panel Side, Removing and Installing, Manual Front Seat".
- Remove the handle from the seat angle adjuster. Refer to → Chapter "Seat Angle Adjustment Handle, Removing and Installing".
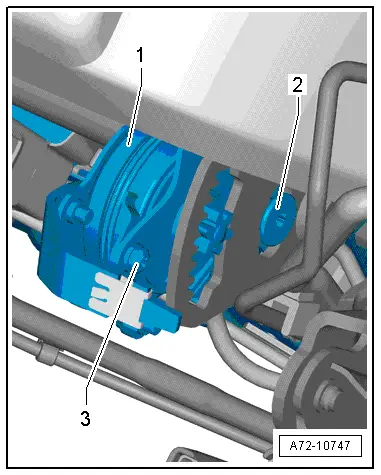
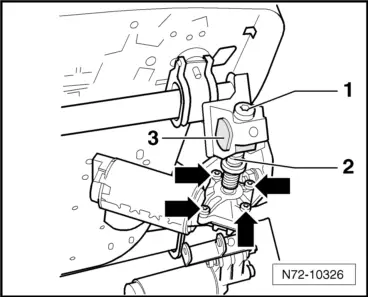
- Remove the step pin -2- and bolt -3-.
- Remove the seat angle adjustment -1-.
Installing
 WARNING
- Follow all safety precautions when working with pyrotechnic components. Refer to → Chapter "Pyrotechnic Components Safety Precautions".
- Before handling pyrotechnic components (for example, connecting the connector), the person handling it must "discharge static electricity". This can be done by touching the door striker, for example.
Install in reverse order of removal. Note the following:
 Note
Note
Make sure the connectors are installed correctly and are secure.
 WARNING
Ignition must be on when connecting battery. If pyrotechnic components (for example, airbag, belt tensioner) are not repaired correctly, they may deploy unintentionally after connecting battery. There must not be anyone inside the vehicle when connecting the battery.
- Connect the battery ground cable with the ignition turned on. Refer to → Electrical Equipment; Rep. Gr.27; Battery; Battery, Disconnecting and Connecting.
 Note
Note
If the Airbag Indicator Lamp -K75- indicates a fault, check the DTC memory, erase it and check it again using the Vehicle Diagnostic Tester → Vehicle diagnostic tester.
Installation notes, for example tightening specifications, replacing components. Refer to → Chapter "Overview - Seat Pan, Seat Angle Adjuster".
Driver/Front Passenger Seat Angle Adjustment Motor -V243-/-V244-, Removing and Installing
Removing
 WARNING
- Follow all safety precautions when working with pyrotechnic components. Refer to → Chapter "Pyrotechnic Components Safety Precautions".
- Before handling pyrotechnic components (for example, disconnecting the connector), the person handling it must "discharge static electricity". This can be done by touching the door striker, for example.
- Move the front seat all the way up.
- Remove the front seat. Refer to → Chapter "Front Seat, Removing and Installing".
- Fasten the front seat on the Engine/Transmission Holder - Seat Repair Fixture -VAS6136-. Refer to → Chapter "Front Seat, Mounting on Fixture for Seat Repair".
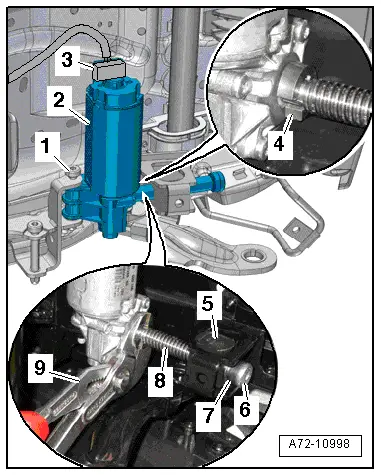
- Disconnect harness connector -3- at the seat angle adjustment motor.
- Remove the ring -4- on the spindle with a screwdriver.
- Hold the spindle -8- with pliers -9- on the marked location to keep it from turning and remove the screw -6-.
- Remove the screw -1- and remove the seat angle adjustment motor -2- from the bracket.
- Separate the upper and seat pan frames, move the seat angle adjustment motor and spindle forward and remove the spindle nut -5-.
Installing
- Install the spindle -8- as far as possible in the spindle nuts -5-.
- Install the bolt -6- by hand in the spindle.
 Note
Note
It is only possible to tighten the bolt -6- to the tightening specification when the seat is inside the vehicle and connected to the vehicle electrical system.
Installation is performed in reverse order of removal, while noting the following:
 WARNING
- Follow all safety precautions when working with pyrotechnic components. Refer to → Chapter "Pyrotechnic Components Safety Precautions".
- Before handling pyrotechnic components (for example, connecting the connector), the person handling it must "discharge static electricity". This can be done by touching the door striker, for example.
- Observe all measures when installing the front seat. Refer to → Chapter "Front Seat, Removing and Installing".
 WARNING
Ignition must be on when connecting battery. If pyrotechnic components (for example, airbag, belt tensioner) are not repaired correctly, they may deploy unintentionally after connecting battery. There must not be anyone inside the vehicle when connecting the battery.
- Connect the battery ground cable with the ignition turned on. Refer to → Electrical Equipment; Rep. Gr.27; Battery; Battery, Disconnecting and Connecting.
- Seat installed in the vehicle and connected to the vehicle electrical system.
- Move the seat down using the inclination adjustment and at the same time tighten the bolt -6-.
Installation notes, for example tightening specifications, replacing components. Refer to → Chapter "Overview - Seat Pan, Seat Angle Adjustment Motor".
Driver/Front Passenger Seat Angle Adjustment Motor -V243-/-V244-, Removing when Faulty
 Note
Note
Before removing the seat angle adjustment motor, check the electric and electronic components as well as the wiring to prevent any unnecessary repair costs. → Wiring diagrams, Troubleshooting & Component locations.
Remove if the seat angle adjustment motor is faulty
 WARNING
- Follow all safety precautions when working with pyrotechnic components. Refer to → Chapter "Pyrotechnic Components Safety Precautions".
- Before handling pyrotechnic components (for example, disconnecting the connector), the person handling it must "discharge static electricity". This can be done by touching the door striker, for example.
- Remove the front seat. Refer to → Chapter "Front Seat, Removing and Installing".
- Fasten the front seat on the Engine/Transmission Holder - Seat Repair Fixture -VAS6136-. Refer to → Chapter "Front Seat, Mounting on Fixture for Seat Repair".
- Disconnect the connector on the seat angle adjustment motor.
- Remove the screw -1- and remove the seat angle adjustment motor.
- Hold the spindle -2- with pliers and remove the screw -1-.
- Remove the bolts -arrows- and the seat angle adjustment motor.
- Remove the spindle from the spindle nut -3-.
- Replace the seat angle adjustment motor. Refer to → Chapter "Driver/Front Passenger Seat Angle Adjustment Motor -V243-/-V244-, Removing and Installing".
READ NEXT:
 Backrest Adjuster, Removing and Installing
Backrest Adjustment Hand Wheel, Removing and Installing
Note
Only the hand wheel for the backrest adjustment wheel can be
removed and installed.
Special tools and workshop equipment
re
Front Backrest, Removing and Installing
Backrest Cover, Removing and Installing
Removing
WARNING
Danger of being injured by burrs on the backrest
cover.
Wear protective gloves.
- Reach behind the backrest cover -1-
a
Headrest, Removing and Installing
Note
The headrests can be removed with the front seats installed.
Removing
- Move the front seat forward into the lowest position and
tilt backrests approximately 45º.
No
SEE MORE:
Rear Brake Rotor, Removing and Installing
Brake Rotor, Removing and Installing, Brake 1KU
Removing
- Remove the brake caliper with brake carrier, refer to
→ Chapter "Brake Caliper, Removing and Installing, Brake 1KU".
- Remove bolt -3- and remove the
brake rotor.
Installing
Install in reverse order of removal. Not
Trailing Arm, Servicing
Trailing Arm, Servicing, FWD Vehicles
Special tools and workshop equipment
required
Press Plate -VW401-
Press Plate -VW402-
Front Subframe Mount Kit -3372-
Hydraulic Press - Bushing Assembly Tool Kit -T10230-
Pressing out the bonded rubber bushing
- Remove trailing arm with mou
