Audi Q3: Rear Brake Rotor, Removing and Installing
Brake Rotor, Removing and Installing, Brake 1KU
Removing
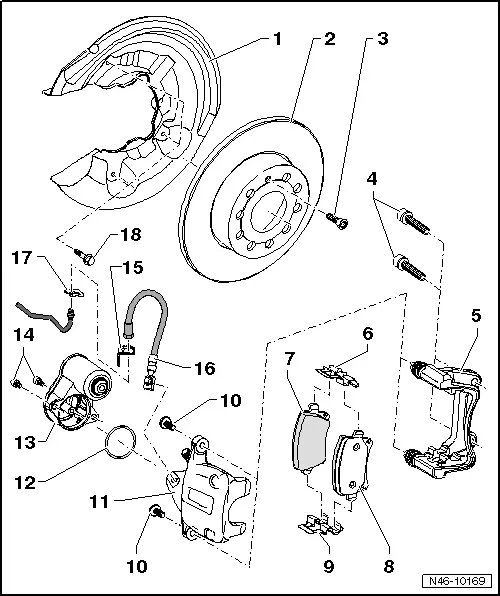
- Remove the brake caliper with brake carrier, refer to → Chapter "Brake Caliper, Removing and Installing, Brake 1KU".
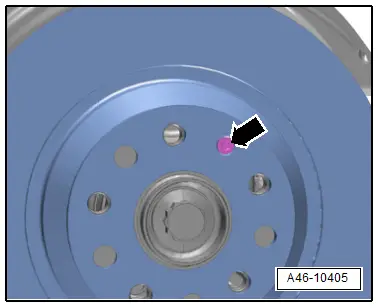
- Remove bolt -3- and remove the brake rotor.
Installing
Install in reverse order of removal. Note the following:
- Thoroughly clean the brake rotor and hub contact surfaces.
- Place the brake rotor on the hub.
 Note
Note
Do not tilt the brake rotor when mounting it on the wheel hub.
- Tighten the bolt -3-.
- Install the brake caliper with brake carrier, refer to → Chapter "Brake Caliper, Removing and Installing, Brake 1KU".
 WARNING
Risk of accident!
- Before moving vehicle, depress brake pedal several times firmly to properly seat brake pads in their normal operating position.
- Make sure the brakes are working correctly before driving the vehicle.

Brake Rotor, Removing and Installing, 2EA, 2EJ, GP1 Brakes
Special tools and workshop equipment required
- Torque Wrench 1331 5-50Nm -VAG1331-
Removing
- Remove the brake caliper, refer to → Chapter "Brake Caliper, Removing and Installing, 2EA, 2EJ, GP1 Brakes".
- Loosen the bolt -1- and remove the brake rotor.
Installing
Install in reverse order of removal. Note the following:
- Thoroughly clean the brake rotor and hub contact surfaces.
- Install the brake caliper, refer to → Chapter "Brake Caliper, Removing and Installing, 2EA, 2EJ, GP1 Brakes".
 WARNING
Risk of accident!
- Before moving vehicle, depress brake pedal several times firmly to properly seat brake pads in their normal operating position.
- Make sure the brakes are working correctly before driving the vehicle.
Rear Brake Shield, Removing and Installing
Brake Shield, Removing and Installing, Brakes 1KU
Removing
- Remove brake rotor, refer to → Chapter "Brake Rotor, Removing and Installing, Brake 1KU".
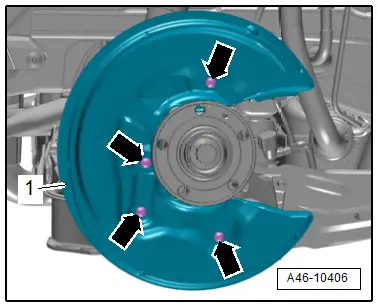
- Remove the bolts -18- and the brake shield -1-.
Installing
Install in reverse order of removal. Note the following:
- Clean the wheel hub and the brake shield.
- Place the brake shield on the wheel hub.
- Tighten the bolts -18-.
- Install the brake rotor, refer to → Chapter "Brake Rotor, Removing and Installing, Brake 1KU".
 WARNING
Risk of accident!
- Before moving vehicle, depress brake pedal several times firmly to properly seat brake pads in their normal operating position.
- Make sure the brakes are working correctly before driving the vehicle.
Brake Shield, Removing and Installing, 2EA, 2EJ, GP1 Brakes
Special tools and workshop equipment required
- Torque Wrench 1331 5-50Nm -VAG1331-
Removing
- Remove brake rotor, refer to → Chapter "Brake Rotor, Removing and Installing, 2EA, 2EJ, GP1 Brakes".
- Remove the bolts -arrows- and remove the brake shield -1-.
Installing
Install in reverse order of removal. Note the following:
- Install the brake rotor, refer to → Chapter "Brake Rotor, Removing and Installing, 2EA, 2EJ, GP1 Brakes".
 WARNING
Risk of accident!
- Before moving vehicle, depress brake pedal several times firmly to properly seat brake pads in their normal operating position.
- Make sure the brakes are working correctly before driving the vehicle.
Cap and Guide Pin, Replacing
 Note
Note
Install the repair kit if the protective caps or guide pins are damaged. Use supplied grease packet to lubricate guide pins.
Removing
- Remove the brake caliper, refer to → Chapter "Brake Caliper, Removing and Installing".
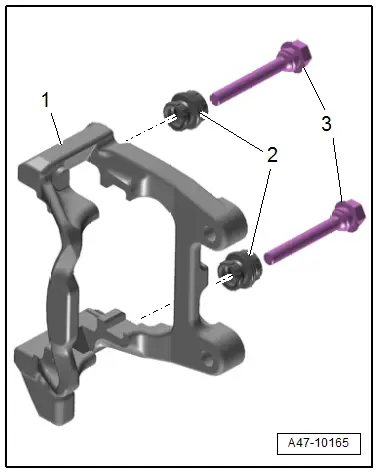
- Remove the protective cap -2- from the groove on the brake carrier -1-.
- Remove the guide pins -3- from the brake carrier.
- Remove the protective cap from the guide pin.
Installing
- Grease the guide pin before inserting.
- Slide the protective cap over the groove on the guide pin.
- Slide the guide pins -3- with the protective cap -2- through the brake carrier -1-.
- Press the protective cap over the groove on the brake carrier.
- Install the brake caliper, refer to → Chapter "Brake Caliper, Removing and Installing".
READ NEXT:
 Parking Brake
Overview - Parking Brake
1 - Bolt
Tightening specification, refer to item-14-.
2 - Parking Brake Motor
Left Parking Brake Motor -V282-, Right Parking Brake Motor -V28
Brake Pedal
Overview - Brake Pedal
1 - Mounting Bracket
Removing and installing, refer to
→ Chapter "Mounting Bracket, Removing and Installing".
2 - Nut
25 Nm
Alw
SEE MORE:
Parallel Parking Assist
Overview - Parallel Parking Assist
1 - Parallel Parking Assistance Button -E581-
Overview. Refer to
→ Chapter "Component Location Overview - Instrument Panel Controls".
2 - Left Front Parallel Parking Assistance Sensor -G568-
Only on vehicles with parallel
Lane Change Assistance, Calibrating
Special tools and workshop equipment
required
Calibration Tool -VAS6350-
Conditions
- The Lane Change Assistance Control Module -J769-/ Lane
Change Assistance Control Module 2 -J770- must be calibrated
using the Vehicle Diagnostic Tester during the following
conditions:
Lane
