Audi Q3: Seat Height Adjuster, Removing and Installing
Seat Height Adjuster, Removing and Installing
Removing
 Caution
Move the front seat to the highest possible position. This reduces the spring force when removing and installing the seat height adjuster.
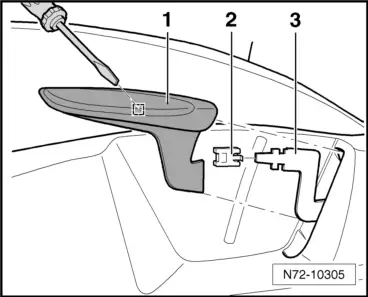
Seat Height Adjustment Handle:
- Pull seat height adjustment handle -1- up as far as the stop and hold it in that position.
- Carefully pull the seat height adjustment handle slightly off of the front seat.
- Push the spring on the clamp -2- on the inside of the seat height adjustment handle toward the outside with a small screwdriver and remove the handle -3-.
Seat Height Adjuster:
- Move the front seat all the way forward and raise it as high as possible. Then lower it one stroke.
- Remove the seat side sill panel trim.
- Standard seat/sport seat. Refer to → Chapter "Seat Side Trim on Sill Panel Side, Removing and Installing, Manual Front Seat".
- Folding seat. Refer to → Chapter "Seat Side Trim on Sill Panel Side, Removing and Installing, Passenger Folding Seat".
- Remove the bolt -1-.
- Remove the lever -2- from the seat height adjuster.

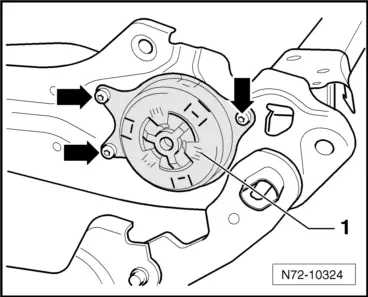
- Remove the bolts -arrows-.
- Loosen and remove the seat height adjustment -1- from the backward adjustment.
Installing
Install in reverse order of removal. Note the following:
- A second technician must push the seat downward over the seat backrest when installing the seat height adjuster into the backward adjustment.
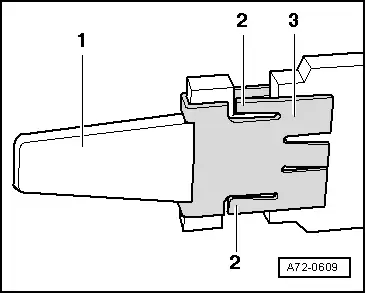
- Note the installation position of the clip.
- Spring latch -2- of retaining clip -3- must be on the outside of lever -1-.
Installation notes, for example tightening specifications, replacing components. Refer to → Chapter "Overview - Seat Pan, Seat Height Adjustment".
Driver/Front Passenger Seat Height Adjustment Motor -V245-/-V246-, Removing and Installing
Removing
 WARNING
- Follow all safety precautions when working with pyrotechnic components. Refer to → Chapter "Pyrotechnic Components Safety Precautions".
- Before handling pyrotechnic components (for example, disconnecting the connector), the person handling it must "discharge static electricity". This can be done by touching the door striker, for example.
- Move front seat to the highest position possible to keep the torsion bar tension as low as possible.
- Remove the front seat. Refer to → Chapter "Front Seat, Removing and Installing".
- Fasten the front seat on the Engine/Transmission Holder - Seat Repair Fixture -VAS6136-. Refer to → Chapter "Front Seat, Mounting on Fixture for Seat Repair".
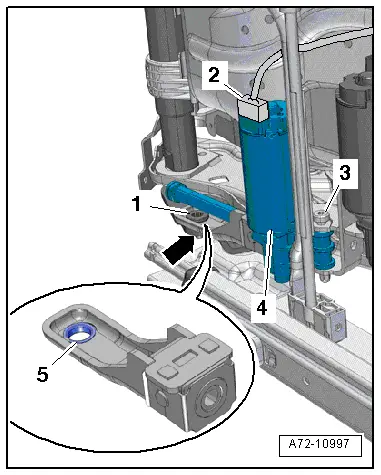
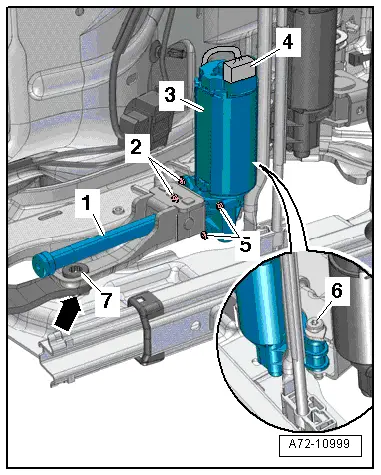
- Disconnect the connector -2- on the seat height adjustment motor.
 Caution
Threaded hole in the seat pan damaged or destroyed -arrow-.
When removing or installing, the spindle guide/seat pan bolting torque must be relieved.
Risk of damage to the bushing -5- in the bearing point (spindle guide/seat pan bolting).
- The bushing cannot be replaced with workshop materials.
- If the bushing is damaged, the corresponding assembly parts must be replaced.
- Remove bolt -1- on the seat height adjustment motor spindle guide.
- Remove the screw -3- and remove the seat height adjustment motor -4- from the bracket.
Installing
- When installing the screw -1- a second technician must push down on the seat via the backrest.
Installation is performed in reverse order of removal, while noting the following:
 WARNING
- Follow all safety precautions when working with pyrotechnic components. Refer to → Chapter "Pyrotechnic Components Safety Precautions".
- Before handling pyrotechnic components (for example, connecting the connector), the person handling it must "discharge static electricity". This can be done by touching the door striker, for example.
- Observe all measures when installing the front seat. Refer to → Chapter "Front Seat, Removing and Installing".
Installation notes, for example tightening specifications, replacing components. Refer to → Chapter "Overview - Seat Pan, Seat Height Adjustment Motor".
Driver/Front Passenger Seat Height Adjustment Motor -V245-/-V246-, Removing when Faulty
 Note
Note
Before removing the seat height adjustment motor, check the electric and electronic components as well as the wiring to prevent any unnecessary repair costs. Refer to → Wiring diagrams, Troubleshooting & Component locations.
Remove if the seat height adjustor motor is faulty
 WARNING
- Follow all safety precautions when working with pyrotechnic components. Refer to → Chapter "Pyrotechnic Components Safety Precautions".
- Before handling pyrotechnic components (for example, disconnecting the connector), the person handling it must "discharge static electricity". This can be done by touching the door striker, for example.
- Remove the front seat. Refer to → Chapter "Front Seat, Removing and Installing".
- Fasten the front seat on the Engine/Transmission Holder - Seat Repair Fixture -VAS6136-. Refer to → Chapter "Front Seat, Mounting on Fixture for Seat Repair".
- Disconnect the connector -4- on the seat height adjustment motor.
- When removing the screw -6- a second technician must push down on the seat via the backrest.
- Remove the screws -2 and 5- and remove the seat height adjustor motor -3-.
- Rotate the spindle -1- backward until the screw -7- is accessible.
- Remove the bolt -7- for the spindle guide and remove the spindle guide.
- Replace the seat height adjustor motor. Refer to → Chapter "Driver/Front Passenger Seat Height Adjustment Motor -V245-/-V246-, Removing and Installing".
READ NEXT:
 Seat Angle Adjuster, Removing and Installing
Seat Angle Adjustment Handle, Removing and Installing
Note
Removal and Installation can be done with the seat
installed.
Removing
- Remove the seat side sill panel trim. Refer to
Backrest Adjuster, Removing and Installing
Backrest Adjustment Hand Wheel, Removing and Installing
Note
Only the hand wheel for the backrest adjustment wheel can be
removed and installed.
Special tools and workshop equipment
re
Front Backrest, Removing and Installing
Backrest Cover, Removing and Installing
Removing
WARNING
Danger of being injured by burrs on the backrest
cover.
Wear protective gloves.
- Reach behind the backrest cover -1-
a
SEE MORE:
Overview - Front Actuators
Overview - Front Actuators, Air Distribution Housing, Left Door Control
1 - Screw
1 Nm
Quantity: 3
2 - Central Air Door Motor -V70-
With Central Door Motor Position Sensor -G112-
Removing and installing. Refer to
→ Chapter "Central Air Door Motor -
Adjusting side assist
Applies to: vehicles with side assist
You can adjust the side assist to your preferences.
The settings depend on the vehicle equipment.
Applies to: MMI: Select on the home screen:
VEHICLE > Driver assistance > Side assist.
Possible settings:
The system can be switched on and off. If the s
