Audi Q3: Overview - Front Actuators
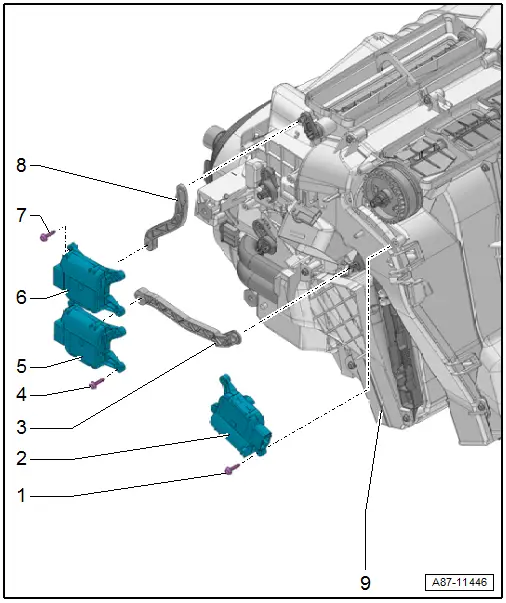
Overview - Front Actuators, Air Distribution Housing, Left Door Control

1 - Screw
- 1 Nm
- Quantity: 3
2 - Central Air Door Motor -V70-
- With Central Door Motor Position Sensor -G112-
- Removing and installing. Refer to → Chapter "Central Air Door Motor -V70-, Removing and Installing".
 Note
Note
For vehicles with a manual climate control system (heater without A/C system), the defroster door is also actuated by the Central Air Door Motor -V70- (via the operating lever).
3 - Operating Lever
- For the operating of the warm air door
4 - Screw
- 1 Nm
- Quantity: 2
5 - Temperature Regulator Door Motor -V68-/Left Temperature Door Motor -V158-
Temperature Regulator Door Motor -V68- for manual climate control system (heater without A/C system)
- With the Temperature Regulator Door Motor Position Sensor -G92-
- The actuator operates both temperature doors - the right and left temperature doors are connected to each other via the shaft
- Removing and installing. Refer to → Chapter "Temperature Regulator Door Motor -V68-, Removing and Installing".
Left Temperature Door Motor -V158- for automatic climate control system
- with Left Temperature Door Potentiometer/Actuator -G220-
- Removing and installing. Refer to → Chapter "Left Temperature Door Motor -V158-, Removing and Installing".
6 - Defroster Door Motor -V107-
- With the Defroster Door Motor Position Sensor -G135-
- Only with an automatic climate control system
- Removing and installing. Refer to → Chapter "Defroster Door Motor -V107-, Removing and Installing".
 Note
Note
- This actuator is fastened on the right on air distribution housing in vehicles with right-side steering.
- For vehicles with a manual climate control system (heater without A/C system), the defroster door is actuated by the Central Air Door Motor -V70- via the operating lever.
7 - Screw
- 1 Nm
- Quantity: 2
8 - Operating Lever
- To actuate the defroster doors
9 - Air Distribution Housing
- A/C unit (heater), removing and installing. Refer to → Chapter "Heater and A/C Unit, Removing and Installing".
- Overview. Refer to → Chapter "Overview - Heater and A/C Unit Attachments and Air Intake Housing".
- There are different versions for the manual climate control system (heater without A/C system) and for the automatic climate control system. Refer to the Parts Catalog.
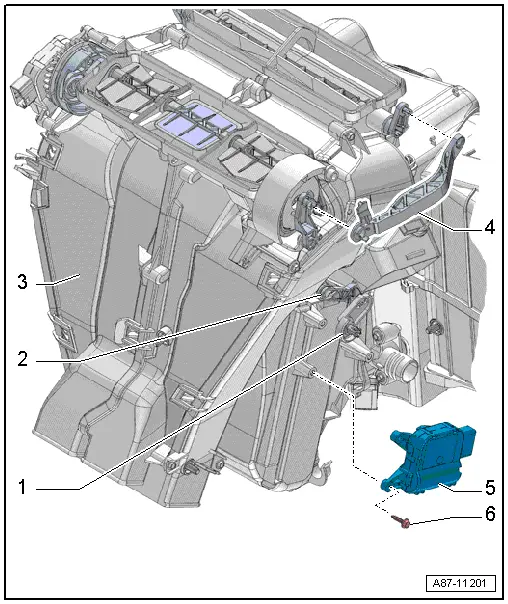
Overview - Front Actuators, Air Distribution Housing, Right Door Control

1 - Operating Lever
- For Right Temperature Door Motor -V159-
- Only with an automatic climate control system
2 - Connecting Element
- For controlling the front and rear footwell vent doors
3 - Air Distribution Housing
- A/C unit (heater), removing and installing. Refer to → Chapter "Heater and A/C Unit, Removing and Installing".
- Overview. Refer to → Chapter "Overview - Heater and A/C Unit Attachments and Air Intake Housing".
- There are different versions for the manual climate control system (heater without A/C system) and for the automatic climate control system. Refer to the Parts Catalog.
4 - Connecting Element
- For controlling the center and defroster instrument panel vent doors
- Only for a manual climate control system (or heater without A/C system)
 Note
Note
For vehicles with a manual climate control system (or heater without A/C system), the defroster door is actuated by the Central Air Door Motor -V70- via the operating lever.
5 - Right Temperature Door Motor -V159-
- With Right Temperature Door Potentiometer/Actuator -G221-
- Removing and installing. Refer to → Chapter "Right Temperature Door Motor -V159-, Removing and Installing".
- Only for an automatic climate control system (or heater without A/C system)
6 - Screw
- 1 Nm
- Quantity: 2
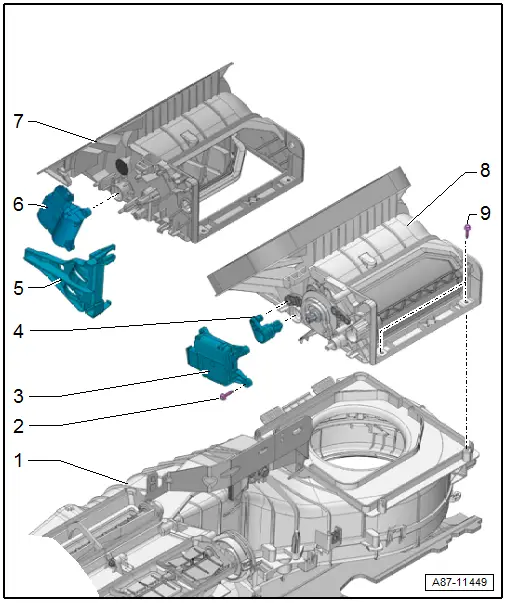
Overview - Front Actuators, Air Intake Duct, Door Control

1 - Evaporator Housing
- Removing and installing. Refer to → Chapter "Air Distribution Housing, Removing and Installing".
2 - Screw
- 1 Nm
- Quantity: 3
3 - Recirculation Door Motor -V113-
- For automatic climate control system
- Removing and installing. Refer to → Chapter "Recirculation Door Motor -V113-, Removing and Installing, Automatic Climate Control System".
4 - Connecting Element
- Between the Recirculation Door Motor -V113- and the recirculation door
- Only automatic climate control system
- Do not dismantle
- Lightly coat the bearing area with lubricant. Refer to the Parts Catalog.
5 - Bracket
- Only manual climate control system (or heater without A/C system)
6 - Recirculation Door Motor -V113-
- For manual climate control system (or heater without A/C system)
- Removing and installing. Refer to → Chapter "Recirculation Door Motor -V113-, Removing and Installing, Manual Climate Control System (or Heater without A/C System)".
7 - Air Intake Duct
- There are different versions. Refer to the Parts Catalog.
- Only manual climate control system (or heater without A/C system)
- With fresh- and recirculated-air door
- Do not dismantle
- Removing and installing. Refer to → Chapter "Heater and A/C Unit Air Intake Housing, Removing and Installing".
8 - Air Intake Duct
- There are different versions. Refer to the Parts Catalog.
- Only automatic climate control system
- With the fresh air-, air recirculation door and the back pressure door
- Do not dismantle
- Removing and installing. Refer to → Chapter "Heater and A/C Unit Air Intake Housing, Removing and Installing".
9 - Bolt
- Tightening specification. Refer to → Chapter "Overview - Heater and A/C Unit Attachments and Air Intake Housing, Fresh Air Blower, Cover".

