Audi Q3: Backrest Release, Removing and Installing
 Note
Note
Release is only on front passenger side folding seat.
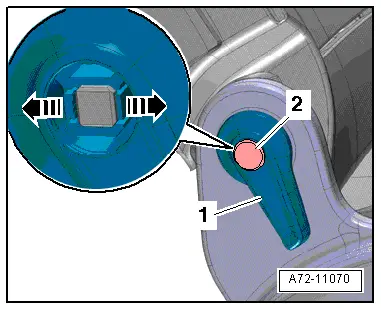
Removing
- Remove cap -2- using screwdriver.
- Open the tabs with a screwdriver -arrows- and remove the release lever -1- from the backrest.
Installing
Install in reverse order of removal.
Installation notes, for example tightening specifications, replacing components. Refer to → Chapter "Overview - Seat Pan, Sill Panel/Tunnel Side Seat Side Trim on Folding Passenger Seat".
Driver/Front Passenger Seat Lumbar Support Adjustment Switch -E176-/-E177-, Removing and Installing
Removing
- Remove the seat side sill panel trim.
- Front seat manual. Refer to → Chapter "Seat Side Trim on Sill Panel Side, Removing and Installing, Manual Front Seat".
- Front seat power. Refer to → Chapter "Seat Side Trim on Sill Panel Side, Removing and Installing, Power Front Seat".
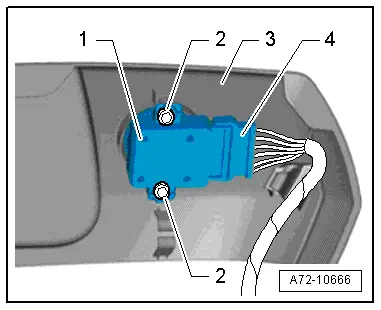
- Disconnect the connector -4-.
- Remove the bolts -2-.
- Remove -1- from the trim -3-.
Installing
Install in reverse order of removal.
Installation notes, for example tightening specifications, replacing components. Refer to → Chapter "Overview - Seat Pan, Lumbar Support Adjustment Switch".
Lumbar Support Adjustment Motors -V125-/-V126-/-V129-/-V130-, Removing and Installing
Special tools and workshop equipment required
- Pop Rivet Pliers -VAG1753B-
- Drill
- Protective eyewear
Removing
 WARNING
- Follow all safety precautions when working with pyrotechnic components. Refer to → Chapter "Pyrotechnic Components Safety Precautions".
- Before handling pyrotechnic components (for example, disconnecting the connector), the person handling it must "discharge static electricity". This can be done by touching the door striker, for example.
- Remove the front seat. Refer to → Chapter "Front Seat, Removing and Installing".
- Fasten the front seat on the Engine/Transmission Holder - Seat Repair Fixture -VAS6136-. Refer to → Chapter "Front Seat, Mounting on Fixture for Seat Repair".
- Remove the backrest cover with the backrest cushion. Refer to → Chapter "Backrest Cover and Cushion, Removing and Installing".
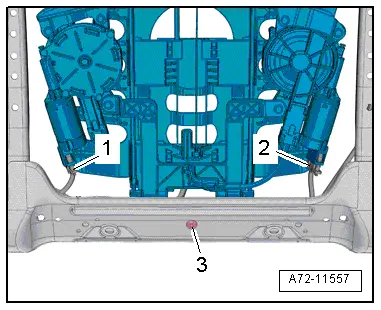
- Detach electrical harness connectors -1- and -2- at the lumbar support forward/back and height adjustment motors.
 WARNING
Danger of eye injury.
Wear protective eyewear.
- Drill out rivet -3-.
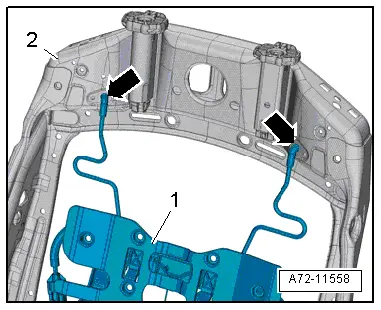
- Free up the wiring harness on the lumbar support.
- Move the lower lumbar support -1- forward, disengage it from the backrest frame -2--arrows- and remove it.
Installing
- Attach the upper lumbar support -1- in the backrest frame -2--arrows- and move it down and to the rear.
- Rivet lumbar support to the backrest frame.
 WARNING
- Follow all safety precautions when working with pyrotechnic components. Refer to → Chapter "Pyrotechnic Components Safety Precautions".
- Before handling pyrotechnic components (for example, connecting the connector), the person handling it must "discharge static electricity". This can be done by touching the door striker, for example.
- Observe all measures when installing the front seat. Refer to → Chapter "Front Seat, Removing and Installing".
Install in reverse order of removal.
Installation notes, for example tightening specifications, replacing components. Refer to → Chapter "Overview - Front Backrest, Lumbar Support".
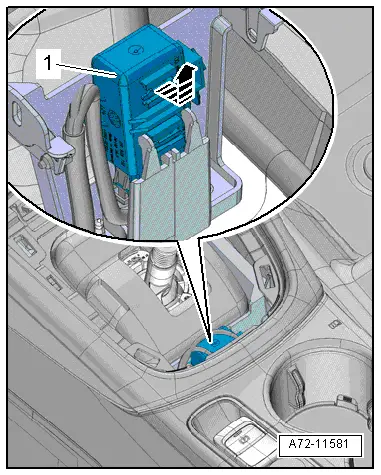
Front Seat Heating Control Module -J774-, Removing and Installing
Removing
- Remove the center console insert. Refer to → Chapter "Center Console Insert, Removing and Installing".
- Pull the Front Seat Heating Control Module -J774--item 1- slightly rearward until the retaining tabs release and then pull upward -arrow-.
- Release the connector safety catch and disconnect the connector.
- Remove the Front Seat Heating Control Module -J774-.
Installing
Install in reverse order of removal.
Installation notes, for example tightening specifications, replacing components.
READ NEXT:
 Overview - Bench Seat/Single Seat
1 - Front Mount
For securing the rear bench seat
Welded to the floor panel.
2 - Cover
For child seat anchor
Quantity: 4
Removing and installing. Refer to
→&n
Bench Seat/Single Seat, Removing and Installing
Removing
- Move the front seats all the way forward.
- Unclip the child seat anchor guides (quantity: four)
-1- from anchorages. Refer to
→ Chapter "Child Seat Anchor Guide, Remov
Rear Seat Backrest, Removing and Installing
Rear Seat Backrest, Removing and Installing
Note
The following describes removing and installing the right
2/3 section of the backrest. Removing and installing the left
1/3 rear seat ba
SEE MORE:
Overview - Rearview Camera System
The rear view camera system assists the driver when driving
in reverse by providing the driver with an image of the traffic
situation behind the vehicle via the Front Information Display
Control Head -J685-.
The rear view camera system is switched on when engaging the
reverse gear. The syst
Using the telephone
Accessing the telephone functions
Applies to: vehicles with telephone
Fig. 124 Center display: selection menu
Requirement: a mobile device must be connected
to the MMI.
Applies to: MMI: Select on the home screen:
PHONE.
Possible telephone functions:
Search
Call list
Favorites
Contacts
Voi
