Audi Q3: A-Pillar Trim Panel, Removing and Installing
Special tools and workshop equipment required
- Pry Lever -80-200-
- Omega Clip Tool -T40280-
Removing
 WARNING
Follow all safety precautions when working with pyrotechnic components. Refer to → Chapter "Pyrotechnic Components Safety Precautions".
- Remove the instrument panel side cover. Refer to → Chapter "Instrument Panel Side Cover, Removing and Installing".
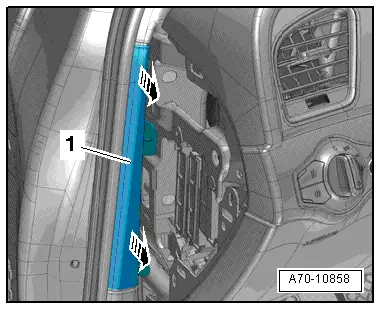
- Unclip the A-pillar gap cover -1- using the Trim Removal Wedge -3409--arrows- and remove.
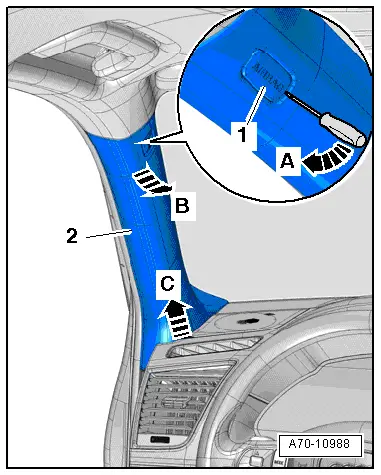
- Pry out the expanding cap -1- with the "airbag" symbol with a screwdriver -arrow A-.
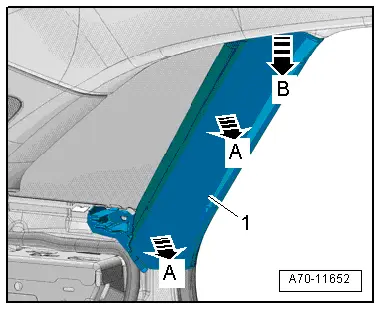
- Carefully loosen the A-pillar upper trim panel -2- starting at the top using a Pry Lever -80-200- up to the first retainer -arrow B-.
- Pull the trim up -arrow C- to disengage the clamps with the hooks. The clamps will slide out of the mounting point on the body.
- Pull the upper A-pillar trim out of the instrument panel and remove it.
Installing
 WARNING
- Follow all safety precautions when working with pyrotechnic components. Refer to → Chapter "Pyrotechnic Components Safety Precautions".
- Do not pinch the head curtain airbag when installing the upper A-pillar trim.
Install in reverse order of removal. Note the following:
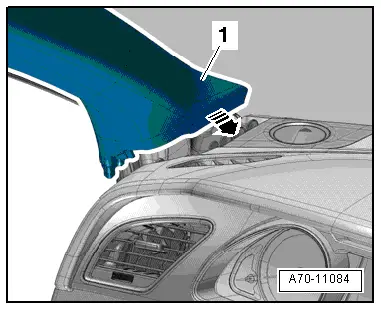
- Insert upper A-pillar trim -1- in the mount on the instrument panel -arrow-.
Installation notes, for example tightening specifications, replacing components. Refer to → Chapter "Overview - A-Pillar Trim Panel".
B-Pillar Trim Panel, Removing and Installing
Upper B-Pillar Trim, Removing and Installing
Special tools and workshop equipment required
- Trim Removal Wedge -3409-
Removing
 WARNING
Follow all safety precautions when working with pyrotechnic components. Refer to → Chapter "Pyrotechnic Components Safety Precautions".
- Remove the front belt end fitting. Refer to → Chapter "Front Belt End Fitting, Removing and Installing".
- Move seat belt height adjuster to the lowest position.
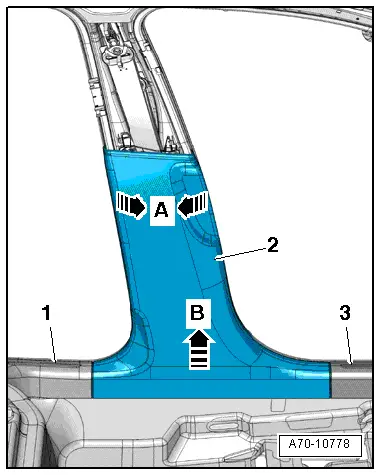
- Position the Trim Removal Wedge -3409- at the bottom edge of the trim and unclip the upper B-pillar trim -2- off the B-pillar -arrows A-.
- Remove the upper B-pillar trim panel from the bracket on the body -arrow B- by moving the trim panel toward the inside and pulling it downward at the same time.
- Guide the seat belt webbing and the belt tongue -1- out through the slide for the seat belt height adjuster -3- and then remove the B-pillar trim panel.

Installing
 WARNING
- Follow all safety precautions when working with pyrotechnic components. Refer to → Chapter "Pyrotechnic Components Safety Precautions".
- Do not pinch the head curtain airbag when installing the B-pillar trim.
- Guide the belt webbing and seat belt latch in through the slide for the seat belt height adjuster.
 Note
Note
Ensure that the seat belt height adjuster is in the lowest position.
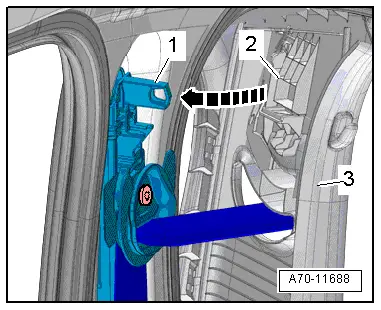
- First, insert the B-pillar trim panel -3- upward into the mount on the roof.
- The mount -2- for the sliding piece of the upper B-pillar trim panel must engage in the retaining pin -1- on the seat belt height adjuster -arrow-.
Install in reverse order of removal.
Installation notes, for example tightening specifications, replacing components. Refer to → Chapter "Overview - B-Pillar Trim Panel".
Lower B-Pillar Trim Panel, Removing and Installing
Special tools and workshop equipment required
- Pry Lever -80-200-
Removing
- Remove the upper B-pillar trim panel. Refer to → Chapter "Upper B-Pillar Trim, Removing and Installing".
- Unclip the front sill panel trim -3- in the rear area of the lower B-pillar trim. Refer to → Chapter "Front Sill Panel Strip, Removing and Installing".
- Unclip the rear sill panel trim -1- in the front area of the lower B-pillar trim. Refer to → Chapter "Rear Sill Panel Strip, Removing and Installing".
- Unclip the B-pillar lower trim panel -2- starting at the top of the B-pillar -A arrows- using the Pry Lever -80 - 200-.
- Unclip and remove the lower B-pillar trim from the sill -arrow B-.
Installing
Install in reverse order of removal.
Installation notes, for example tightening specifications, replacing components. Refer to → Chapter "Overview - B-Pillar Trim Panel".
C-Pillar Trim Panel, Removing and Installing
Special tools and workshop equipment required
- Pry Lever -80-200-
- Omega Clip Tool -T40280-
Removing
 WARNING
Follow all safety precautions when working with pyrotechnic components. Refer to → Chapter "Pyrotechnic Components Safety Precautions".
- Remove the rear outer belt guide. Refer to → Chapter "Rear Seat Belt Guide, Removing and Installing".
- Remove the C-pillar trim panel -1- from the C-pillar -arrow A- using the Pry Lever - 80-200-.
- Remove the upper C-pillar trim from the bracket on the body -arrow B- by moving the trim toward the inside and pulling it downward at the same time.
Installing
 WARNING
- Follow all safety precautions when working with pyrotechnic components. Refer to → Chapter "Pyrotechnic Components Safety Precautions".
- Do not pinch the head curtain airbag when installing the C-pillar trim.
Install in reverse order of removal.
Installation notes, for example tightening specifications, replacing components. Refer to → Chapter "Overview - C-Pillar Trim Panel".
D-Pillar Trim Panel, Removing and Installing
Seat Belt Guide Cover, Removing and Installing
Removing
- Versions with a side cushion: remove the side cushion. Refer to → Chapter "Rear Side Padding With Side Airbag, Removing and Installing".
- Remove the rear sill trim. Refer to → Chapter "Rear Sill Panel Strip, Removing and Installing".
- Remove the luggage compartment side trim. Refer to → Chapter "Luggage Compartment Side Trim Panel, Removing and Installing".
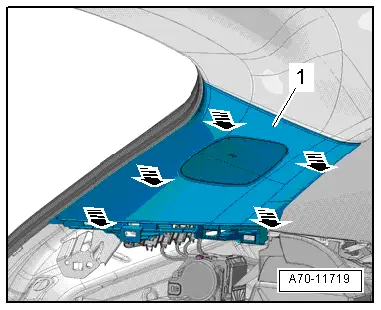
- Remove the cover -1- from the C-pillar trim and the D-pillar trim -arrows-.
- Disengage the cover from the belt guide and remove.
Installing
Install in reverse order of removal.
Installation notes, for example tightening specifications, replacing components. Refer to → Chapter "Overview - C-Pillar Trim Panel".

D-Pillar Trim Panel, Removing and Installing
Special tools and workshop equipment required
- Pry Lever -80-200-
- Omega Clip Tool -T40280-
Removing
- Remove the cover from the seat belt guide Refer to → Chapter "Seat Belt Guide Cover, Removing and Installing".
- Unclip the D-pillar trim panel -1- using the Pry Lever -80-200--arrows-.
Installing
Install in reverse order of removal.
Installation notes, for example tightening specifications, replacing components. Refer to → Chapter "Overview - D-Pillar Trim Panel".
READ NEXT:
 Foot Rest, Removing and Installing
Special tools and workshop equipment
required
Trim Removal Wedge -3409-
Removing
- Remove the front driver side sill panel trim. Refer to
→ Chapter "Front Sill Panel Strip, Remo
Component Location Overview - Luggage Compartment Trim Panels
1 - Lock Carrier Trim
Overview. Refer to
→ Chapter "Overview - Lock Carrier Trim".
2 - Luggage Compartment Floor Covering
Overview. Refer to
→ Chapte
Lower Rear Lid Trim Panel, Removing and Installing
Lower Rear Lid Trim Panel, Removing and Installing
Special tools and workshop equipment
required
Pry Lever -80-200-
Omega Clip Tool -T40280-
Removing
- If installed, remove the rear
SEE MORE:
Wheel Housing Liner
Overview - Front Wheel Housing Liner
1 - Front Wheel Spoiler
Removing and installing. Refer to
→ Chapter "Front Wheel Spoiler, Removing and Installing".
2 - Bolt
2.5 Nm
3 - Metal Nut
4 - Spring Nut
For the quick release
Quantit
Front seats
General information
Make sure that:
You can press the pedals down completely
while your legs are slightly bent.
The distance between your upper body and the
steering wheel or instrument panel is at least
10 inches (25 cm).
The distance between your knees and the instrument
panel is at least
