Audi Q3: Overview - Cover and Cushion
Audi Q3 (8U) 2011-2018 Service Manual / Body / Body Interior / Seat Upholstery, Covers / Overview - Cover and Cushion
Overview - Cover and Cushion, Sport Bench Seat
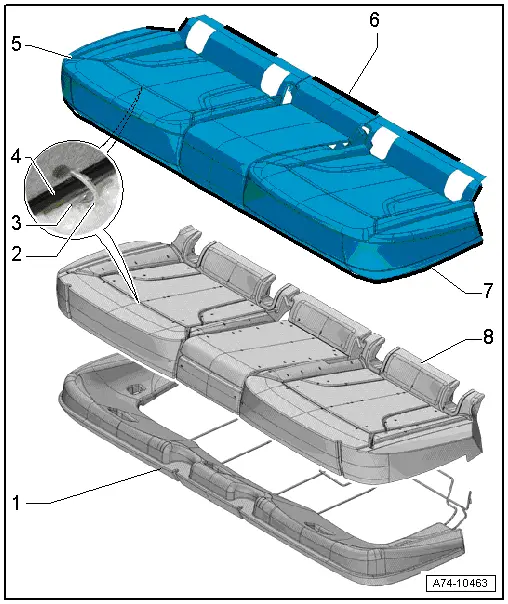
1 - Seat Frame
- With the molded piece
2 - Upholstery Clip
- For attachment of seat cover to seat cushion
- Replace
- Install at the same location with Upholstery Clip Pliers -VAG1634-.
3 - Wire
- Embedded in the foam of the seat cushion
- For attachment of seat cover to seat cushion
4 - Contour Strip
- Sewn into seat cover
- For attachment of seat cover to seat cushion
5 - Seat Cover
- Seat cover and cushion, removing and installing. Refer to → Chapter "Cover and Cushion, Removing and Installing, Bench Seat".
- Seat cover and cushion, removing and installing. Refer to → Chapter "Cover and Cushion, Separating, Bench Seat".
- Allocation. Refer to the Parts Catalog.
- Make sure there are no folds after installing
6 - Molding
- Sewn into seat cover
- For engaging the seat cover in the seat frame
- Make sure is fits correctly on the seat frame
7 - Clamping Strip
- Sewn into seat cover
- For attaching the seat cover to the seat frame
- Strip inward 180º and engage in the groove in the molded piece.
8 - Seat Cushion
- Seat cover and cushion, removing and installing. Refer to → Chapter "Cover and Cushion, Removing and Installing, Bench Seat".
- Seat cover and cushion, removing and installing. Refer to → Chapter "Cover and Cushion, Separating, Bench Seat".
- Allocation. Refer to the Parts Catalog.
Overview - Cover and Cushion, Backrest without a Pass-Through
 Note
Note
A right 2/3 rear seat backrest is shown in the assembly overview. The left 1/3 rear seat backrest is identical.
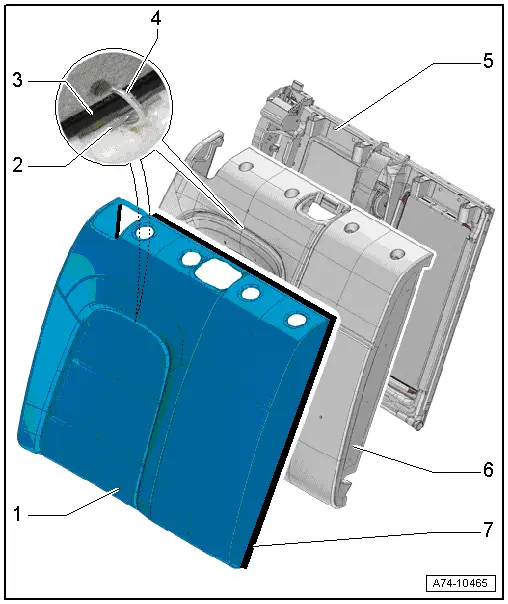
1 - Backrest Cover
- Backrest cover and cushion, removing and installing. Refer to → Chapter "Cover and Cushion, Removing and Installing, Backrest".
- Backrest cover and cushion, separating and assembling. Refer to → Chapter "Cover and Cushion, Separating, Backrest".
- Allocation. Refer to the Parts Catalog.
- Make sure there are no folds after installing
2 - Wire
- Embedded in the foam of the backrest cushion
- For attachment of backrest cover to backrest cushion
3 - Contour Strip
- Sewn into backrest cover
- For attachment of backrest cover to backrest cushion
4 - Upholstery Clip
- For attachment of backrest cover to backrest cushion
- Replace
- Install at the same location with Upholstery Clip Pliers -VAG1634-.
5 - Backrest Frame
- Removing and installing. Refer to → Chapter "Cover and Cushion, Removing and Installing, Backrest".
6 - Backrest Cushion
- Backrest cover and cushion, removing and installing. Refer to → Chapter "Cover and Cushion, Removing and Installing, Backrest".
- Backrest cover and cushion, separating and assembling. Refer to → Chapter "Cover and Cushion, Separating, Backrest".
- Allocation. Refer to the Parts Catalog.
7 - Clamping Strip
- Sewn into backrest cover
- For attaching the backrest cover on the backrest frame
Overview - Cover and Cushion, Backrest with a Pass-Through
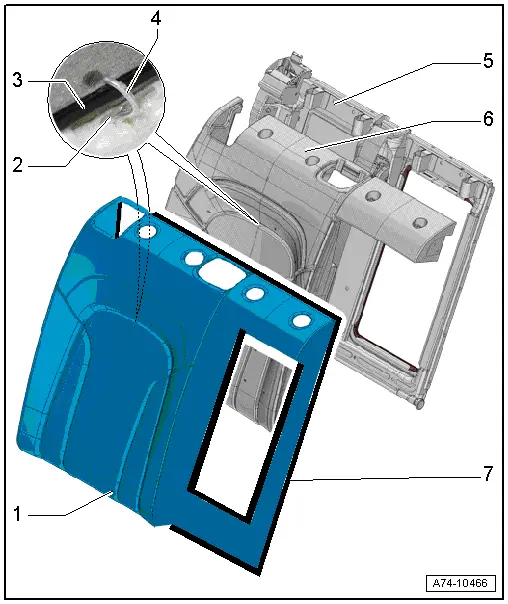
1 - Backrest Cover
- Backrest cover and cushion, removing and installing. Refer to → Chapter "Cover and Cushion, Removing and Installing, Backrest".
- Backrest cover and cushion, separating and assembling. Refer to → Chapter "Cover and Cushion, Separating, Backrest".
- Allocation. Refer to the Parts Catalog.
- Make sure there are no folds after installing
2 - Wire
- Embedded in the foam of the backrest cushion
- For attachment of backrest cover to backrest cushion
3 - Contour Strip
- Sewn into backrest cover
- For attachment of backrest cover to backrest cushion
4 - Upholstery Clip
- For attachment of backrest cover to backrest cushion
- Replace
- Install at the same location with Upholstery Clip Pliers -VAG1634-.
5 - Backrest Frame
- Removing and installing. Refer to → Chapter "Cover and Cushion, Removing and Installing, Backrest".
6 - Backrest Cushion
- Backrest cover and cushion, removing and installing. Refer to → Chapter "Cover and Cushion, Removing and Installing, Backrest".
- Backrest cover and cushion, separating and assembling. Refer to → Chapter "Cover and Cushion, Separating, Backrest".
- Allocation. Refer to the Parts Catalog.
7 - Clamping Strip
- Sewn into backrest cover
- For attaching the backrest cover on the backrest frame
READ NEXT:
 Cover and Cushion, Removing and Installing
Cover and Cushion, Removing and Installing, Bench Seat
Removing
- Remove the rear bench seat. Refer to
→ Chapter "Bench Seat/Single Seat, Removing and Installing".
- Pry up the s
Cover and Cushion, Separating
Cover and Cushion, Separating, Bench Seat
Special tools and workshop equipment
required
Upholstery Clip Pliers -VAG1634-
Removing
- Remove the rear bench seat. Refer to
→ Chap
SEE MORE:
Overview - Hood
Overview - Hood
1 - Hood
A second technician is needed to support and hold the hood during
removal and installation.
Removing:
Unclip and remove the cover -4-.
Engage the gas-filled strut on the hood. Refer to
→ Chapter "Gas-Filled Strut, Removing and Installin
Overview - Radiator Grille
Overview - Radiator Grille, Vehicles through MY 2014
1 - Audi Rings
Removing and installing. Refer to
→ Chapter "Front Emblem, Removing and Installing".
2 - Right Mount
For the parking aid sensor
Removing and installing. Refer to
→ Chapter "Front
© 2019-2025 Copyright www.auq3.net
