Audi Q3: Overview - Interior Rearview Mirror
Audi Q3 (8U) 2011-2018 Service Manual / Body / Body Interior / Interior Equipment / Overview - Interior Rearview Mirror
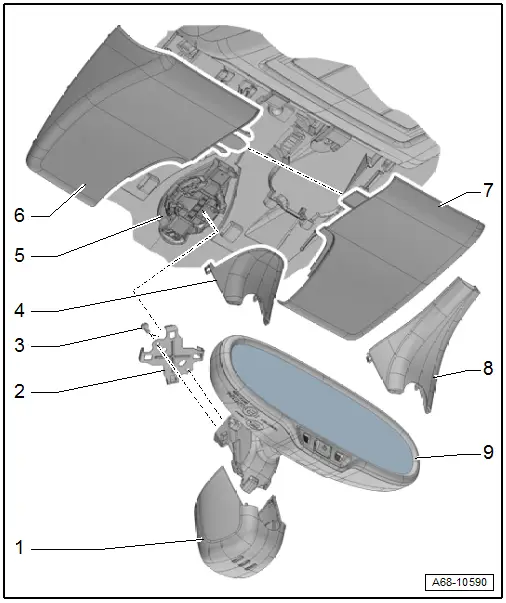
Overview - Interior Rearview Mirror, Version 1

1 - Front Cover
- For the mirror base
- Removing and installing. Refer to → Chapter "Interior Rearview Mirror, Removing and Installing".
2 - Clip
- For the interior rearview mirror
- There are different versions. Refer to the Parts Catalog for the allocation.
- Replace after removing the interior rearview mirror
3 - Bolt
- 1.5 Nm
- Quantity: 2
4 - Rear Cover
- For the mirror base
- For interior rearview mirror with optional equipment
5 - Retaining Plate
- For the interior rearview mirror
- Bonded to the windshield
6 - Left Cover
- For interior rearview mirror with optional equipment
- Press on until it engages audibly
7 - Right Cover
- For interior rearview mirror with optional equipment
- Press on until it engages audibly
8 - Rear Cover
- For the mirror base
- For interior rearview mirror without optional equipment
- Press on until it engages audibly
9 - Interior Rearview Mirror
- Manual dimming rearview mirror or Automatic Dimming Interior Rearview Mirror -Y7-.
- There are different versions. Refer to the Parts Catalog for the allocation.
- Removing and installing. Refer to → Chapter "Interior Rearview Mirror, Removing and Installing".
- Attach in the installed location while turned to 30º and turn it clockwise all the way
- Replace the clip after removing
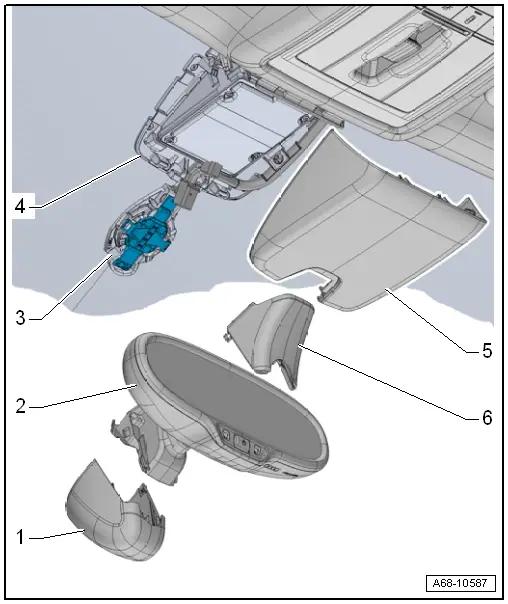
Overview - Interior Rearview Mirror, Version 2

1 - Front Cover
- For the mirror base
2 - Interior Rearview Mirror
- There are different versions. Refer to the Parts Catalog for the allocation.
- Removing and installing. Refer to → Chapter "Interior Rearview Mirror, Removing and Installing".
- Attach in the installed location while turned to 20º and turn it clockwise all the way
- Replace the clip after removing. Refer to → Fig. "Mirror Base Clip".
3 - Retaining Plate
- For the interior rearview mirror
- Bonded to the windshield
4 - Retaining Plate
- Bonded to the windshield
5 - Cover
- For interior rearview mirror with optional equipment
6 - Rear Cover
- For the mirror base
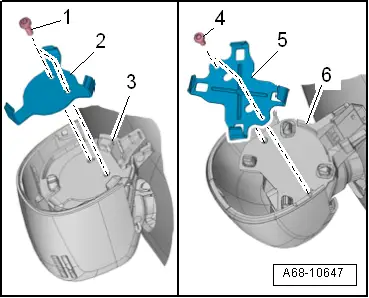
Mirror Base Clip

1 - Screw - 1.5 Nm
2 - Interior rearview mirror clip After removing replace the interior rearview mirror. Allocation. Refer to the Parts Catalog.
3 - Interior Rearview Mirror
4 - Screw - 1.5 Nm
5 - Interior rearview mirror clip After removing replace the interior rearview mirror. Allocation. Refer to the Parts Catalog.
6 - Interior Rearview Mirror
READ NEXT:
 Interior Rearview Mirror, Removing and Installing
Removing
- Turn interior rearview mirror at the mirror base
-1- counterclockwise
-arrow- as far as the stop and
remove from the retaining plate.
Interior Rearview Mirror without Optional
 Component Location Overview - Seat Belts and Attaching Points
1 - Front Seat Belt Latch
Overview. Refer to
→ Chapter "Overview - Front Seat Belt Latch".
2 - Front Passenger Seat Belt Tensioner Igniter 2 -N298-
Only USA a
SEE MORE:
 Condensation Water Drain, Checking
Procedure
- Remove the glove compartment. Refer to
→ Body Interior; Rep. Gr.68; Storage Compartments and Covers;
Glove Compartment, Removing and Installing.
- Remove the right front footwell center console trim panel.
Refer to
→ Body Interior; Rep. Gr
 Towing Guide
Towing Guide
Note
This is a "guide" for Audi models and their towing weights.
The proper towing weight of the respective vehicle must
always adhere to the corresponding vehicle document (certificate
of conformity).
For the towing weights of individual models and special
model
© 2019-2025 Copyright www.auq3.net


