Audi Q3: Overview - Microphone Unit
The Microphone Unit In Front Roof Module -R164- is installed in the Front Interior Lamp -W1-. Up to three microphones may be installed, depending on the equipment.
One microphone (Interior Microphone -R74-) is connected directly to the Digital Sound System Control Module -J525-. The other microphone (Telephone Microphone -R38-) is connected with the Information Electronics Control Module 1 -J794-.
The Microphone Unit In Front Roof Module -R164- located in the Front Interior Lamp -W1- can only be replaced as a complete unit. It is not possible to replace individual microphones (Interior Microphone -R74- or Telephone Microphone -R38-).
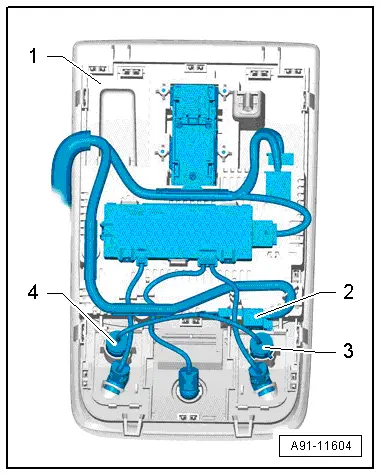
Microphone Unit in Front Roof Module -R164-
1 - Front Interior Lamp -W1-
2 - 4-Pin Connector -T4bg-
3 - Interior Microphone -R74-, Black to the Digital Sound System Control Module -J525-
4 - Telephone Microphone -R38-, gray to the Information Electronics Control Module 1 -J794-, MMI
Microphone Unit in Front Roof Module -R164-, removing and installing. Refer to → Chapter "Microphone Unit in Front Roof Module -R164-, Removing and Installing".
Microphone Unit in Front Roof Module -R164-, Removing and Installing
The Microphone Unit In Front Roof Module -R164- located in the Front Interior Lamp -W1- can only be replaced as a complete unit. It is not possible to replace individual microphones (Interior Microphone -R74- or Telephone Microphone -R38-).
Removing
- Turn off the ignition and all electrical equipment and remove the ignition key.
- Remove the Front Interior Lamp -W1-. Refer to → Electrical Equipment; Rep. Gr.96; Lamps; Roof Trim Panel Lamps Component Location Overview.
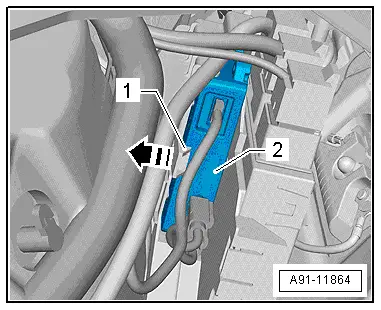
- Unclip and disconnect the connector -2- from the holder in the Front Interior Lamp -W1--1-.
- Pry the individual microphones -3 and 4- out of the housing for the Front Interior Lamp -W1--1-.
Installing
- Install in reverse order of removal.

Cellular Telephone Amplifier -R86-, Removing and Installing
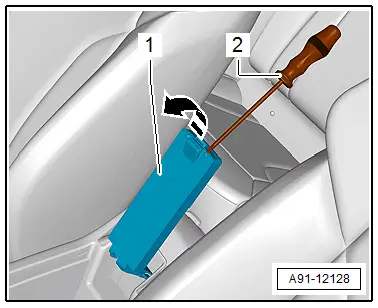
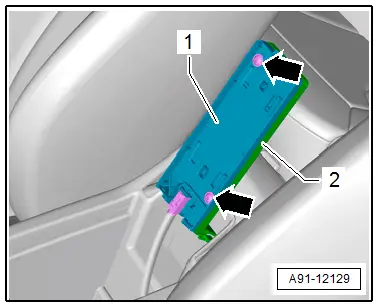
The Cellular Telephone Amplifier -R86--2- is behind the right luggage compartment trim panel.
The Cellular Telephone Amplifier -R86--2- is locked into place in the bracket -1-.
Removing
- Turn off the ignition and all electrical equipment and remove the ignition key.
- Remove the cover from the right side of the luggage compartment.
- Press the catch on the bracket -1- in direction of -arrow- and remove the Cellular Telephone Amplifier -R86--2- from the bracket.
- Release and disconnect all the connectors from the Cellular Telephone Amplifier -R86-.
Installing
- Install in reverse order of removal.

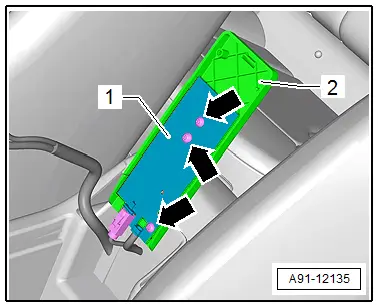
Telephone Baseplate -R126-, Removing and Installing
The Telephone Baseplate -R126- is composed of multiple components (cover, base plate, circuit board with sockets), that must be removed.
Removing
- Turn off the ignition and all electrical equipment and remove the ignition key.
- Fold the Telephone Baseplate -R126- center console storage compartment upward.
- Unclip the bottom of the cover -1- with a small screwdriver -2--arrow-.
- Remove the bolts -arrows- from the Telephone Baseplate -R126--2- and remove the base plate -1-.
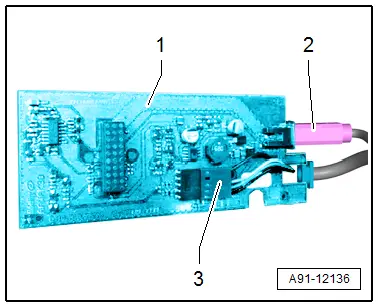
- Remove the bolts -arrows- from the Telephone Baseplate -R126--2- and remove the circuit board -1-.
- Release and disconnect the connectors -2 and 3- from the circuit board -1-.
Installing
- Install in reverse order of removal.
READ NEXT:
 Connector Assignments, Cell Phone Preparation Concert MOST, 9ZF
Information Electronics Control Module 1 -J794-
1 - Connector AM/FM1 from the Antenna Amplifier -R24- (Radio
Antenna 2 -R93-)
2 - DAB connection from Antenna Amplifier 4 -R113-
Connector Assignments, Cell Phone Preparation MMI, 9ZF
Information Electronics Control Module 1 -J794-
1 - Not Assigned
2 - 4-Pin Connector -T4u- to the External Audio Source
Connection -R199-/Internet Access Control Mo
Connector Assignment, Bluetooth Hands-Free Calling Concert MOST, 9ZX
Information Electronics Control Module 1 -J794-
1 - Connector AM/FM1 from the Antenna Amplifier -R24- (Radio
Antenna 2 -R93-)
2 - DAB connection from Antenna Amplifier 4 -R113-
SEE MORE:
Select destination
Applies to: vehicles with navigation system
Fig. 129 Menu: select destination
Opening a menu
Applies to: MMI: Press NAVIGATION on the
home screen.
If the map is displayed, press
fig. 128.
The following functions are available:
Last destinations
Favorites
Contacts
Received destination
Rear Brake Pads, Removing and Installing
Brake Pads, Removing and Installing, Brakes 1KU
If old brake pads are being replaced with new ones, then it
is necessary to check the brake rotor thickness for wear. Pay
attention to the wear specifications for the brake rotor, refer
to
→ Chapter "Brakes Technical Data".
Special too
