Audi Q3: Automatic Headlamp Range Control
Overview - Automatic Head Lamp Range Control
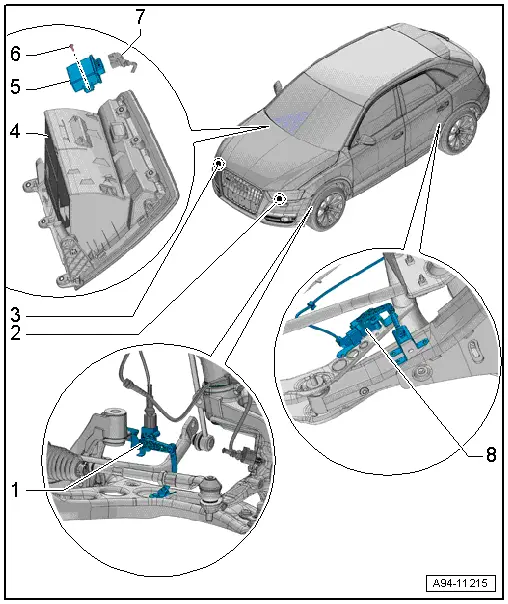
1 - Left Front Level Control System Sensor -G78-
- Component location: on the left front control arm
- Removing and installing. Refer to → Suspension, Wheels, Steering; Rep. Gr.43; Front Level Control System Sensor G78/G89 Removing and Installing.
2 - Left Headlamp Beam Adjustment Motor -V48-
- Removing and installing. Refer to → Chapter "Left/Right Headlamp Beam Adjustment Motor -V48-/-V49-, Removing and Installing, HID Headlamps, Version 1, through MY 2014".
3 - Right Headlamp Beam Adjustment Motor -V49-
- Removing and installing. Refer to → Chapter "Left/Right Headlamp Beam Adjustment Motor -V48-/-V49-, Removing and Installing, HID Headlamps, Version 1, through MY 2014".
4 - Glove Compartment
5 - Headlamp Range Control Module -J431-
- For vehicles without cornering lamp
- For vehicles with cornering light with integrated Cornering Lamp and Headlamp Range Control Module -J745-.
- Removing and installing. Refer to → Chapter "Headlamp Range Control Module, Removing and Installing".
6 - Bolt
- 1.5 Nm
- Quantity: 2
7 - Connector
8 - Left Rear Level Control System Sensor -G76-
- Component location: on the left rear control arm
- Removing and installing. Refer to → Suspension, Wheels, Steering; Rep. Gr.43; Rear Level Control System Sensor G76/G77 Removing and Installing.
Headlamp Range Control Module, Removing and Installing
- If replacing the control module, select the "Replace Control Module" function Vehicle Diagnostic Tester.
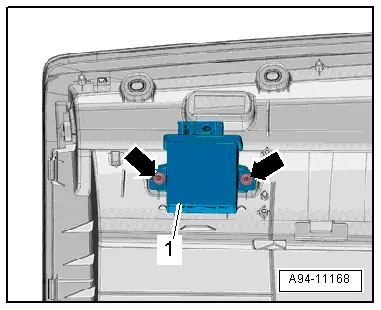
Removing
- Remove the glove compartment. Refer to → Body Interior; Rep. Gr.68; Storage Compartment/Covers; Glove Compartment, Removing and Installing.
- Remove bolts -arrows- and remove control module -1-.
Installing
Install in reverse order of removal. Note the following:
- Install the glove compartment. Refer to → Body Interior; Rep. Gr.68; Storage Compartment/Covers; Glove Compartment, Removing and Installing.
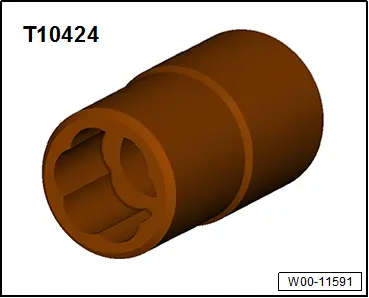
Special Tools
Special tools and workshop equipment required
- 7/16 Inch Extractor -T10424US-
- Hook Tool -T40207-

- Pry Lever -80-200-

READ NEXT:
 Component Location Overview - Instrument Panel Lamps
1 - Center Instrument Panel Vent Illumination Bulb -L68-
integrated in the center instrument panel vent Cannot be replaced
separately if faulty.
Center Instrument Panel Vent, remov
Component Location Overview - Door Ambient Lighting
1 - Storage Compartment Illumination Bulb -L120- in the Front Center
Console
Equipment level
Removing and installing. Refer to
→ Chapter "Storage Compartment Illumination
SEE MORE:
Front Brake Pads, Removing and Installing
Brake Pads, Removing and Installing, 1LJ, 1ZD Brakes
If old brake pads are being replaced with new ones, then it is necessary
to check the brake rotor thickness for wear. Pay attention to the wear
specifications for the brake rotor.
Special tools and workshop equipment
required
Torque Wr
Parallel Parking Assist
Overview - Parallel Parking Assist
1 - Parallel Parking Assistance Button -E581-
Overview. Refer to
→ Chapter "Component Location Overview - Instrument Panel Controls".
2 - Left Front Parallel Parking Assistance Sensor -G568-
Only on vehicles with parallel
