Audi Q3: Component Location Overview - Door Ambient Lighting
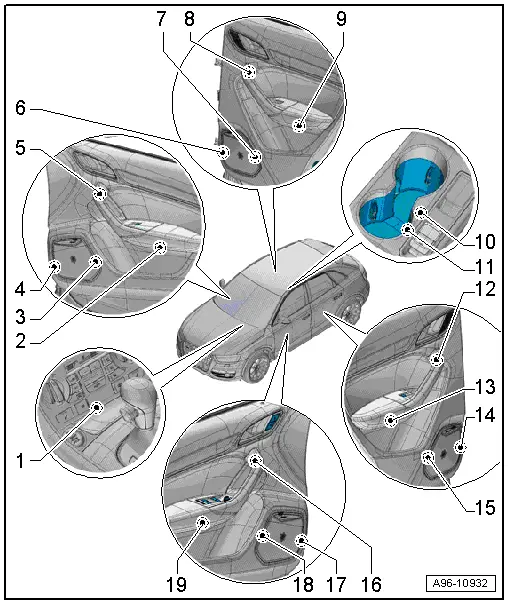
1 - Storage Compartment Illumination Bulb -L120- in the Front Center Console
- Equipment level
- Removing and installing. Refer to → Chapter "Storage Compartment Illumination Bulb -L120-, Removing and Installing".
2 - Front Passenger Door Storage Compartment Illumination Bulb -L161-
- Equipment level
- Removing and installing. Refer to → Chapter "Driver and Front Passenger Door Storage Compartment Illumination Bulb -L160-/-L161-, Removing and Installing".
3 - Speaker Ambient Lighting Bulb 2 -L212-, Front Passenger Door
- Equipment level
- Removing and installing. Refer to → Chapter "Speaker Ambient Lighting Bulb 1 -L211-, Removing and Installing, Front Door".
4 - Speaker Ambient Lighting Bulb 1 -L211-, Front Passenger Door
- Equipment level
- Removing and installing. Refer to → Chapter "Speaker Ambient Lighting Bulb 2 -L212-, Removing and Installing, Front Door".
5 - Front Passenger Door Ambient Lighting Bulb -L165-
- Equipment level
- Removing and installing. Refer to → Chapter "Driver and Front Passenger Door Ambient Lighting Bulb -L164-/-L165-, Removing and Installing".
6 - Speaker Ambient Lighting Bulb 1 -L211-, Right Rear Door
- Equipment level
- Removing and installing. Refer to → Chapter "Speaker Ambient Lighting Bulb 2 -L212-, Removing and Installing, Rear Door".
7 - Speaker Ambient Lighting Bulb 2 -L212-, Right Rear Door
- Equipment level
- Removing and installing. Refer to → Chapter "Speaker Ambient Lighting Bulb 1 -L211-, Removing and Installing, Rear Door".
8 - Right Rear Door Ambient Lighting Bulb -L167-
- Equipment level
- Removing and installing. Refer to → Chapter "Left and Right Ambient Lighting Bulb for Rear Doors -L166-/-L167-, Removing and Installing".
9 - Right Rear Door Storage Compartment Illumination Bulb -L171-
- Equipment level
- Removing and installing. Refer to → Chapter "Left and Right Rear Door Storage Compartment Illumination Bulb -L170-/-L171-, Removing and Installing".
10 - Cupholder Illumination Bulb 2 -L215-
- Equipment level
- Removing and installing. Refer to → Chapter "Cupholder Illumination Bulb\Cupholder Illumination Bulb 2 -L121-/-L215-, Removing and Installing".
11 - Cupholder Illumination Bulb -L121-
- Equipment level
- Removing and installing. Refer to → Chapter "Cupholder Illumination Bulb\Cupholder Illumination Bulb 2 -L121-/-L215-, Removing and Installing".
12 - Left Rear Door Ambient Lighting Bulb -L166-
- Equipment level
- Removing and installing. Refer to → Chapter "Left and Right Ambient Lighting Bulb for Rear Doors -L166-/-L167-, Removing and Installing".
13 - Left Rear Door Storage Compartment Illumination Bulb -L170-
- Equipment level
- Removing and installing. Refer to → Chapter "Left and Right Rear Door Storage Compartment Illumination Bulb -L170-/-L171-, Removing and Installing".
14 - Speaker Ambient Lighting Bulb 1 -L211-, Left Rear Door
- Equipment level
- Removing and installing. Refer to → Chapter "Speaker Ambient Lighting Bulb 2 -L212-, Removing and Installing, Rear Door".
15 - Speaker Ambient Lighting Bulb 2 -L212-, Left Rear Door
- Equipment level
- Removing and installing. Refer to → Chapter "Speaker Ambient Lighting Bulb 1 -L211-, Removing and Installing, Rear Door".
16 - Driver Door Ambient Lighting Bulb -L164-
- Equipment level
- Removing and installing. Refer to → Chapter "Driver and Front Passenger Door Ambient Lighting Bulb -L164-/-L165-, Removing and Installing".
17 - Speaker Ambient Lighting Bulb 1 -L211-, Driver Door
- Equipment level
- Removing and installing. Refer to → Chapter "Speaker Ambient Lighting Bulb 2 -L212-, Removing and Installing, Front Door".
18 - Speaker Ambient Lighting Bulb 2 -L212-, Driver Door
- Equipment level
- Removing and installing. Refer to → Chapter "Speaker Ambient Lighting Bulb 1 -L211-, Removing and Installing, Front Door".
19 - Driver Door Storage Compartment Illumination Bulb -L160-
- Equipment level
- Removing and installing. Refer to → Chapter "Driver and Front Passenger Door Storage Compartment Illumination Bulb -L160-/-L161-, Removing and Installing".
Component Location Overview - Center Console Lamps
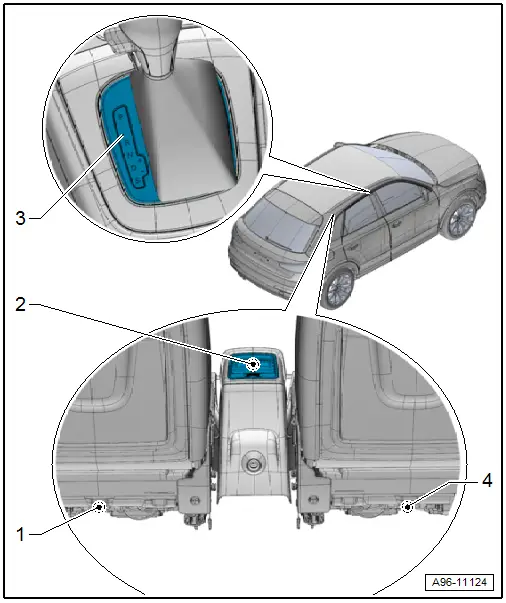
1 - Left Rear Footwell Lamp -W45-
- Removing and installing. Refer to → Chapter "Left/Right Rear Footwell Lamp -W45-/-W46-, Removing and Installing".
2 - Rear Vent Illumination Bulb -L216-
- Equipment level
- Cannot be replaced separately if faulty.
- Replacing. Refer to → Body Interior; Rep. Gr.68; Overview - Center Console.
3 - Selector Lever Transmission Range Position Display Unit -Y26- with Selector Lever Scale Illumination Bulb -L101-
- Removing and installing. Refer to → Chapter "Selector Lever Transmission Range Position Display Unit -Y26-, Removing and Installing".
4 - Right Rear Footwell Lamp -W46-
- Removing and installing. Refer to → Chapter "Left/Right Rear Footwell Lamp -W45-/-W46-, Removing and Installing".
Component Location Overview - Roof Trim Panel Lamps
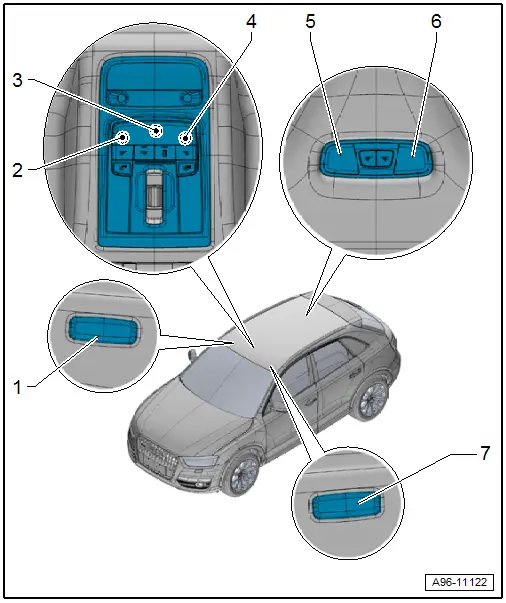
1 - Right Vanity Mirror Illumination
- Equipment level
- Front Passenger Vanity Mirror Lamp -W14-
- 12 V, 5 W
- Removing and installing. Refer to → Chapter "Driver/Front Passenger Vanity Mirror Lamp -W20-/-W14-, Removing and Installing".
2 - Driver Reading Lamp -W19-
- If the LED is faulty, then the interior lamp/reading lamp must be replaced. Refer to → Chapter "Front Interior Lamp/Reading Lamp, Removing and Installing".
3 - Front Interior Lamp -W1-
Without LED-bulb
- 12V, 5W
- Removing and installing. Refer to → Chapter "Front Interior Lamp -W1-/Front Passenger Reading Lamp -W13-/ Driver Reading Lamp -W19-, Replacing".
With LED-bulb
- If the LED is faulty, then the interior lamp/reading lamp must be replaced. Refer to → Chapter "Front Interior Lamp/Reading Lamp, Removing and Installing".
4 - Front Passenger Reading Lamp -W13-
- Equipment level
- If the LED is faulty, then the interior lamp/reading lamp must be replaced. Refer to → Chapter "Front Interior Lamp/Reading Lamp, Removing and Installing".
5 - Left Rear Reading Lamp -W11-
Without LED-bulb
- 12V, 5W
- Replacing. Refer to → Chapter "Left/Right Rear Reading Lamp -W11-/-W12-, Replacing".
- If the LED is faulty, then the interior lamp/rear reading lamp must be replaced.
6 - Right Rear Reading Lamp -W12-
Without LED-bulb
- 12V, 5W
- Replacing. Refer to → Chapter "Left/Right Rear Reading Lamp -W11-/-W12-, Replacing".
- If the LED is faulty, then the interior lamp/rear reading lamp must be replaced.
7 - Left Vanity Mirror Illumination
- Equipment level
- Driver Vanity Mirror Lamp -W20-
- 12 V, 5 W
- Removing and installing. Refer to → Chapter "Driver/Front Passenger Vanity Mirror Lamp -W20-/-W14-, Removing and Installing".
Component Location Overview - Luggage Compartment Lamps
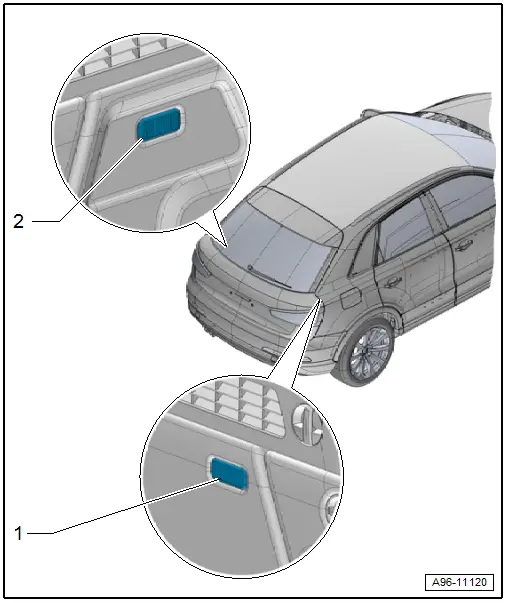
1 - Right Luggage Compartment Lamp -W35-
- Inside the top of the luggage compartment trim panel
- 12 V, 5 W
- Removing and installing. Refer to → Chapter "Left/Right Luggage Compartment Lamp -W18- / -W35-, Removing and Installing".
2 - Left Luggage Compartment Lamp -W18-
- Inside the top of the luggage compartment trim panel
- 12 V, 5 W
- Removing and installing. Refer to → Chapter "Left/Right Luggage Compartment Lamp -W18- / -W35-, Removing and Installing".
READ NEXT:
 Glove Compartment Lamp -W6-, Removing and Installing
Removing
- Turn the light switch to position "0".
- Press in the tab -1- using a
flat-head screwdriver and pry out the glove compartment lamp
-2-.
- Disconnect the connector -3-.
Driver/Front Passenger Door Warning Lamp -W30-/-W36-, Removing and
Installing
Removing
- Press the tab -1- with a
flat-blade screwdriver and remove the door warning lamp
-2-.
- Disconnect the connector -3-.
- Carefully pry out the cover over the lamp in d
Speaker Ambient Lighting Bulb 1 and 2 -L211-/-L212-, Removing and Installing
Speaker Ambient Lighting Bulb 1 -L211-, Removing and Installing, Front
Door
Removing
- Remove the front door trim panel. Refer to
→ Body Interior; Rep. Gr.70; Front Door Tri
SEE MORE:
Overview - Rear Brakes
Overview - Rear Brakes, Brakes 1KU
1 - Brake Shield
Removing and installing, refer to
→ Chapter "Brake Shield, Removing and Installing, Brakes 1KU".
2 - Brake Rotor
Allocation, refer to the Parts Catalog.
Dimensions
→ Chapter "Brakes Technical Da
Dryer Bag/Dryer Cartridge, Removing and Installing
Dryer Bag/Dryer Cartridge, Removing and Installing
WARNING
Danger due to refrigerant coming out under pressure.
Danger of frost bite to skin and other parts of the
body.
Extract the refrigerant and immediately open the
refrigerant circuit after that.
If the refrigerant was ext
