Audi Q3: Dryer Bag/Dryer Cartridge, Removing and Installing
Dryer Bag/Dryer Cartridge, Removing and Installing
 WARNING
Danger due to refrigerant coming out under pressure.
Danger of frost bite to skin and other parts of the body.
- Extract the refrigerant and immediately open the refrigerant circuit after that.
- If the refrigerant was extracted more than 10 minutes in the past and the refrigerant circuit was not opened, extract the refrigerant again. Pressure in the refrigerant circuit is caused by evaporation.
Special tools and workshop equipment required
- Commercially available pick-up tool
Removing
- Discharge the refrigerant circuit. Refer to → Refrigerant R134a, Servicing; Rep. Gr.87; Refrigerant Circuit (Refrigerant R134a, Servicing; Refrigerant Circuit, Using Service Station).
- Remove the lock carrier cover. Refer to → Body Exterior; Rep. Gr.63; Front Bumper; Attachments, Removing and Installing.
- Check the pressure in the refrigerant circuit using a pressure gauge from an A/C service station. Refer to → Refrigerant R134a Servicing; Rep. Gr.87; Refrigerant Circuit (Refrigerant R134a Servicing; Refrigerant Circuit, Using Service Station).
 WARNING
Danger due to refrigerant coming out under pressure.
Danger of frost bite to skin and other parts of the body.
Only remove the sealing plug when the pressure in the refrigerant circuit is the same or smaller than the ambient pressure.
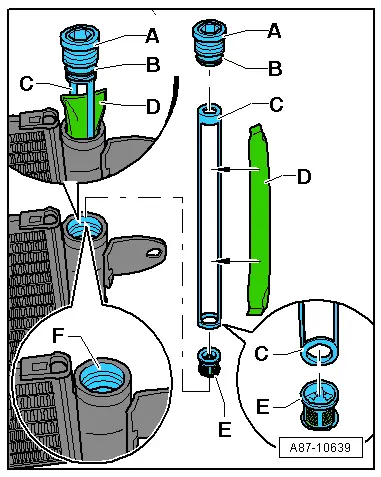
- Remove the sealing plug -A-.
- Remove the dryer carrier -C- with the dryer cartridge -D- upward from the condenser.
- Remove the filter element -E- upward from the condenser using, for example, a commercially available pick-up tool.
- Seal the open receiver/dryer with the sealing plug -1- to prevent dirt and moisture from getting in.
Installing
Installation is done is reverse order, observe the following:
 Note
Note
The sealing plug, O-ring seal and dryer cartridge must be replaced after every opening of the receiver/dryer. Refer to the Parts Catalog.
- Using the opening, inspect the receiver/dryer on the condenser for debris or for damage on the threaded and sealing surfaces.
 Note
Note
- Keep the dryer cartridge sealed in its air-tight package as long as possible. Open the package just before installing the dryer cartridge into the condenser. The dryer cartridge absorbs moisture in a very short time and become unusable.
- Coat the o-ring seal for the plug lightly with refrigerant oil before installing. Refer to → Chapter "Refrigerant Circuit Seals".
- Install the filter element -E- with the correct side into the condenser receiver/dryer.
- Remove the dryer cartridge from the package and insert it into the dryer carrier.
- Insert the dryer carrier together with the dryer cartridge -D- into the condenser receiver/dryer.
- Position and install the sealing plug -A-.
- Install the lock carrier cover. Refer to → Body Exterior; Rep. Gr.63; Front Bumper; Attachments, Removing and Installing.
- Evacuate the refrigerant circuit and fill it. Refer to → Refrigerant R134a, Servicing; Rep. Gr.87; Refrigerant Circuit (Refrigerant R134a, Servicing; Refrigerant Circuit, Using Service Station).
- Operate the A/C system after filling the refrigerant circuit. Refer to → Chapter "A/C System, Starting Operation after Filling Refrigerant Circuit".
- Check the DTC memory and erase any displayed entries using the Vehicle Diagnostic Tester in the "Guided Fault Finding" function.

Dryer Cartridge, Removing and Installing, Modine Condenser
 WARNING
Danger due to refrigerant coming out under pressure.
Danger of frost bite to skin and other parts of the body.
- Extract the refrigerant and immediately open the refrigerant circuit after that.
- If the refrigerant was extracted more than 10 minutes in the past and the refrigerant circuit was not opened, extract the refrigerant again. Pressure in the refrigerant circuit is caused by evaporation.
Special tools and workshop equipment required
- Dryer Element Plug Socket -T10128- for version "2"
Removing
- Remove the lock carrier cover. Refer to → Body Exterior; Rep. Gr.63; Front Bumper; Attachments, Removing and Installing.
- Discharge the refrigerant circuit. Refer to → Refrigerant R134a, Servicing; Rep. Gr.87; Refrigerant Circuit (Refrigerant R134a, Servicing; Refrigerant Circuit, Using Service Station).
Version "1":
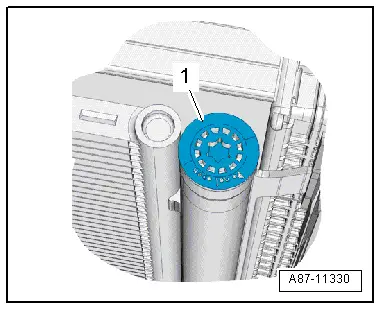
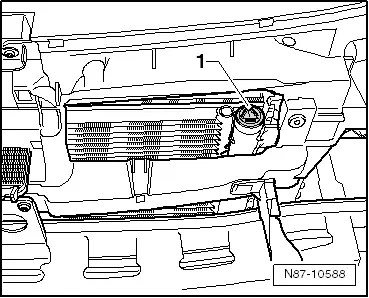
- Remove the protective cap -1-.
- Check the pressure in the refrigerant circuit using a pressure gauge from an A/C service station. Refer to → Refrigerant R134a Servicing; Rep. Gr.87; Refrigerant Circuit (Refrigerant R134a Servicing; Refrigerant Circuit, Using Service Station).
 WARNING
Danger due to refrigerant coming out under pressure.
Danger of frost bite to skin and other parts of the body.
Only remove the circlip when the pressure in the refrigerant circuit is the same or smaller than the ambient pressure.
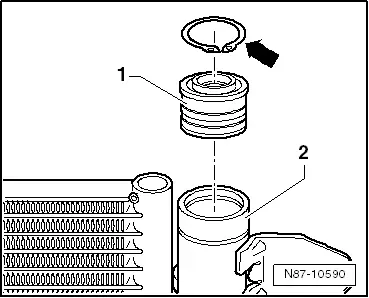
- Push the sealing cap -1- in slightly.
- Remove the snap ring -arrow- and then remove the closure cap from the condenser -2- using a M12 bolt.

- Make a 2 mm diameter welding wire with the following dimensions.
- Dimension -a- = 380 mm.
- Dimension -b- = maximum 7 mm.
- Dimension -c- = maximum 6 mm.
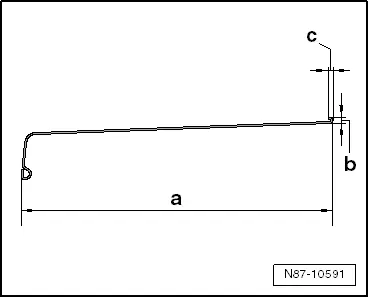
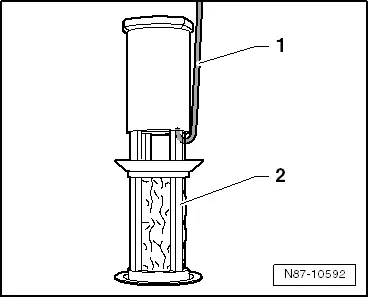
- Hook the welding wire to the strainer exactly as illustrated to prevent damaging the condenser.
- Carefully remove the filter element (strainer) -2- from the receiver/dryer with the welding wire -1-.

- Seal the open receiver/dryer with the sealing cap -1- to prevent dirt and moisture from getting in.
Version "2":
- Remove the protective cap -1- using the Dryer Element Plug Socket -T10128-.
- Check the pressure in the refrigerant circuit using a pressure gauge from an A/C service station. Refer to → Refrigerant R134a Servicing; Rep. Gr.87; Refrigerant Circuit (Refrigerant R134a Servicing; Refrigerant Circuit, Using Service Station).
 WARNING
Danger due to refrigerant coming out under pressure.
Danger of frost bite to skin and other parts of the body.
Only remove the circlip when the pressure in the refrigerant circuit is the same or smaller than the ambient pressure.
- Push the sealing cap -1- in slightly.
- Remove the snap ring -arrow- and then remove the closure cap from the condenser -2- using a M12 bolt.

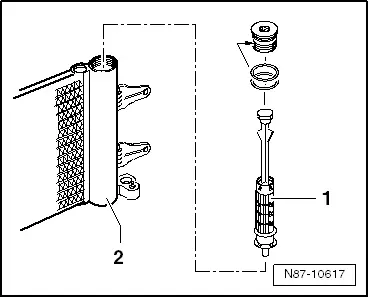
- Remove the dryer unit -1- from the condenser -2- using the needle nose pliers.
- Seal the open receiver/dryer with the sealing cap to prevent dirt and moisture from getting in.
Installing
Installation is done is reverse order, observe the following:
 Note
Note
The closure cap with the O-ring seals, dryer cartridge and the filter element (strainer) must be replaced after every opening of the receiver/dryer. Refer to the Parts Catalog.
- Using the opening, inspect the receiver/dryer on the condenser for debris or for damage on the sealing surfaces.
Version "1":
- Insert the filter element (with strainer) -2- with the correct side into the condenser receiver/dryer.
- The filter element must be pushed in until stop.
 Note
Note
Keep the dryer cartridge sealed in its air-tight package as long as possible. Open the package just before installing the dryer cartridge into the condenser. The dryer cartridge absorbs moisture in a very short time and become unusable.
- Remove the dryer cartridge from the package and insert it into the condenser receiver/dryer.
Version "2":
- Remove the dryer unit -1- from the package and insert it into the condenser -2-.

Continuation for All Versions:
- Insert the closure cap -1- and push it far enough downward so that the snap ring -arrow- can engage in the groove.
 Note
Note
Coat the O-ring seals on the closure cap lightly with refrigerant oil before installing. Refer to → Chapter "Refrigerant Circuit Seals".

- Version "1": Press on the protective cap.
- Version "2": Install the protective cap using the Dryer Element Plug Socket -T10128-.
- Evacuate the refrigerant circuit and fill it. Refer to → Refrigerant R134a, Servicing; Rep. Gr.87; Refrigerant Circuit (Refrigerant R134a, Servicing; Refrigerant Circuit, Using Service Station).
- Operate the A/C system after filling the refrigerant circuit. Refer to → Chapter "A/C System, Starting Operation after Filling Refrigerant Circuit".
- Check the DTC memory and erase any displayed entries using the Vehicle Diagnostic Tester in the "Guided Fault Finding" function.

Dryer Cartridge, Removing and Installing, Showa/Keihin Condenser
 Note
Note
Depending on the version, the receiver/dryer is either completely replaced or only the dryer cartridge is replaced on the Showa/Keihin condenser (there are different versions. Refer to the Parts Catalog).
Special tools and workshop equipment required
- Commercially available pick-up tool
Removing
- Discharge the refrigerant circuit. Refer to → Refrigerant R134a, Servicing; Rep. Gr.87; Refrigerant Circuit (Refrigerant R134a, Servicing; Refrigerant Circuit, Using Service Station).
- Remove the lock carrier cover. Refer to → Body Exterior; Rep. Gr.63; Front Bumper; Attachments, Removing and Installing.
- Check the pressure in the refrigerant circuit using a pressure gauge from an A/C service station. Refer to → Refrigerant R134a Servicing; Rep. Gr.87; Refrigerant Circuit (Refrigerant R134a Servicing; Refrigerant Circuit, Using Service Station).
 WARNING
Danger due to refrigerant coming out under pressure.
Danger of frost bite to skin and other parts of the body.
Only remove the circlip when the pressure in the refrigerant circuit is the same or smaller than the ambient pressure.
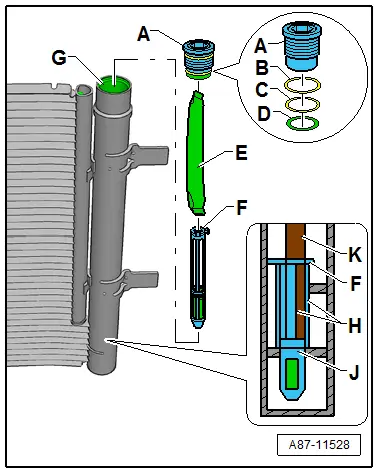
- Remove the sealing plug -A-.
- Remove the dryer cartridge -E- upward from the condenser receiver/dryer.
- Remove the filter element -F- upward from the condenser receiver/dryer using, for example, a commercially available pick-up tool.
- Seal the open receiver/dryer with the sealing plug -A- to prevent dirt and moisture from getting in.
Installing
Installation is done is reverse order, observe the following:
 Note
Note
Replace the sealing plug, O-ring seal and dryer cartridge after every opening of the receiver/dryer. Refer to Parts Catalog.
- Using the opening, inspect the receiver/dryer on the condenser for debris and damage on the thread and the sealing surfaces.
 Note
Note
- Keep the dryer cartridge sealed in its air-tight package as long as possible. Open the package just before installing the dryer cartridge in the receiver/dryer of the condenser. The dryer cartridge absorbs moisture in a very short time and become unusable.
- Coat the O-ring seal for the plug with refrigerant oil before installing. Refer to → Chapter "Refrigerant Circuit Seals".
- Lightly coat the filter element -F- in the sealing surface area -J- with refrigerant oil before installing. Refer to → Chapter "Refrigerant Circuit Seals".
- Using a suitable tool -K-, insert the filter element -F- on the proper side all the way into the mount in the receiver/dryer. While doing so, do not damage the braces -H-.
- Assemble the sealing plug -A- with the O-ring seals -B- and -C- and the support ring -D-.
- Remove the dryer cartridge -E- from the package and insert it into the receiver/dryer.
- Position and install the sealing plug -A-.
- Install the lock carrier cover. Refer to → Body Exterior; Rep. Gr.63; Front Bumper; Attachments, Removing and Installing.
- Evacuate the refrigerant circuit and fill it. Refer to → Refrigerant R134a, Servicing; Rep. Gr.87; Refrigerant Circuit (Refrigerant R134a, Servicing; Refrigerant Circuit, Using Service Station).
- Operate the A/C system after filling the refrigerant circuit. Refer to → Chapter "A/C System, Starting Operation after Filling Refrigerant Circuit".
- Check the DTC memory and erase any displayed entries using the Vehicle Diagnostic Tester in the "Guided Fault Finding" function.
READ NEXT:
 Service Connection on Low and High Pressure Side, Removing and Installing
WARNING
Danger due to refrigerant coming out under pressure.
Danger of frost bite to skin and other parts of the
body.
Extract the refrigerant and immediately open the
refrigerant
Overview - A/C Compressor Power Unit
Overview - A/C Compressor Power Unit, 4-Cylinder Engine
1 - Ribbed Belt
Check for wear
Removing and installing. Refer to
→ Rep. Gr.13; Cylinder Block, Belt Pulley Side
SEE MORE:
Evaporator, Removing and Installing
Removing
- Removing the air distribution housing. Refer to
→ Chapter "Air Distribution Housing, Removing and Installing".
- Remove the spacer foam -6-.
- Remove the bolts -1 and 3-.
- Remove the air distribution housing upper section
-5- from the lower section
-4- b
Overview - Condenser
Overview - Condenser, Dryer Cartridge
Note
There are different versions of the condenser, radiator and
auxiliary radiator. Observe the correct allocation of these components.
Refer to the Parts Catalog.
The "Modine" condenser is shown in the illustration.
1 - Conde
