Audi Q3: Overview - A/C Compressor Power Unit
Audi Q3 (8U) 2011-2018 Service Manual / Heating, Ventilation & Air Conditioning / Air Conditioning / A/C Compressor / Overview - A/C Compressor Power Unit
Overview - A/C Compressor Power Unit, 4-Cylinder Engine
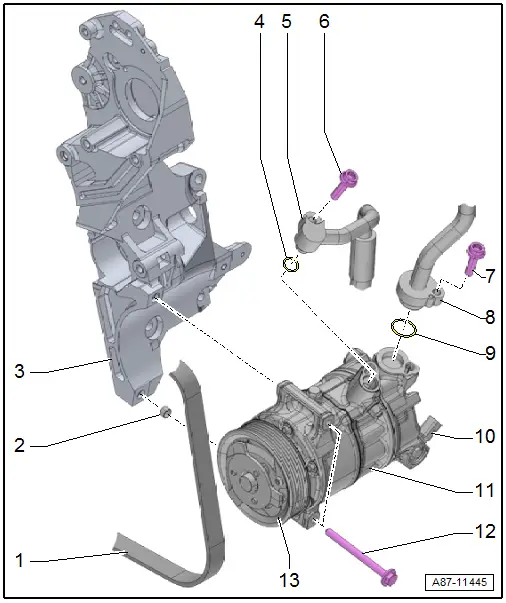
1 - Ribbed Belt
- Check for wear
- Removing and installing. Refer to → Rep. Gr.13; Cylinder Block, Belt Pulley Side; Ribbed Belt, Removing and Installing.
- Mark the rotation direction, install on correct side. Refer to → Rep. Gr.13; Cylinder Block, Belt Pulley Side; Ribbed Belt, Removing and Installing.
2 - Alignment Sleeve
- Quantity: 2
3 - Auxiliary Component Bracket
- There are different versions. Refer to the Parts Catalog.
- To remove and install, refer to → Engine Mechanical, Fuel Injection and Ignition; Rep. Gr.13; Cylinder Block, Belt Pulley Side; Auxiliary Components Bracket, Removing and Installing.
4 - O-Ring Seal
- Replacing. For the correct version, refer to the Parts Catalog.
- Coat with refrigerant oil before installing. Refer to → Chapter "Refrigerant Circuit Seals".
5 - High Pressure Side Refrigerant Line
6 - Bolt
- Tightening specification. Refer to → Chapter "Overview - Condenser, A/C Compressor, Expansion Valve, Refrigerant Line".
7 - Bolt
- Tightening specification. Refer to → Chapter "Overview - Condenser, A/C Compressor, Expansion Valve, Refrigerant Line".
8 - Low Pressure Side Refrigerant Line
9 - O-Ring Seal
- Replacing. For the correct version, refer to the Parts Catalog.
- Coat with refrigerant oil before installing. Refer to → Chapter "Refrigerant Circuit Seals".
10 - A/C Compressor Regulator Valve -N280-
- To check, refer to Vehicle Diagnostic Tester in the "Guided Fault Finding" function, → Chapter "A/C Compressor Regulator Valve -N280-, Checking Switch-On Signal" and → Wiring diagrams, Troubleshooting & Component locations.
 Note
Note
- Certain functions on the A/C Compressor Regulator Valve -N280- (for example, a stuck valve or a disruption in the coil) can lead to a complaint regarding the A/C compressor (A/C system doesn't cool, the evaporator ices over, etc.). If the cause is with the A/C Compressor Regulator Valve -N280- (and not the A/C compressor itself), the A/C compressor can be serviced by replacing the A/C Compressor Regulator Valve -N280-. Refer to → Refrigerant R134a Servicing; Rep. Gr.87; Refrigerant Circuit Components, Replacing (Refrigerant R134a, Servicing; Refrigerant Circuit Components, Replacing).
- The A/C Compressor Regulator Valve -N280- is not available as a replacement part for all A/C compressors. If the A/C Compressor Regulator Valve -N280- is not available as an individual A/C compressor part (different versions), then the entire A/C compressor must be replaced. Refer to the Parts Catalog.
11 - A/C Compressor
- There are different versions. Refer to the Parts Catalog.
- Refrigerant line, disconnecting and reconnecting. Refer to → Chapter "Refrigerant Lines, Disconnecting and Connecting at A/C Compressor".
- Removing from and attaching to the bracket. Refer to → Chapter "A/C Compressor, Removing and Installing on Bracket".
- Removing and installing. Refer to → Chapter "A/C Compressor, Removing and Installing".
12 - Bolt
- Quantity: 3
- There are different versions. Refer to the Parts Catalog.
- Tightening specification for steel bolts: 25 Nm
- Tightening specification for aluminum bolts: 8 Nm +180º
- Only use aluminum bolts once, then replace.
13 - Belt Pulley with Overload Protection
- There are different versions. Refer to the Parts Catalog.
- Overview. Refer to → Chapter "Overview - Belt Pulley".
Overview - A/C Compressor Power Unit, 5-Cylinder Engine (Audi RS Q3)

1 - Auxiliary Component Bracket
- There are different versions. Refer to the Parts Catalog.
- To remove and install, refer to → Engine Mechanical, Fuel Injection and Ignition; Rep. Gr.13; Cylinder Block, Belt Pulley Side; Auxiliary Components Bracket, Removing and Installing.
2 - Bolt
- Tightening specification. Refer to → Engine Mechanical, Fuel Injection and Ignition; Rep. Gr.13; Cylinder Block, Belt Pulley Side; Overview - Cylinder Block, Belt Pulley Side.
3 - Bolt
- Tightening specification. Refer to → Engine Mechanical, Fuel Injection and Ignition; Rep. Gr.13; Cylinder Block, Belt Pulley Side; Overview - Cylinder Block, Belt Pulley Side.
4 - Bolt
- Tightening specification. Refer to → Engine Mechanical, Fuel Injection and Ignition; Rep. Gr.13; Cylinder Block, Belt Pulley Side; Overview - Cylinder Block, Belt Pulley Side.
5 - A/C Compressor
- There are different versions. Refer to the Parts Catalog.
- Refrigerant line, disconnecting and reconnecting. Refer to → Chapter "Refrigerant Lines, Disconnecting and Connecting at A/C Compressor".
- Removing from and attaching to the bracket. Refer to → Chapter "A/C Compressor, Removing and Installing on Bracket".
- Removing and installing. Refer to → Chapter "A/C Compressor, Removing and Installing".
6 - Bolt
- Quantity: 3
- There are different versions. Refer to the Parts Catalog.
- Tightening specification for steel bolts: 25 Nm
- Tightening specification for aluminum bolts: 8 Nm +180º
- Only use aluminum bolts once, then replace.
7 - Alignment Sleeve
- Quantity: 2
- Be careful to use the correct version and make sure the subassembly bracket and A/C compressor fit correctly.
READ NEXT:
 Overview - Belt Pulley
Overview - Belt Pulley, Denso A/C Compressor, Version 1
Note
This type of belt pulley is installed on a "7 SEU 16" A/C
compressor.
1 - Bolt
20 Nm
Replacing
2&nb
Overview - Belt Pulley, Valeo A/C Compressor
1 - Bolt
17 Nm
Replacing
- The threaded bolt holes, into which the self-locking bolts or bolts
with locking compound were installed, must be cleaned (for example with
A/C Compressor, Removing and Installing on Bracket
A/C Compressor, Removing and Installing from Bracket, 4-Cylinder Engine
Note
The Air Conditioning (A/C) compressor can be removed and
installed at the bracket without opening the refri
SEE MORE:
Drive Axle Threaded Connection, Loosening and Tightening
Special tools and workshop equipment
required
Socket AF 24 mm -T10361A-
Digital Torque Wrench -VAG1756A-
The wheel bearing must not be under a load while the
driveshaft threaded connection on the wheel side is loose.
If the bearings are loaded by the vehicle weight the wheel
bearing
Predictive route guidance
Applies to: vehicles with navigation system and predictive
route guidance
Your MMI can learn the routes that you drive frequently
(such as your daily commute to work and
back) and suggest route guidance based on the
current vehicle position.
When the function is switched on, the MMI records
the rou
© 2019-2025 Copyright www.auq3.net
