Audi Q3: A/C Compressor, Removing and Installing on Bracket
A/C Compressor, Removing and Installing from Bracket, 4-Cylinder Engine
 Note
Note
- The Air Conditioning (A/C) compressor can be removed and installed at the bracket without opening the refrigerant lines.
- In the following, removal and installation of compressor is described for a vehicle with a 2.0 L gasoline engine with a "Denso" compressor of type "7 SEU 16". On vehicles with different engine or a different A/C compressor, slight changes may result (depending on engine, additional assemblies may need to be removed or loosened)
- Do not discharge the refrigerant circuit, do not remove refrigerant hoses and lines from the A/C compressor.
- Do not unfasten refrigerant lines and corresponding clamps.
- After removing, tie the A/C compressor to the longitudinal member with wire. Never leave hanging from refrigerant pipes.
- Before removing, mark direction of operation of ribbed belt with chalk or felt-tipped pen. Running a used belt in the opposite direction could destroy it. Refer to → Engine Mechanical, Fuel Injection and Ignition; Rep. Gr.13; Cylinder Block, Belt Pulley Side; Ribbed Belt, Removing and Installing.
- Different A/C compressors may be installed depending on the engine and country. Refer to the Parts Catalog.
Removing
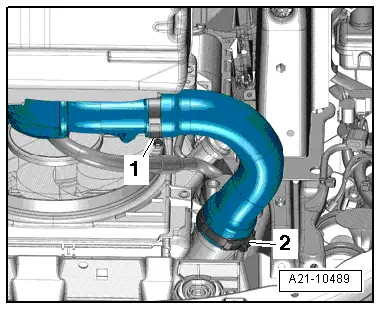
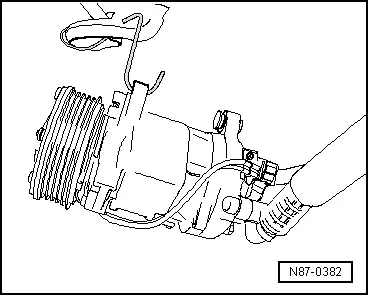
- Vehicles with a TDI engine: Remove the air guide hose by loosening the hose clamps -1- and -2-.
- Seal the open lines and connections with clean plugs from the Engine Bung Set -VAS6122-.
- Remove the ribbed belt. Refer to → Engine Mechanical, Fuel Injection and Ignition; Rep. Gr.13; Cylinder Block, Belt Pulley Side; Ribbed Belt, Removing and Installing.
- Remove the noise insulation. Refer to → Body Exterior; Rep. Gr.66; Noise Insulation; Noise Insulation, Removing and Installing.
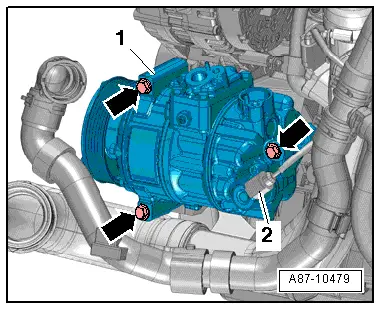
- Disconnect the connector -2- from the A/C Compressor Regulator Valve -N280-.
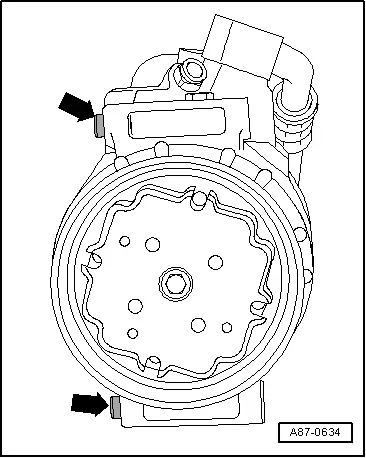
- Remove the bolts -arrows- and remove the A/C compressor -1-.
- Hang the A/C compressor on the lock carrier with wire.
Installing
Install in reverse order of removal. Note the following:
- Clean the contact surfaces on the A/C compressor thoroughly.
- Insert the alignment sleeve -arrows- in the A/C compressor.
- After installing the A/C compressor, refrigerant lines and related brackets, make sure that there is a sufficient distance between the belt, bracket and belt pulley.
 Note
Note
Make sure the alignment sleeves are seated correctly and the contact surfaces are clean. Alignment sleeves that are installed incorrectly and dirty or damaged contact surfaces can lead to alignment irregularities between the compressor and engine. Alignment irregularities over operating time lead to damage to the A/C compressor or ribbed belt.
- Install the ribbed belt. Refer to → Engine Mechanical, Fuel Injection and Ignition; Rep. Gr.13; Cylinder Block, Belt Pulley Side; Ribbed Belt, Removing and Installing.
- Install the air guide hose. Refer to → Rep. Gr.21; Charge Air System; Overview - Charge Air System.
- Install the noise insulation. Refer to → Body Exterior; Rep. Gr.66; Noise Insulation; Noise Insulation, Removing and Installing.

A/C Compressor, Removing and Installing from Bracket, 5-Cylinder Engine (Audi RS Q3)
 Note
Note
- The Air Conditioning (A/C) compressor can be removed from the subassembly bracket and installed again without opening the refrigerant lines.
- The subassembly bracket (for the A/C compressor and its parts) can be removed and installed without having to open the refrigerant line.
- The A/C compressor on vehicles with a 5-cylinder engine (Audi RS Q3) have 2 ribbed belts. The A/C compressor has a belt pulley with a double belt guide. To remove the ribbed belt, refer to → Engine Mechanical, Fuel Injection and Ignition; Rep. Gr.13; Cylinder Block, Belt Pulley Side; Ribbed Belt, Removing and Installing.
- Routing for both ribbed belts. Refer to → Engine Mechanical, Fuel Injection and Ignition; Rep. Gr.13; Cylinder Block, Belt Pulley Side; Ribbed Belt, Removing and Installing.
- The removal and installation on a "Sanden" A/C compressor is described in the following.
- Do not discharge the refrigerant circuit, do not remove refrigerant hoses and lines from the A/C compressor.
- Do not unfasten refrigerant lines and corresponding clamps.
- After removing the A/C compressor, tie it to the vehicle with wire. Do not let is hang by the refrigerant lines.
- Before removing, mark direction of operation of ribbed belt with chalk or felt-tipped pen. Running a used belt in the opposite direction could destroy it.
- Different A/C compressors may be installed depending on engine and country variant. Refer to the Parts Catalog.
Removing
- Remove the center noise insulation and the right wheel housing liner. Refer to → Body Exterior; Rep. Gr.66; Noise Insulation; Noise Insulation, Removing and Installing.
- Remove the ribbed belt. Refer to → Engine Mechanical, Fuel Injection and Ignition; Rep. Gr.13; Cylinder Block, Belt Pulley Side; Ribbed Belt, Removing and Installing.
- Remove the right air guide pipe. Refer to → Rep. Gr.21; Charge Air System; Overview - Charge Air System.
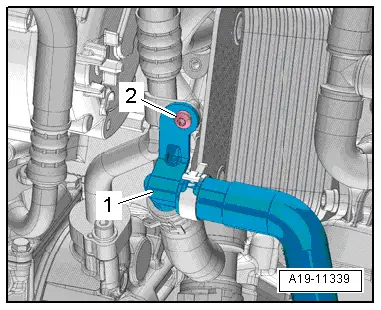
- Remove the bolt -2- and free up the coolant line -1-.
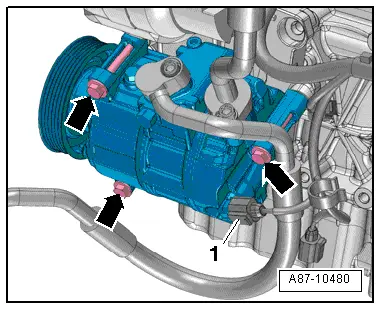
- Disconnect the connector -1- from the A/C Compressor Regulator Valve -N280-.
- Remove the bolts -arrows-.
- Hang the A/C compressor on the lock carrier with wire.
Installing
Install in reverse order of removal. Note the following:
- Clean the contact surfaces on the A/C compressor thoroughly.
- Insert the alignment sleeve -arrows- in the A/C compressor.
- After installing the A/C compressor, refrigerant lines and related brackets, make sure that there is a sufficient distance between the belt, bracket and belt pulley.
 Note
Note
Make sure the alignment sleeves are seated correctly and the contact surfaces are clean. Alignment sleeves that are installed incorrectly and dirty or damaged contact surfaces can lead to alignment irregularities between the compressor and engine. Alignment irregularities over operating time lead to damage to the A/C compressor or ribbed belt.
- Install the ribbed belt. Refer to → Engine Mechanical, Fuel Injection and Ignition; Rep. Gr.13; Cylinder Block, Belt Pulley Side; Ribbed Belt, Removing and Installing.
- Install the right air guide pipe. Refer to → Rep. Gr.21; Charge Air System; Overview - Charge Air System.
READ NEXT:
 Refrigerant Lines, Disconnecting and Connecting at A/C Compressor
Special tools and workshop equipment
required
Wrench - Door Adjusting - Joint -3320/1-
Engine Bung Set -VAS6122-
WARNING
Danger due to refrigerant coming out under pressure.
Dan
Belt Pulley, Removing and Installing
Belt Pulley, Removing and Installing, Denso A/C Compressor, Version 1
Note
Belt pulley is sensitive to impact. Handle it with special
care
If the belt pulley overload protection acti
Belt Pulley, Removing and Installing, Valeo A/C Compressor
Note
On A/C compressors with part number 1K0 820 803 as of index
"N", the drive plate splines are bonded to Air Conditioning
(A/C) compressor shaft splines, removing drive plate. RefeSEE MORE:
Repair Information
Minimum Curing Time for Bonded Windows
WARNING
For safety reasons, use only electrically
non-conductive 2C-adhesive when installing windshield
and rear window using the materials listed below.
The vehicle can only be used after the minimum
curing time has elapsed.
Window
Front Belt End Fitting, Removing and Installing
Front Belt End Fitting, Removing and Installing, USA and Canada
Market-Specific
Removing
- Remove the front seat. Refer to
→ Chapter "Front Seat, Removing and Installing".
- Remove front sill panel trim. Refer to
→ Chapter "Front Sill Panel Strip, Removing and Instal