Audi Q3: Belt Pulley, Removing and Installing
Belt Pulley, Removing and Installing, Denso A/C Compressor, Version 1
 Note
Note
- Belt pulley is sensitive to impact. Handle it with special care
- If the belt pulley overload protection activates, check the Air Conditioning (A/C) compressor for ease of movement before replacing the belt pulley. Replace an A/C compressor that is not operating smoothly.
- If the drive plate overload protection has activated, the belt pulley can be rotated using the outer part of the drive plate so that the A/C compressor shaft and the hexagon head on the drive plate (inner part of the drive plate) do not rotate.
Removing
- Remove the ribbed belt. Refer to → Engine Mechanical, Fuel Injection and Ignition; Rep. Gr.13; Cylinder Block, Belt Pulley Side; Ribbed Belt, Removing and Installing.
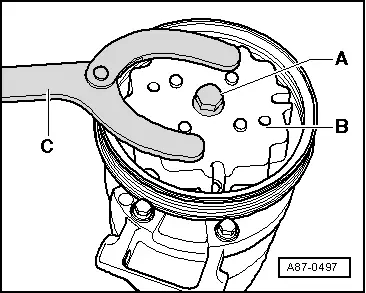
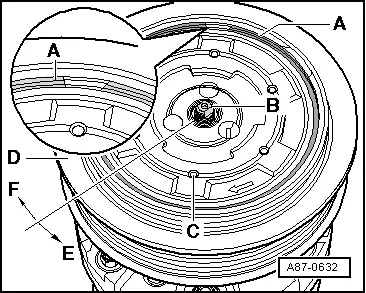
- Remove the bolt -A- by counterholding on the drive plate -B- with a commercially available pin wrench -C- (pin diameter 5.0 mm).
 Note
Note
If the belt pulley cannot be removed when the is A/C compressor installed, remove the A/C compressor with the refrigerant lines connected. Refer to → Chapter "A/C Compressor, Removing and Installing on Bracket".
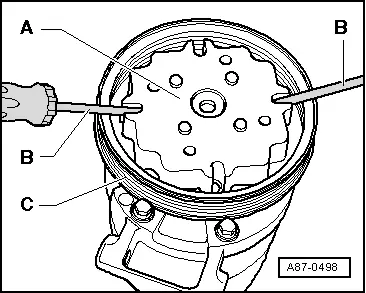
- Carefully and uniformly pry out the drive plate -A- with two screwdrivers -B-.
 Note
Note
- Make sure that the collar for pulley -C- is not damaged when prying off drive plate -A-.
- There are different versions of the belt pulley -C- and the drive plate -A-. For allocation, refer to the Parts Catalog.
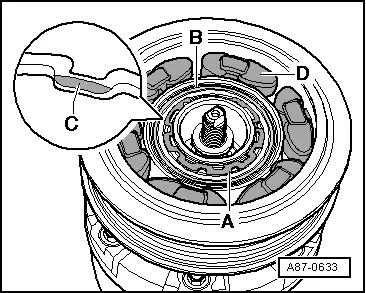
- Remove the circlip -A-.
- Remove the belt pulley -B-.
Installing
Installation is done is reverse order, observe the following:
- Clean the A/C compressor flange before installing the belt pulley.
- Place the belt pulley onto the A/C compressor flange.
- The fitting must be possible without much force.
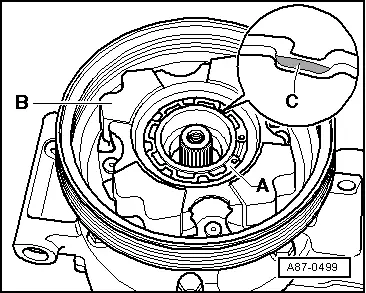
- Insert the locking ring -A- on the proper side.
- The side with beveled insertion edge -C- faces away from the A/C compressor - install flat side facing the A/C compressor.
- Install the A/C compressor. Refer to → Chapter "A/C Compressor, Removing and Installing on Bracket".
- Install the ribbed belt. Refer to → Engine Mechanical, Fuel Injection and Ignition; Rep. Gr.13; Cylinder Block, Belt Pulley Side; Ribbed Belt, Removing and Installing.
Belt Pulley, Removing and Installing, Denso A/C Compressor, Version 2
 Note
Note
- Belt pulley is sensitive to impact. Handle it with special care
- If the belt pulley overload protection activates, check the Air Conditioning (A/C) compressor for ease of movement before replacing the belt pulley. Replace an A/C compressor that is not operating smoothly.
- If the drive plate overload protection has activated, the belt pulley can be rotated using the outer part of the drive plate so that the A/C compressor shaft and the hexagon head on the drive plate (inner part of the drive plate) do not rotate.
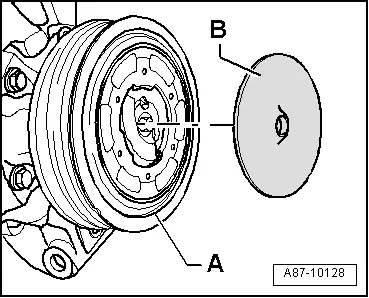
- A plastic disc -B- may be glued on the belt pulley drive plate -A- to optimize noise reduction. Refer to the Parts Catalog.
- This plastic disc reduces a clapping (castanet-like) noise, which can occur especially at the belt pulley in vehicles with a TDI engine when the A/C system is switched off (A/C compressor activation is switched off). (The noise is almost inaudible with A/C system operating at full output.)
Removing
- Remove the ribbed belt. Refer to → Engine Mechanical, Fuel Injection and Ignition; Rep. Gr.13; Cylinder Block, Belt Pulley Side; Ribbed Belt, Removing and Installing.
- If equipped, remove the plastic washer from the belt pulley.
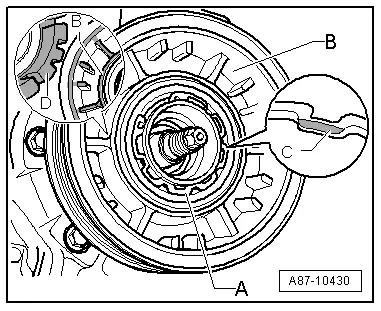
- Carefully remove the circlip -A- (with a rubber disc vulcanized on) using a small screwdriver or needle nose pliers.
 Caution
Risk of causing damage.
- Do not damage the belt pulley when removing the circlip.
- A damaged belt pulley must be replaced.
- Counterhold the A/C compressor input shaft -B- with a commercially available hex wrench.
 Note
Note
Depending on the A/C compressor version, the input shaft can be counterheld with a socket from the Shock Absorber Set -T10001-.
- Turn the drive plate -C- with the belt pulley -D- in the direction of the -arrow E -.
- Remove the drive plate.
- Remove the circlip -A-.
- Remove the belt pulley -B-.
 Note
Note
If the belt pulley cannot be removed when the is A/C compressor installed, remove the A/C compressor with the refrigerant lines connected. Refer to → Chapter "A/C Compressor, Removing and Installing on Bracket".
Installing
Installation is done is reverse order, observe the following:
- Clean the A/C compressor input shaft before setting the belt pulley on it.
- Place the belt pulley onto the A/C compressor input shaft.
- The fitting must be possible without much force.
- Insert the locking ring -A- on the proper side.
- The side with beveled insertion edge -C- faces away from the A/C compressor - install flat side facing the A/C compressor.
- Install the rubber elements -D- into the belt pulley -B-, as illustrated.
- To install the drive plate, coat the rubber elements lightly, for example, with tire mounting paste or soap solution (as lubricant).
- Insert the drive plate -C- far enough into the rubber elements until it contacts the A/C compressor input shaft -B-.
- Position the drive plate on the A/C compressor flange and turn it in direction of the arrow -F- using a commercially available strap wrench (with cloth tape) while counterholding with a hex wrench.
 Note
Note
Depending on the A/C compressor version, the input shaft can be counter-held with a socket from the Shock Absorber Set -T10001-.
- Install the circlip -A- (with rubber disc).
- Install the ribbed belt. Refer to → Engine Mechanical, Fuel Injection and Ignition; Rep. Gr.13; Cylinder Block, Belt Pulley Side; Ribbed Belt, Removing and Installing.

Belt Pulley, Removing and Installing, Denso A/C Compressor, Version 3
 Note
Note
- Belt pulley is sensitive to impact. Handle it with special care
- If the belt pulley overload protection activates, check the Air Conditioning (A/C) compressor for ease of movement before replacing the belt pulley. Replace an A/C compressor that is not operating smoothly.
- If the drive plate -C- overload protection activates, rotate the pulley -E- using the outer part of the drive plate -C- so that the A/C compressor shaft -B- and the hexagon head on the drive plate -D- (inner part of the drive plate -C-) do not rotate.
- As a replacement part, the belt pulley with the drive plate and the closure cap are held together with one bolt (when the bolt is no longer needed, dispose of it). Refer to the Parts Catalog.
- When the bolt was manufactured, a predetermined amount of a specific grease was applied to the threads in the drive plate; this amount is sufficient for bolting the drive plate to the A/C compressor one time (a drive plate, which has been removed, cannot be reused).

Removing
- Remove the ribbed belt. Refer to → Engine Mechanical, Fuel Injection and Ignition; Rep. Gr.13; Cylinder Block, Belt Pulley Side; Ribbed Belt, Removing and Installing.
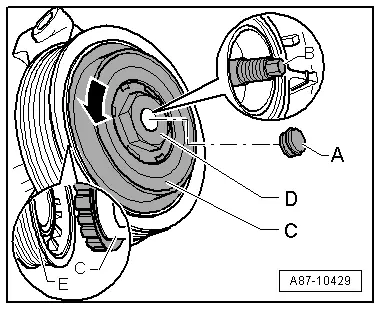
- Remove the closure cap -A-.
- Counterhold the A/C compressor input shaft -B- with a commercially available 7mm hex wrench.
- Turn the drive plate -C- with the belt pulley -E- in the direction of the -arrow-.
- Remove the drive plate.
 Note
Note
- The torque to drive the A/C compressor is transferred to the drive plate via the threaded connection.
- If, while the A/C compressor is working, the drive plate was attached to the A/C compressor shaft so tight, that it cannot be loosened (the 7 mm wrench cannot transmit the necessary torque) then the A/C compressor must be replaced.

- Remove the circlip -A-.
- Remove the belt pulley -B-.
 Note
Note
If the belt pulley cannot be removed when the is A/C compressor installed, remove the A/C compressor with the refrigerant lines connected. Refer to → Chapter "A/C Compressor, Removing and Installing on Bracket".
Installing
Installation is done is reverse order, observe the following:
- Clean the A/C compressor input shaft before setting the belt pulley on it.
- Place the belt pulley onto the A/C compressor input shaft.
- The fitting must be possible without much force.
- Insert the locking ring -A- on the proper side.
- The side with beveled insertion edge -C- faces away from the A/C compressor - install flat side facing the A/C compressor.
- Clean the driveshaft thread for the A/C compressor before removing the drive plate.
 Note
Note
The thread of the new drive plate has already been greased with a specific amount of a grease by the manufacturer.
- Insert the rubber elements -D- into the belt pulley -A- as shown and lightly coat using, for example, tire mounting paste or soap solution (as a lubricant).
- Insert the drive plate -C- far enough into the rubber elements until it contacts the A/C compressor input shaft -B-.
- Press the drive plate rubber element so far into the belt pulley -E- until the drive plate contacts the threads for the A/C compressor drive shaft.
- Install the drive plate with the belt pulley by turning them opposite of the direction of the -arrow- onto the A/C compressor input shaft, while counterholding with a hex wrench.
- Install the ribbed belt. Refer to → Engine Mechanical, Fuel Injection and Ignition; Rep. Gr.13; Cylinder Block, Belt Pulley Side; Ribbed Belt, Removing and Installing.
READ NEXT:
 Belt Pulley, Removing and Installing, Valeo A/C Compressor
Note
On A/C compressors with part number 1K0 820 803 as of index
"N", the drive plate splines are bonded to Air Conditioning
(A/C) compressor shaft splines, removing drive plate. Refe
Overview - Front Actuators
Overview - Front Actuators, Air Distribution Housing, Left Door Control
1 - Screw
1 Nm
Quantity: 3
2 - Central Air Door Motor -V70-
With Central Door Motor Pos
SEE MORE:
Using the telephone
Accessing the telephone functions
Applies to: vehicles with telephone
Fig. 124 Center display: selection menu
Requirement: a mobile device must be connected
to the MMI.
Applies to: MMI: Select on the home screen:
PHONE.
Possible telephone functions:
Search
Call list
Favorites
Contacts
Voi
Refrigerant Circuit, Determining Leaks
General Information
Vehicles with a High Voltage System (Hybrid Vehicles)
Extremely Dangerous Due to High-Voltage
The high-voltage system is under high-voltage. Death or serious
bodily injury by electric shock.
- Individuals with electronic/medical life- and health sustaining
machines i
