Audi Q3: Overview - Belt Pulley
Overview - Belt Pulley, Denso A/C Compressor, Version 1
 Note
Note
This type of belt pulley is installed on a "7 SEU 16" A/C compressor.
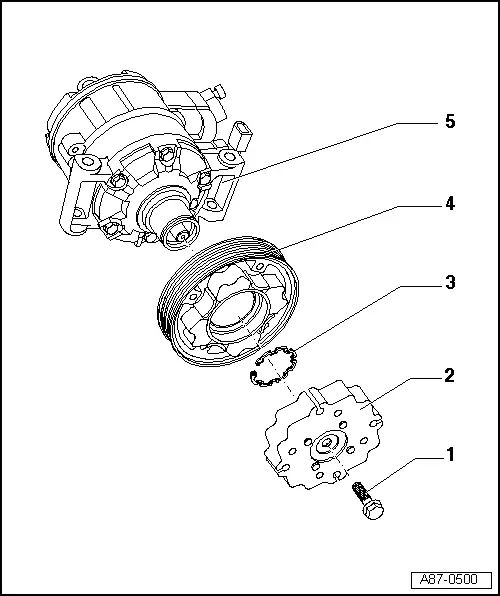
1 - Bolt
- 20 Nm
- Replacing
2 - Drive Plate
- There are different versions. Refer to the Parts Catalog.
- Removing and installing. Refer to → Chapter "Belt Pulley, Removing and Installing, Denso A/C Compressor, Version 1".
- The overload protection takes over when the torque is excessive (for example, if the A/C compressor runs with resistance) and the belt pulley runs freely without driving the A/C compressor
3 - Circlip
- Replacing
- Install on the proper side - the flat side faces A/C compressor
4 - Belt Pulley
- There are different versions. Refer to the Parts Catalog.
- Removing and installing. Refer to → Chapter "Belt Pulley, Removing and Installing, Denso A/C Compressor, Version 1".
- The overload protection takes over when the rubber element on the belt pulley loosens because the torque is excessive (for example, if the A/C compressor runs with resistance) and the belt pulley runs freely without driving the A/C compressor.
 Note
Note
Under certain conditions (for example, rough engine idle), rubber element of pulley can disengage without a malfunction existing at compressor or in refrigerant circuit.
5 - Air Conditioning (A/C) Compressor
- Clean the A/C compressor driveshaft before setting the belt pulley on it
Overview - Belt Pulley, Denso A/C Compressor, Version 2
 Note
Note
This type of belt pulley is installed on a "7 SEU 17" A/C compressor.
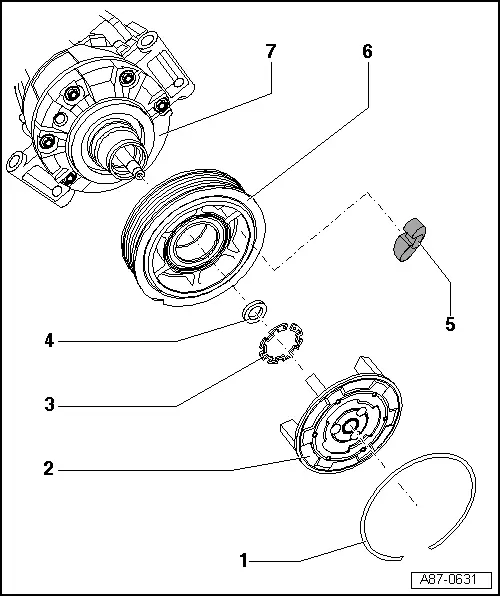
1 - Circlip
- With a rubber disc vulcanized on
- Carefully remove using a small screwdriver or needle-nose pliers (especially note the belt pulley when doing this)
- The rubber disc that is vulcanized on serves as noise insulation during low compressor output when engine is idling
2 - Drive Plate
- 35 Nm
- There are different versions. Refer to the Parts Catalog.
- Removing and installing. Refer to → Chapter "Belt Pulley, Removing and Installing, Denso A/C Compressor, Version 2".
- Attached to the A/C compressor input shaft
- The overload protection takes over when the torque is excessive (for example, if the A/C compressor runs with resistance) and the belt pulley runs freely without driving the A/C compressor
- A plastic washer may be glued on, depending on time period of production. Refer to → Chapter "Belt Pulley, Removing and Installing, Denso A/C Compressor, Version 2".
3 - Circlip
- Replacing
- Install on the proper side - the flat side faces A/C compressor
4 - Spacer
- Dimension: 17.5 x 10 x 3 mm
5 - Rubber Elements
- Quantity: 6
- Install on correct side. Refer to → Chapter "Belt Pulley, Removing and Installing, Denso A/C Compressor, Version 2".
- Decouples the belt pulley from A/C compressor input shaft, dampens vibrations and noise
6 - Belt Pulley
- There are different versions. Refer to the Parts Catalog.
- Made of plastic and is sensitive to impact
- Removing and installing. Refer to → Chapter "Belt Pulley, Removing and Installing, Denso A/C Compressor, Version 2".
7 - A/C Compressor
- Clean the A/C compressor driveshaft before setting the belt pulley on it
Overview - Belt Pulley, Denso A/C Compressor, Version 3
 Note
Note
This type of belt pulley is installed on a "6 SEU 14" A/C compressor.

1 - Sealing Cap
2 - Drive Plate
- 30 Nm
- Replacing
- Attached to the A/C compressor input shaft
 Note
Note
The thread of the new drive plate has already been greased with a specific amount of a grease by the manufacturer.
- There are different versions. Refer to the Parts Catalog.
- The overload protection takes over when the torque is excessive (for example, if the A/C compressor runs with resistance) and the belt pulley runs freely without driving the A/C compressor
- With rubber elements for decoupling belt pulley from A/C compressor input, dampens rations and noise.
- Removing and installing. Refer to → Chapter "Belt Pulley, Removing and Installing, Denso A/C Compressor, Version 3".
3 - Circlip
- Replacing
- Install on the proper side - the flat side faces A/C compressor
4 - Belt Pulley
- There are different versions. Refer to the Parts Catalog.
- Made of plastic and is sensitive to impact
- Removing and installing. Refer to → Chapter "Belt Pulley, Removing and Installing, Denso A/C Compressor, Version 3".
5 - Air Conditioning (A/C) Compressor
- Clean the A/C compressor driveshaft before setting the belt pulley on it
READ NEXT:
 Overview - Belt Pulley, Valeo A/C Compressor
1 - Bolt
17 Nm
Replacing
- The threaded bolt holes, into which the self-locking bolts or bolts
with locking compound were installed, must be cleaned (for example with
A/C Compressor, Removing and Installing on Bracket
A/C Compressor, Removing and Installing from Bracket, 4-Cylinder Engine
Note
The Air Conditioning (A/C) compressor can be removed and
installed at the bracket without opening the refri
Refrigerant Lines, Disconnecting and Connecting at A/C Compressor
Special tools and workshop equipment
required
Wrench - Door Adjusting - Joint -3320/1-
Engine Bung Set -VAS6122-
WARNING
Danger due to refrigerant coming out under pressure.
DanSEE MORE:
Satellite map
Applies to: vehicles with navigation system and satellite map
You can display the navigation map with satellite
images.
Requirement: the MMI must be connected to the
Internet.
Applies to: MMI: Select on the home screen:
NAVIGATION > > Map settings >
Satellite
map1).
The map view is
Side Air Intake Trim, Removing and Installing, Audi RS Q3 through MY 2014
Removing
- Left: remove the front bumper cover. Refer to
→ Chapter "Bumper Cover, Removing and Installing".
- Right: remove the front wheel housing liner and wheel
spoiler. Refer to
→ Chapter "Front Wheel Housing Liner, Removing and Installing".
- Carefully remov