Audi Q3: Door, Adjusting
Special tools and workshop equipment required
- Gauge - Gap Adjustment -3371-
- Door Adjustment Template -T40038 /16-
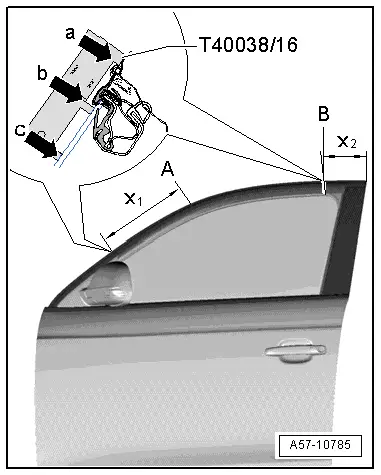
Check the height adjustment using the Door Adjustment Template -T40038 /16-.
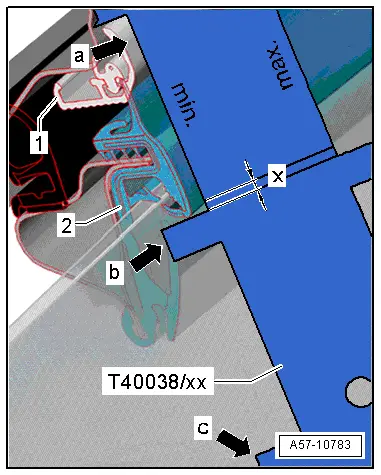
- Place the template on top of the trim strip -1- on side with the marking -min.- as shown.
- The height is adjusted correctly when the bottom of the window guide -2- is inside the groove; a = 2.5 mm.

Check the lateral adjustment using the Door Adjustment Template -T40038 /16-.
- Place the template on check point -A- at -x1- = 300 mm or on check point -B- at -x2- = 150 mm.
- For the "min" adjustment the template must be positioned on the upper edge of the roof trim molding -1-.
- The template must be touching points -b- and -c- when the adjustment is correct.
- At the point -a- there can be no gaps (to 0.8 mm).
- For the "max" adjustment the template must be positioned on the upper edge of the window guide-2-.
- The template must be touching points -a- and -c- when the adjustment is correct.
- The point -b- can have a gap (to 1.5 mm).
Front Door Gap Dimension
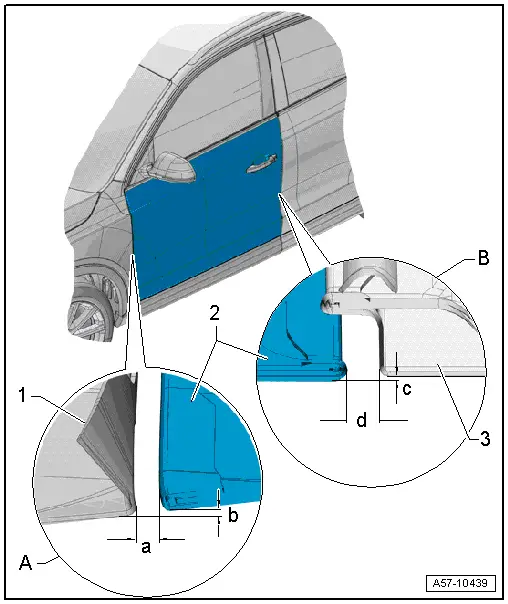
A - Front Door to the Front Fender
- Gap dimension -a- = 3.5 +- 0.5 mm
- Flush dimension -b- = 0 +- 1.0 mm
- Parallel alignment = 0.5 mm.
-1- Front fender
-2- Front door
- Adjusting. Refer to → Chapter "Door, Adjusting".
B - Front Door to Rear Door
- Gap dimension -d- = 4.4 +- 0.5 mm.
- Flush -c- = 0 +- 1.0 mm
- Parallel alignment = 0.5 mm.
Door -2-
-3- Rear door
- Adjusting. Refer to → Chapter "Door, Adjusting".
Preliminary work for adjusting lengthwise and toward the vehicle center
- Remove the front sill panel strip. Refer to → Body Interior; Rep. Gr.70; Passenger Compartment Trim; Sill Panel Strip, Removing and Installing.
Driver Side:
- Remove the driver side instrument panel cover. Refer to → Body Interior; Rep. Gr.68; Storage Compartments and Covers; Driver Side Instrument Panel Cover Removing and Installing.
- Install the control module mount, relay and fuse panel. Refer to → Electrical Equipment; Rep. Gr.97; Component Location Overview - Relay Carrier, Fuse Panel, E-Boxes.
Front Passenger Side:
- Remove the glove compartment. Refer to → Body Interior; Rep. Gr.68; Storage Compartments and Covers; Glove Compartment Removing and Installing.
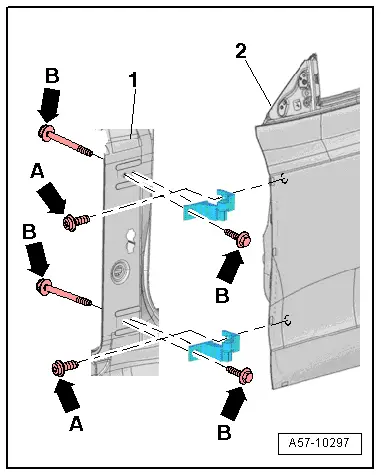
Adjustment in Longitudinal Direction
- Remove the upper and lower bolts -arrows B- from the hinge and A-pillar -1-.
- Adjust the door -2- lengthwise.
- Tighten the bolts -B arrows-.
Adjustment to Center of Vehicle
 Note
Note
- The bolt -A- is a fitting bolt so it is generally not necessary to adjust the door using it.
- If it is necessary to make an adjustment using these bolts, the bolt can be replaced with one of the same length and strength category.
- Loosen the bolts -A arrows- on the top and bottom of the hinge.
- Adjust the door -2- lengthwise.
- Tighten the bolts -A arrows-.
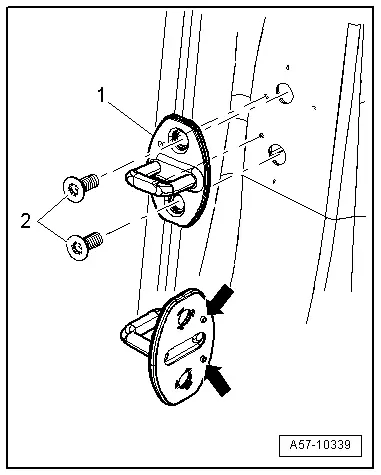
Catch, Adjusting
 Note
Note
- The striker pin backing must be position with the pins -arrows- exactly in the hole.
- The striker pins must be sheared off cleanly after sliding the striker pin.
- Loosen the bolts -2-.
- Slide the catch -1- until the door is flush with the body contours.
 Note
Note
- When adjusting the catch, move it only toward the center of the vehicle.
- Do not adjust the door height using the catch because the door lock will be damaged.
- The catch must align in door lock center for correct adjustment.
- Tighten the bolts -2-.
READ NEXT:
 Inner Door Seal, Removing and Installing
Removing
- Remove the upper A-pillar trim. Refer to
→ Body Interior; Rep. Gr.70; Passenger Compartment Trim;
A-Pillar Trim, Removing and Installing.
- Remove the front
Overview - Window Regulator
1 - Door
2 - Clip
For the window regulator cable
3 - Lower Double-Bolt
4 - Window Regulator
Removing and installing. Refer to
→ Chapter
Window Regulator Motor, Removing and Installing
Removing
Note
The window regulator motor can be removed or installed with
the motor or door window in any position.
- Remove the front door trim panel. Refer to
→ Body Inter
SEE MORE:
Battery, Removing and Installing
Battery in Engine Compartment, Removing and Installing, Version 1
Note
If the battery is to be replaced, connect the battery
charger for battery support mode. Refer to
→ Electrical Equipment General Information; Rep. Gr.27; Battery,
Charging.
Removing
- Turn
Wheel Bolt Tightening Specifications
Wheel Bolt Tightening Specifications, Current Models
DANGER!
To ensure that the wheel bolts fit correctly, be
sure to use the correct wheel bolts specified for the
model. The wheel bolts for each model have different
diameters on the surface of the ball running surface on
the wheel rim and
