Audi Q3: Window Regulator Motor, Removing and Installing
Removing
 Note
Note
The window regulator motor can be removed or installed with the motor or door window in any position.
- Remove the front door trim panel. Refer to → Body Interior; Rep. Gr.70; Front Door Trim Panels; Front Door Trim Panel, Removing and Installing.
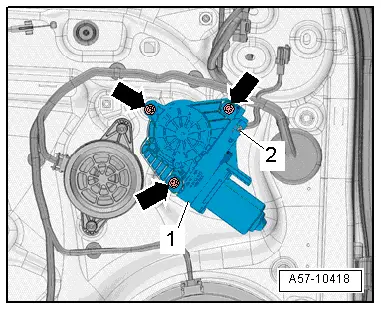
- Disconnect the connector -2-.
- Remove the bolts -arrows- and remove the window regulator motor -1- from the window regulator.
Installing
Install in reverse order of removal. Note the following:
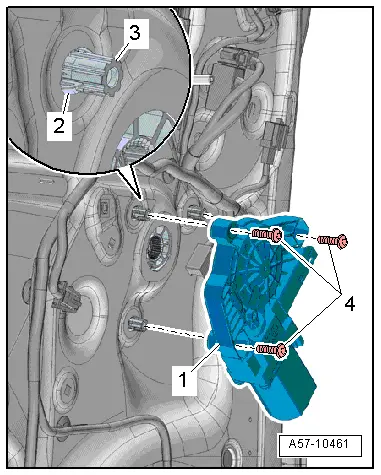
- The clips -2- for the window regulator motor threaded pins -3- must be engaged in the inner door panel.
- Slide the window regulator motor -1- onto the threaded pins and tighten the bolts -4-.
- Install the front door trim panel. Refer to → Body Interior; Rep. Gr.70; Front Door Trim Panels; Front Door Trim Panel, Removing and Installing.
Window Regulator, Removing and Installing
Removing
- Remove the window regulator motor. Refer to → Chapter "Window Regulator Motor, Removing and Installing".
- Remove the door window. Refer to → Chapter "Front Door Window, Removing and Installing".
- Remove the bass speaker. Refer to → Communication; Rep. Gr.91; Component Location Overview - Sound System.
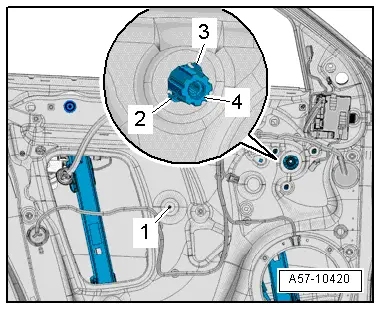
- Open the clips -2, 3- on the threaded pin -4- for the window regulator using an 11 mm socket. To do this, place the socket on the threaded pin.
- Unclip the window regulator cable guide clip -1-.
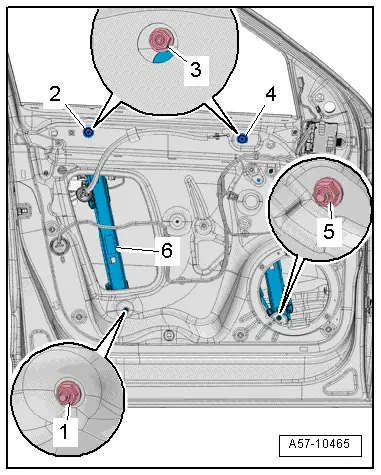
- Remove the plugs -2 and 4-.
- Loosen the nuts -3- three turns.
- Remove the nuts -1 and 5-
- Guide the window regulator -6- back out of the opening.
Installing
Install in reverse order of removal. Note the following:
- The clips for the window regulator threaded pins must be latched into the inner door panel.
- The window regulator cable guide clip must be clipped in the inner door panel.
- Install the bass speaker. Refer to → Communication; Rep. Gr.91; Sound System; Component Location Overview - Sound System.
- Install the door window. Refer to → Chapter "Front Door Window, Removing and Installing".
- Install window regulator motor. Refer to → Chapter "Window Regulator Motor, Removing and Installing".
Window Guide, Removing and Installing
Removing
- Remove the front window frame trim panel. Refer to → Body Interior; Rep. Gr.70; Front Door Trim; Window Frame Trim Removing and Installing.
- Remove the door window. Refer to → Chapter "Front Door Window, Removing and Installing".
- Remove the mirror adjustment unit bracket. Refer to → Chapter "Mirror Adjusting Unit Mount, Removing and Installing".
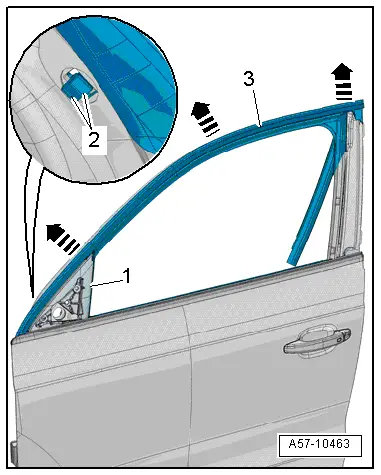
- Remove the seal -1- for the mirror adjustment unit mount.
- Release the retaining tabs -2- and remove the window guide -3- upward -arrows-.
Installing
Install in reverse order of removal. Note the following:
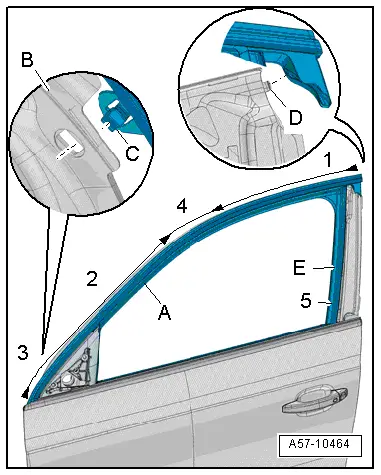
- Attach the window guide -A- to the door flange in sequence -1 through 5-, as illustrated.
- Position the upper edge of the window guide on the B- pillar door flange and push forward.
- While doing this the guide pins -D- must engage in the window guide mount.
- Align the window guide on the A-pillar guide rail and place the seal in the guide rail.
- Push the window guide forward, while doing this the clip -C- must engage audibly in the door flange -B-.
- Press the window guide on the door flange.
- Install the B-pillar trim (refer to → Chapter "Front Door B-Pillar Trim, Removing and Installing") and place the seal -E- in the guide rail.
- Install the mirror adjustment unit mount. Refer to → Chapter "Mirror Adjusting Unit Mount, Removing and Installing".
- Install the door window. Refer to → Chapter "Front Door Window, Removing and Installing".
- Install the front window frame trim panel. Refer to → Body Interior; Rep. Gr.70; Front Door Trim; Window Frame Trim Removing and Installing.
READ NEXT:
 Inner Window Shaft Strip, Removing and Installing
Removing
- Remove the front window frame trim panel. Refer to
→ Body Interior; Rep. Gr.70; Front Door Trim; Window Frame Trim
Removing and Installing.
- Remove the wind
Door Inner Cover, Removing and Installing
Special tools and workshop equipment
required
Wedge Set -T10383-
Removing
- Remove the door trim panel. Refer to
→ Body Interior; Rep. Gr.70; Front Door Panels; Front
Door Handle, Removing and Installing
Lock Cylinder, Removing and Installing
Removing
- Remove the sealing plugs.
- Remove the clamping screw -3-
until it stops using a screwdriver -4-.
- Press the lock cylinder ret
SEE MORE:
Wheel Bearing Housing Bonded Rubber Bushing, Replacing
Wheel Bearing Housing Bonded Rubber Bushing, Replacing, FWD Vehicles
Special tools and workshop equipment
required
Bearing Installer - Control Arm -3346-
Bearing Installer - Carrier Bearing -3350-
Fitting Sleeve -3378-
Torque Adapter -3390-
Torque Wrench 1332 40-200Nm -VAG1332-
Rem
Control Module and Hydraulic Unit
Overview - Control Module and Hydraulic Unit
1 - Brake Booster
Removing and installing, refer to
→ Chapter "Brake Booster, Removing and Installing".
2 - Brake Line
Master brake cylinder/primary piston circuit to hydraulic control
unit
Identification: 6.
