Audi Q3: Inner Window Shaft Strip, Removing and Installing
Removing
- Remove the front window frame trim panel. Refer to → Body Interior; Rep. Gr.70; Front Door Trim; Window Frame Trim Removing and Installing.
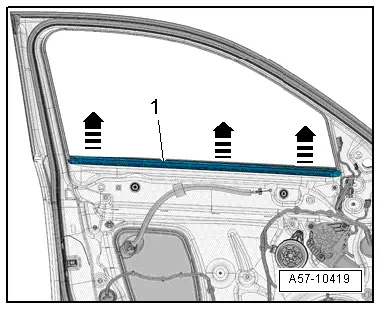
- Remove the window shaft strip -1- upward -arrows-.
Installing
Install in reverse order of removal. Note the following:
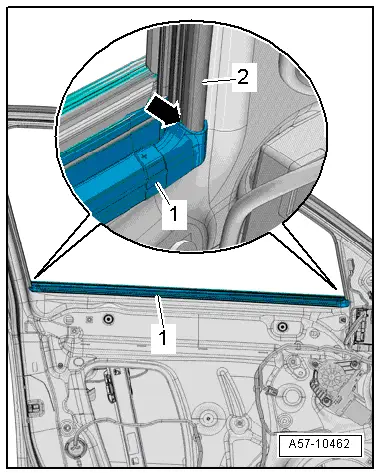
- Place the inner window shaft strip -1- on both ends on the window guide -2--arrow- and press to the center of the door fold.
- Install the front window frame trim panel. Refer to → Body Interior; Rep. Gr.70; Front Door Trim; Window Frame Trim Removing and Installing.
Outer Window Shaft Strip, Removing and Installing
Special tools and workshop equipment required
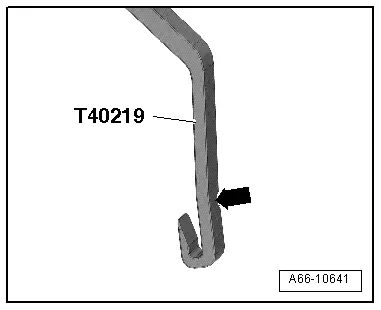
- Window Slot Seal Tool -T40219-
Window Slot Seal Tool -T40219- preparing:
- To remove the window shaft strip, pull the Window Slot Seal Tool -T40219- carefully at the marked location -arrow- so that it can be inserted behind the strip.
Removing
- Lower the door window.
- Remove the door trim panel. Refer to → Body Interior; Rep. Gr.70; Front Door Panels; Front Door Panel, Removing and Installing.
- Remove the mirror adjustment unit bracket. Refer to → Chapter "Mirror Adjusting Unit Mount, Removing and Installing".
- Remove the inner window shaft strip. Refer to → Chapter "Inner Window Shaft Strip, Removing and Installing".
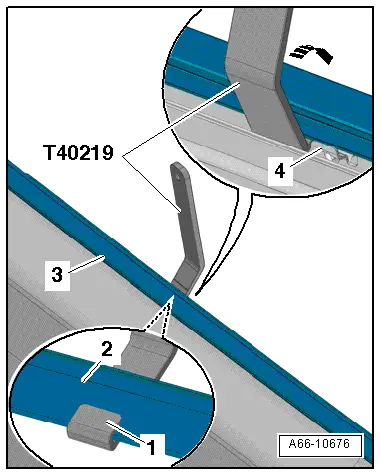
- Insert the Window Slot Seal Tool -T40219- next to the guide-4- for the window shaft strip -3- and hold it on the strip -2-.
- The front section -1- of the Window Slot Seal Tool -T40219- must be installed as illustrated.
- Push the Window Slot Seal Tool -T40219- gently in direction of -arrow- to release it.
- The retaining strip must audibly unlock.
- Remove the window shaft strip upward from the door flange using the Window Slot Seal Tool -T40219-.
- Remove the window shaft strip.
Installing
Install in reverse order of removal. Note the following:
 Note
Note
When installing, the lower edge of the window shaft strip can be coated with tire mounting paste.
- Position the window shaft strip -1- on the B-pillar trim on the door fold and press on it evenly -arrows A-. When doing this, the strip -2- must audibly engage.
- The retaining strip must fit -arrow- under the retaining plate -3-.
- Install the inner window shaft strip. Refer to → Chapter "Inner Window Shaft Strip, Removing and Installing".
- Install the mirror adjustment unit mount. Refer to → Chapter "Mirror Adjusting Unit Mount, Removing and Installing".

READ NEXT:
 Door Inner Cover, Removing and Installing
Special tools and workshop equipment
required
Wedge Set -T10383-
Removing
- Remove the door trim panel. Refer to
→ Body Interior; Rep. Gr.70; Front Door Panels; Front
Door Handle, Removing and Installing
Lock Cylinder, Removing and Installing
Removing
- Remove the sealing plugs.
- Remove the clamping screw -3-
until it stops using a screwdriver -4-.
- Press the lock cylinder ret
Door Lock, Removing and Installing
Door Lock, Removing and Installing
Caution
There is a risk of malfunctions.
The door lock must be removed and installed together
with the bracket to prevent over-bending the cable when SEE MORE:
Instrument Panel, Removing and Installing
Instrument Panel Storage Compartment, Removing and Installing
Special tools and workshop equipment
required
Trim Removal Wedge -3409-
Removing
- Remove the center instrument panel vent. Refer to
→ Chapter "Center Instrument Panel Vent, Removing and
Installing".
- Remo
Ball Joint, Removing and Installing
Special tools and workshop equipment
required
Puller - Ball Joint -3287A-
Digital Torque Wrench -VAG1756A-
Torque Wrench 1332 Insert - Ring Wrench - 18mm -VAG1332/10-
Removing
- Loosen drive axle bolt on the wheel hub. Refer to
→ Chapter "Drive Axle Threaded Connection, Lo